Adding an Android App to the App Catalog
Many apps typically require some configuration on the device such as user information (email address), server information (URL, port), enable specific features (VPN), and so on. By defining these configurations in the admin console, the app can auto-configure with minimal user input and will simplify the setup process for end users.
Adding an app to the App Catalog does not automatically deliver apps to the user's device. The app must first be added to an appropriate policy, and the policy published.
All configuration changes made to the app in the App Catalog are the defaults for the app. However, you can overwrite these after adding the app to a specific policy.
Viewing the App Catalog
The App Catalog page lists the apps that have been added to the management console. On this page, you can see the app details or add a new app.
To view the app catalog:
1.Select the Workspaces menu.
2.Select the App Catalog tab.
The App Catalog page lists all apps in the catalog. For example:
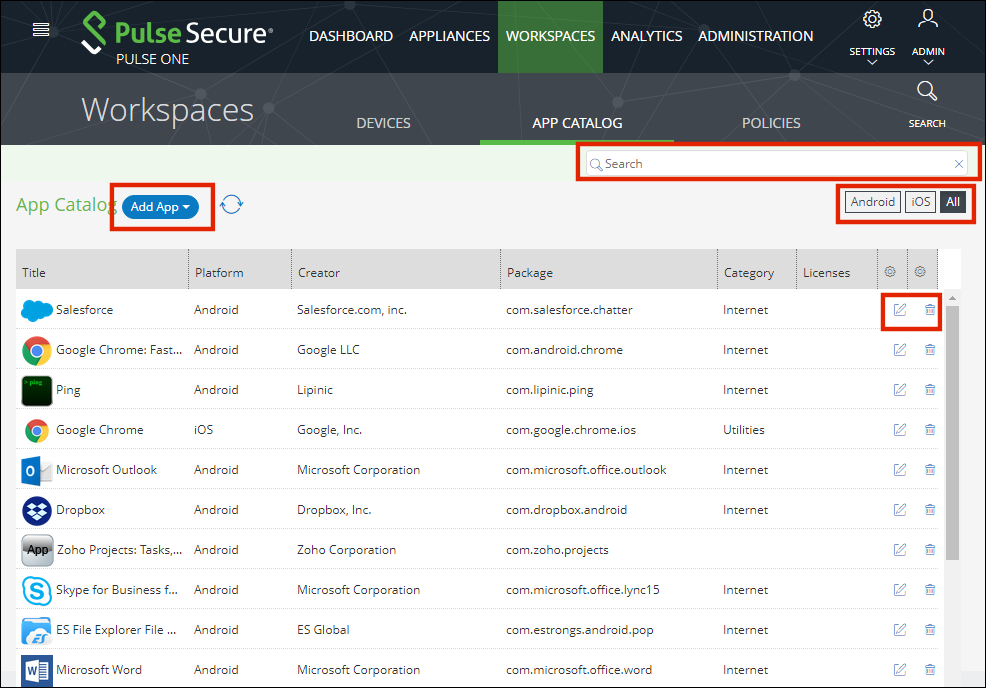
On this page:
•Search – This enables you to filter the apps list.
•Android / iOS / All – This enables you to filter the app list by platform.
•Add App – This enables you to add apps from Google Play, Apple App Store or manually.
•App Catalog – Displays information about each app in the system.
•Edit (![]() ) – This enables you to edit the settings for an app.
) – This enables you to edit the settings for an app.
•Delete (![]() ) – This enables you to delete an app from the App Catalog.
) – This enables you to delete an app from the App Catalog.
You must remove the app from all policies before you can delete it.
Adding an Android App to the App Catalog from Google Play
To add an Android app to the App Catalog from Google Play:
1.Select the Workspaces menu.
2.Select the App Catalog tab.
The App Catalog page appears.
Ensure the app you are going to add is not listed.
3.In the App Catalog page, click Add App and then select Add App From Store.
The From Public App Store dialog appears.
4.In the From Public App Store dialog, select Google Play Store.
For information about enabling international apps stores, see Workspaces.
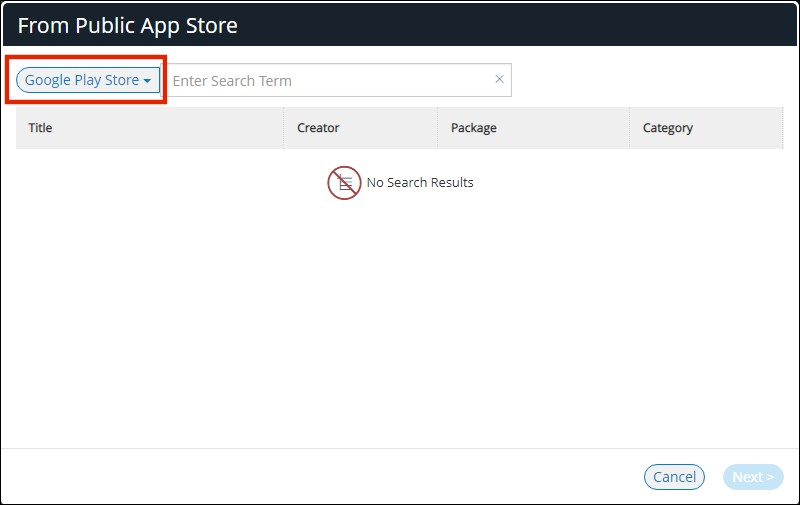
5.Type the name of the app in the Search box and press Enter.
A list of apps is displayed based on the search criteria.
6.Select the required app from the apps list and click Next.
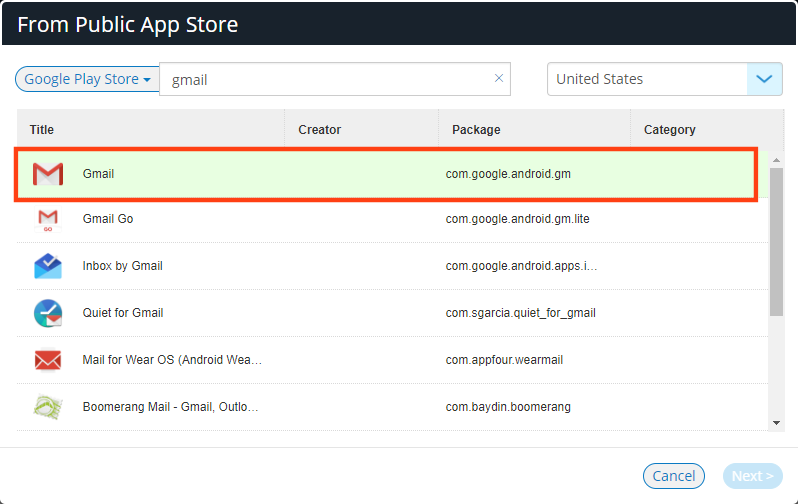
The Configure App Details dialog appears.
7.In the Configure App Details dialog:
•Change the Description if required.
•Select the Required check box if the app should be pushed automatically upon enrollment.
•If you access the app through VPN, then set Network access to Require VPN.
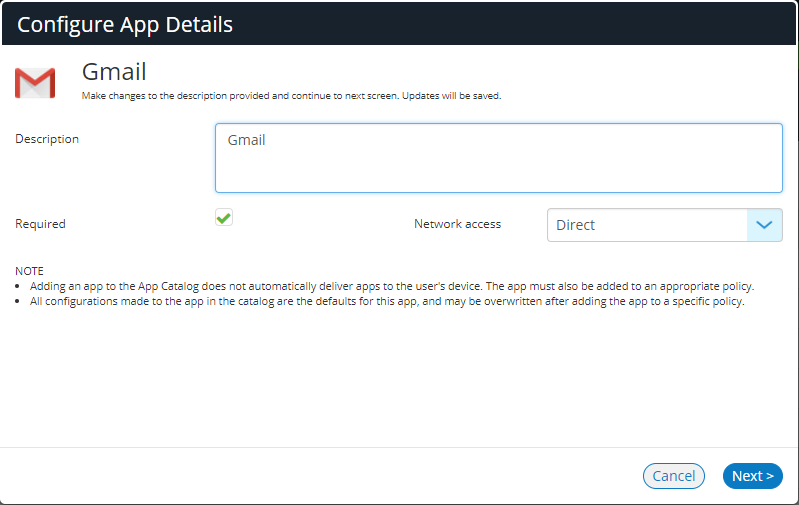
•Click Next.
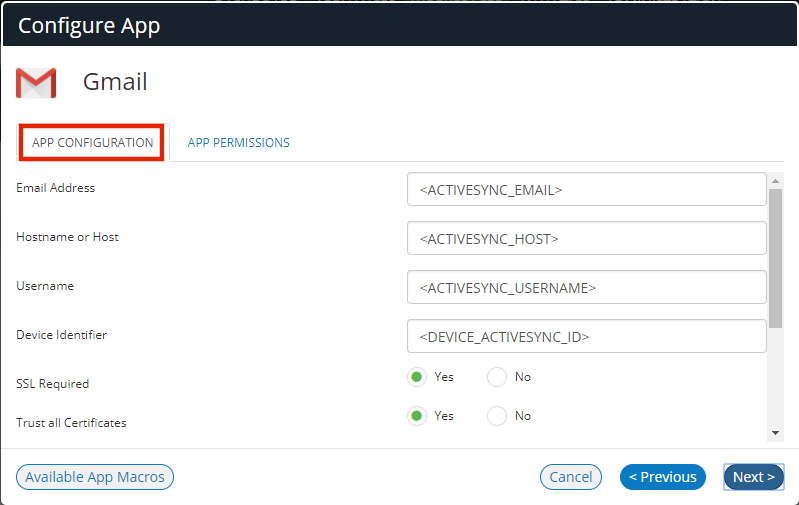
The Configure App dialog appears:
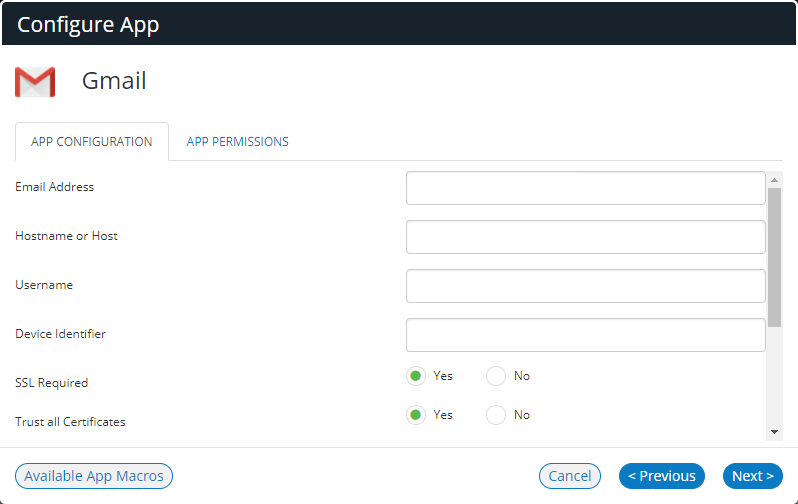
8.In the Configure App dialog:
•Specify the Email address that will be used by the app.
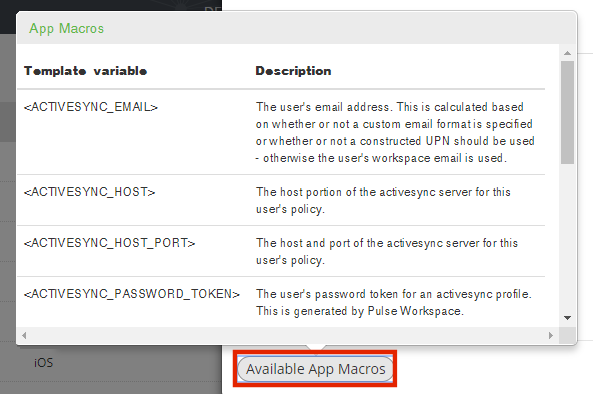
Typically, you will specify an app macro such as <USER_WORKSPACE_EMAIL> or <ACTIVESYNC_EMAIL>.
To view app macros, click the Available App Macros switch:
•Specify a Hostname or Host for the app.
Typically, you will specify an app macro such as <ACTIVESYNC_HOST> or <ACTIVESYNC_HOST_PORT>.
•Specify a Username for the app.
Typically, this will be an app macro such as <USER_USERNAME> or <ACTIVESYNC_USERNAME>.
•Specify a Device Identifier for the app.
Typically, this will be an app macro such as <DEVICE_ACTIVESYNC_ID>.
•Select whether SSL is required to access the app.
If True, end-to-end encryption is required when accessing the app from a device.
•Select whether to Trust All Certificates.
If True, no certificate checks are performed.
•Specify a managed Login Certificate Alias if required.
•Select whether to Allow Unmanaged Accounts to access the app.
•(Optional) Specify a Default Email Signature.
This can include an app macro such as <USER_DISPLAY_NAME>.
•Specify a Default Sync Window for devices. This is expressed as minutes.
•Click Next.
If additional permissions are required for the app, the Configure App dialog updates. In the App Permissions tab, select the required permissions for the app and click Next. For example:
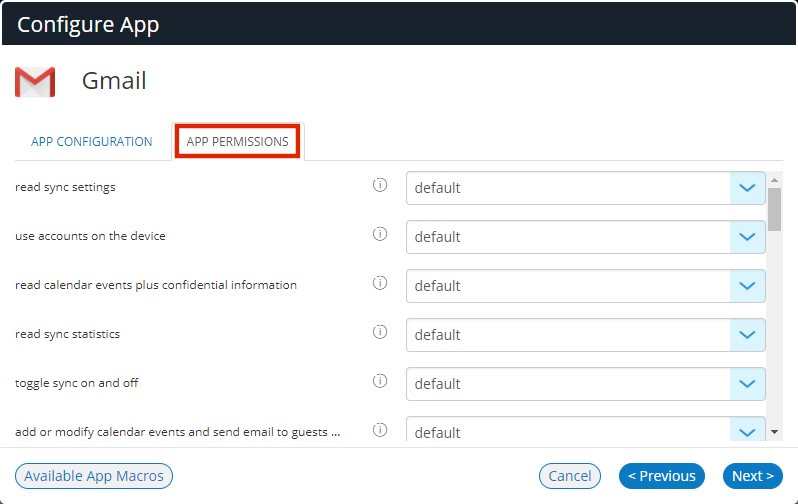
For information about app permission properties, see Workspaces.
An approval dialog appears. This lists the permissions that will be set for the app using the specified settings. For example:
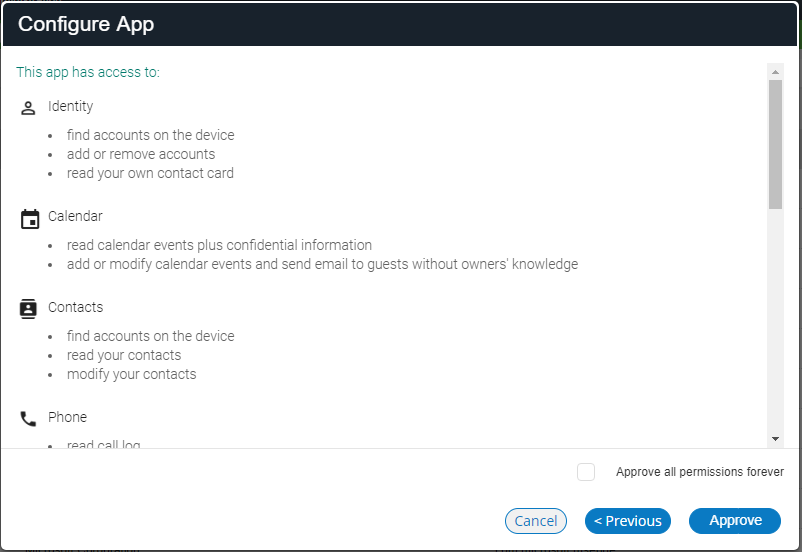
9.(Optional) Click Approve all permissions forever to create open-ended approval of permissions for the app.
All revoked (or newly-added) permissions will be granted by default if this check box is selected.
10.In the approval dialog, click Approve.
A confirmation message appears.
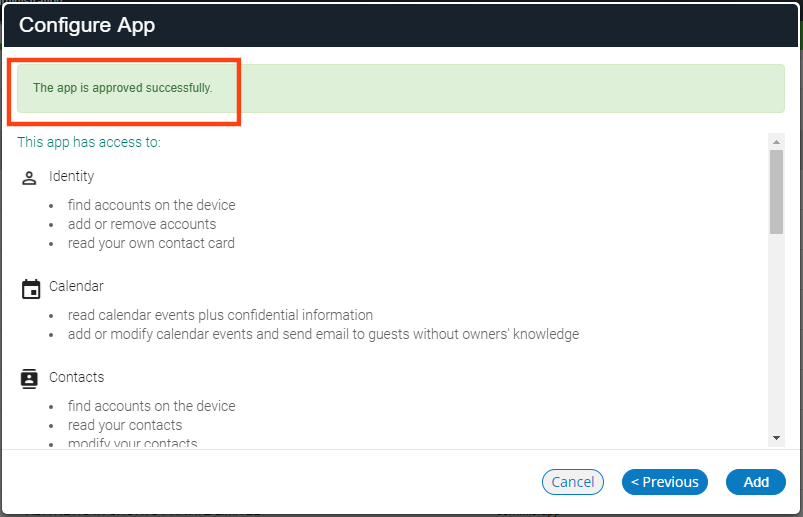
11.Click Add to add the app from Google Play to the App Catalog.
Adding an app to the App Catalog does not automatically deliver apps to the user's device. The app must also be added to an appropriate policy.
All configuration changes made to the app in the App Catalog are the defaults for the app. However, you can overwrite these after adding the app to a specific policy.
The next step is to add the app to a specific policy. For details, see Adding an Android App to a Policy.
Adding an Android App to the App Catalog Manually
To add an Android app to the App Catalog manually:
1.Select the Workspaces menu.
2.Select the App Catalog tab. The App Catalog page appears.
3.In the App Catalog page, click Add App and then select Add App Manually.
The Add App Manually dialog appears.
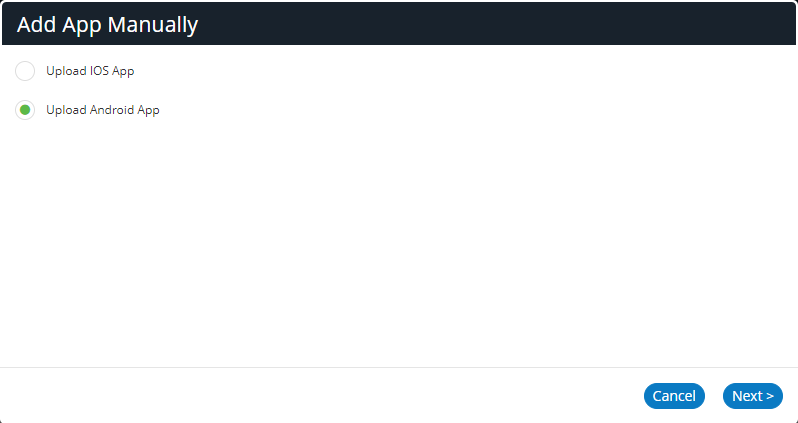
4.Select Upload Android App and click Next.
The Add Android App Manually dialog appears.
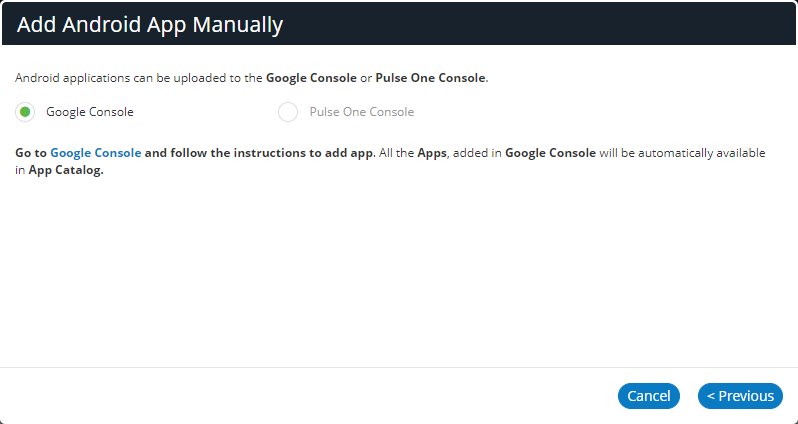
5.In the Add Android App Manually window, select Google Console.
6.Select the Google Console hyperlink.
7.Log in with Google enterprise credentials.
8.Follow the Google instructions to upload the APK, publish the app, publish the content rating and pricing, and publish the custom app.
After publication, it takes approximately four hours to appears in the Pulse Workspace App Catalog.
9.(Optional) Click Edit to modify the app, and follow the steps described in Adding an Android App to the App Catalog from Google Play.
The next step is to add the app to a specific policy. For details, see Adding an Android App to a Policy.
Uploading an Android App to the App Catalog from Pulse One
You can add an Android app to the App Catalog from Pulse One. To do this, you upload an Android app APK to Pulse One manually. The app is then added automatically to the Google Play Store for your Google developer account. After the app is approved on Google Play Store, it is added automatically to your Pulse One App Catalog.
Before you can upload an APK, you must delegate publishing rights from Android Enterprise to Pulse One.
You cannot delegate publishing rights for Android app upload when your Android Enterprise is enrolled using the Google Apps setup method.
To delegate publishing rights from Android Enterprise to Pulse One:
1.Click the Settings icon on top-right-corner of the page and select Android Enterprise.
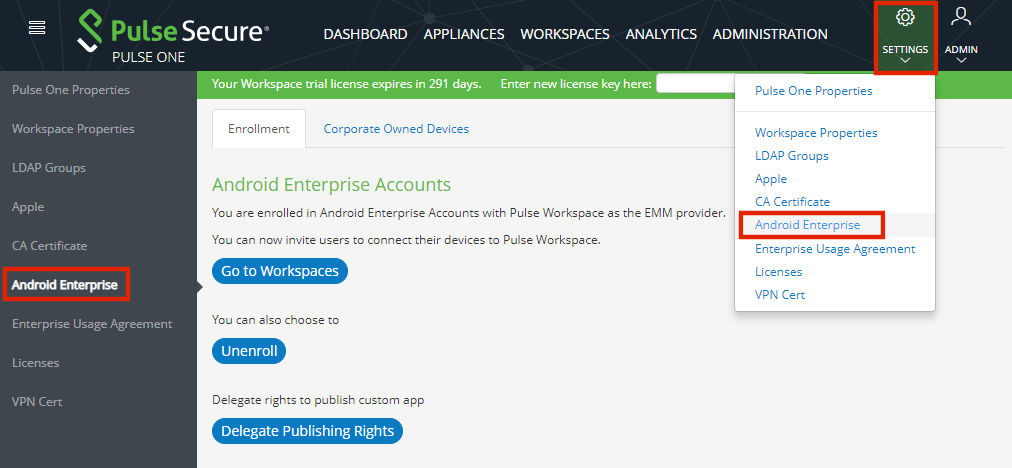
The Android Enterprise Accounts page appears.
Ensure that your Google developer account is enrolled in Android Enterprise Accounts with Pulse Workspace as the Enterprise Mobility Management (EMM) provider (see the notification above). If it is not, you must click Enroll and follow the Google process.
2.Click Delegate Publishing Rights.
A confirmation dialog appears.
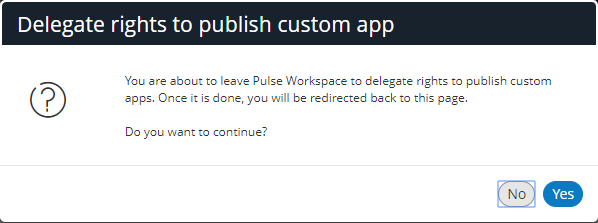
3.Click Yes.
4.Log in with required Google developer credentials.
A Google Play confirmation screen appears.
5.Confirm that you want to publish private apps.
The delegate rights process is complete.
To add an Android app to the App Catalog from Pulse One:
1.Select the Workspaces menu.
2.Select the App Catalog tab. The App Catalog page appears.
3.In the App Catalog page, click Add App and then select Add App Manually.
The Add App Manually dialog appears.

4.Select Upload Android App and click Next.
The Add Android App Manually dialog appears.
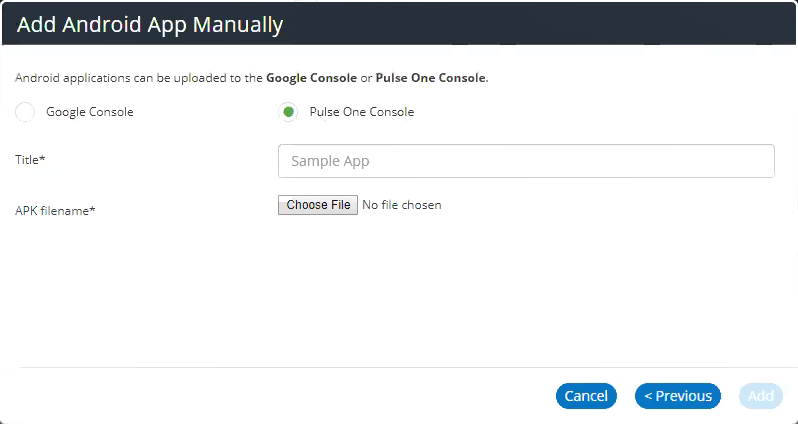
5.In the Add Android App Manually window, select Pulse One Console.
6.Enter a Title for the app.
7.Click Choose File and locate the required Android APK filename.
8.Click Add.
The APK is uploaded automatically to the Google Play console in an Pending publication state. For example:
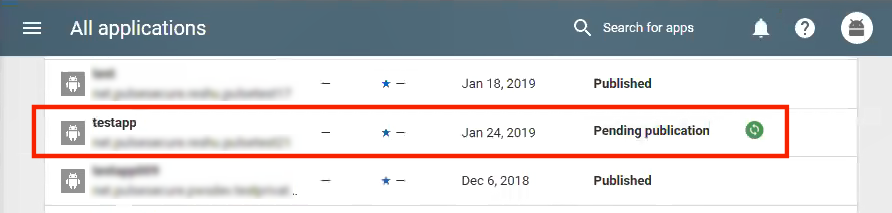
The approval and publication can takes up to ten minutes. After publication, the state updates:
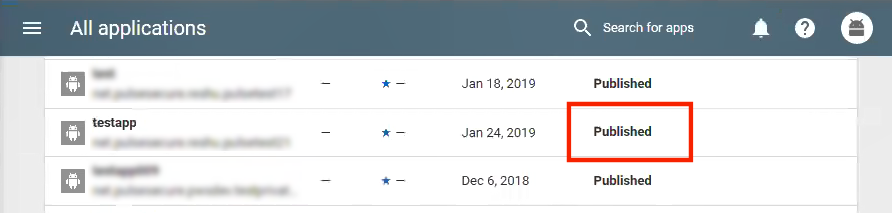
After the app is published on the Google Play console, it is added automatically to the App Catalog on Pulse One. For example:
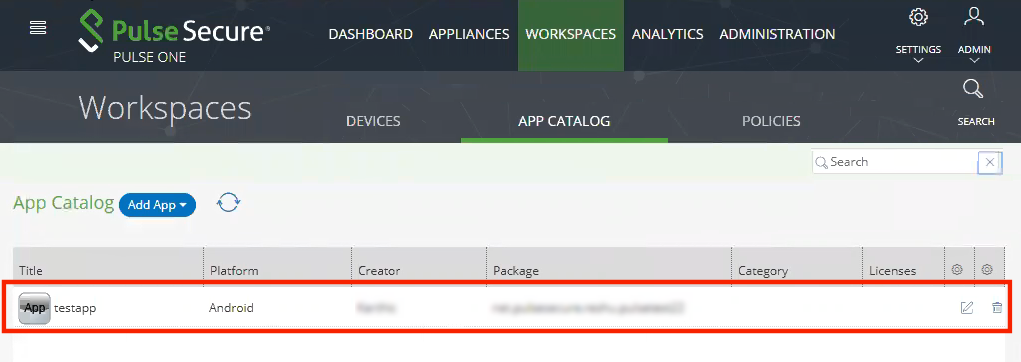
After the app is in the App Catalog, you can add the app to a specific policy. For details, see Adding an Android App to a Policy.