Working with Applications and Application Groups
•Adding Applications to the Controller
•Adding Application Groups to the Controller
•Workflow: Publishing Applications to nZTA Gateways
Introduction
After you have defined the user authentication system for your Ivanti Neurons for Zero Trust Access (nZTA) service, you can:
- Create definitions of applications to which your end users require access, see Adding Applications to the Controller.
- Group together multiple applications for which a single secure access policy is required, see Adding Application Groups to the Controller.
- Create secure access policies through which you can publish your applications, or application groups, to a nZTA Gateway, see Workflow: Publishing Applications to nZTA Gateways.
An application, or application group, can be associated with only one secure access policy.
Adding Applications to the Controller
For each application you want to make available through nZTA, you add an application definition to the Controller. Application definitions are referenced from a secure access policy in the following ways:
- A single application can be referenced from a secure access policy to identify an application for the policy.
- Multiple applications can be referenced from an application group, to enable all of the applications in the application group to be identified for a secure access policy.
To add an application:
-
Log into the Controller as a Tenant Admin, see Logging in as a Tenant Administrator.
-
From the nZTA menu, click the Secure Access icon, then select Manage Applications > Applications.
The Applications page appears. This page lists all applications defined on the Controller.
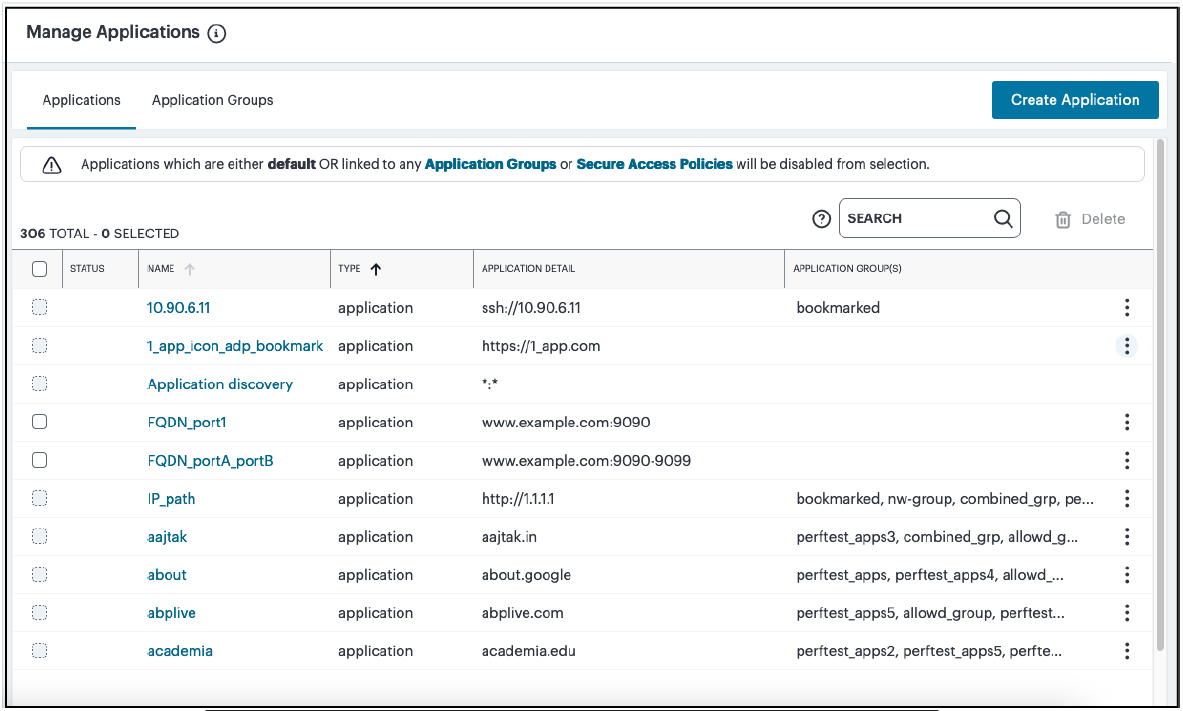
This page also includes a built-in application called Application discovery. The Application Detail for this application is *:*, indicating that all applications that it applies to all unlisted applications. This application is used by the nZTA application discovery feature, and cannot be deleted.
-
Click Create Application.
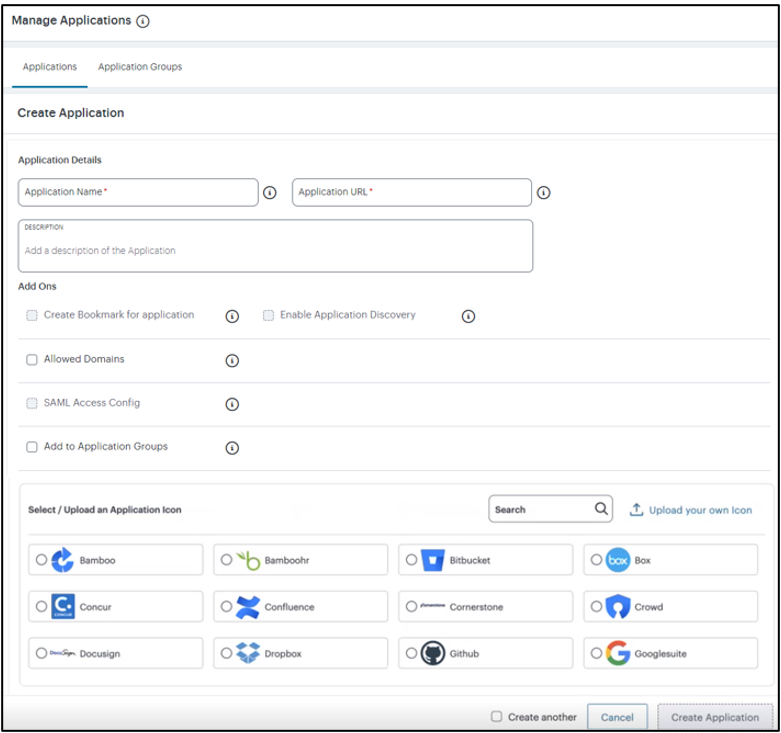
A form appears enabling you to create the application.
-
Enter the Application Name.
-
Enter the Application Details. That is, the URI (Uniform Resource Identifier) you use to access the application. To view a complete list of valid entries for this field, see Defining Applications and Application Groups.
-
For scenarios that require one or more additional domains to be associated with an application, select Allowed Domains:
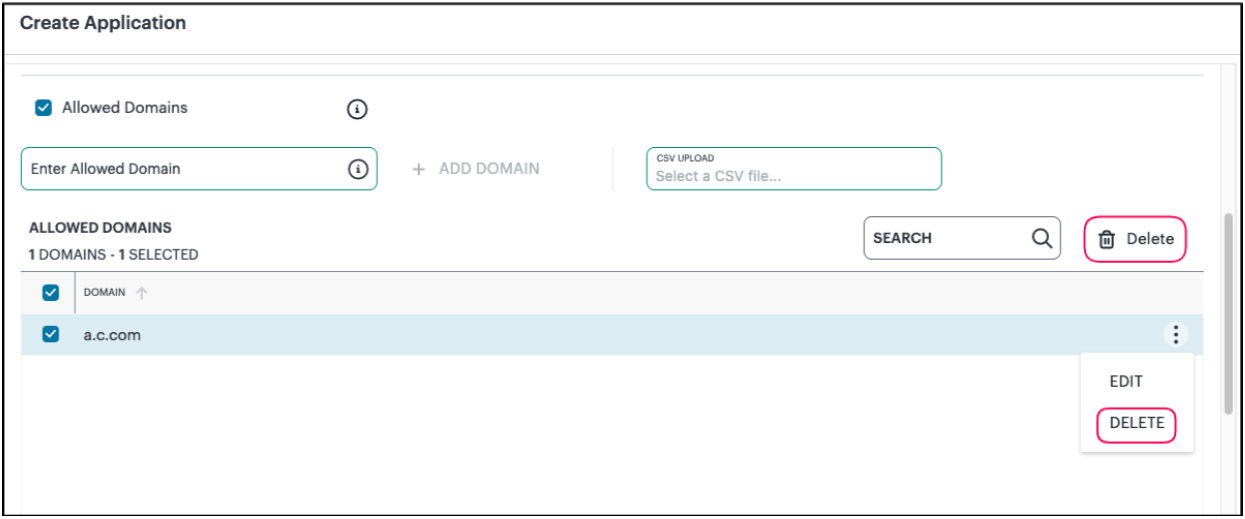
Add your domains through one of the following methods:
- Individually, by entering valid domains in the Enter Allowed Domain text box, then selecting Add Domain to add the domains to the list. You can add several domains at the same time by using a comma (,) separator. Repeat this step for each domain you want to add.
- In bulk, by uploading a Comma-Separated Value (CSV) text file containing the full list of your domains.
Domains added to this list must conform to the same scheme rules as the URI used in the Application Details field. To view a complete list of valid domain schemes, see Defining Applications and Application Groups.
In the list of added domains:
•to edit an entry, click the three dots next to the entry and then select Edit.
•to remove individual entries, click the three dots next to the entry and then select Delete.
•to remove all entries, select all check boxes and click Delete.
-
For HTTP/HTTPS applications, the SAML Access setting appears.
The Controller can use SAML to provide a secure connection to your application or resource. In this scenario, nZTA acts as a SAML Identity Provider (IdP), with the application acting as the SAML Service Provider (SP). To learn more about using SAML, see SAML Authentication.
- Disable this setting if you are using a application-level login for the application.
- Enable this setting if you are using SAML single sign-on for the
application. Then:
- Under Download IdP Metadata, click Download the IDP metadata file using the link and save the IdP metadata file.
- Log into your application and upload the IdP metadata file. Refer to the product documentation for the third-party application for details of this process.
- In the application, download the SAML metadata as a file. Refer to the product documentation for the third-party application for details of this process.
- Under Upload the file below, select and upload the SAML metadata file from the application.
You must keep the SAML metadata up-to-date, especially after renewing certificates. This is essential for a secure and successful SaaS Apps SAML SSO flow. Regularly updating configurations in both the Identity Provider and Service Providers helps prevent authentication failures and ensures the security of the authentication process.
-
(Optional) If you want to add custom SAML attributes, use Attribute and Value to add key-value pairs. Click Add to add an attribute pair, and repeat as required.
Added attributes are displayed beneath the input fields. Click the corresponding X indicator to remove an attribute.
-
To associate an icon with this application, either:
- Select an Application Icon from the list of supported icons. This field auto-populates based on the scheme you use in Application Details.
- Click Upload your own Icon to upload a bespoke image file as the reusable custom icon. Then select the icon from the list to associate to this application. Make sure your icon is in JPEG format using the maximum dimensions 48 x 48 pixels (maximum file size 1 MB). Ivanti recommends you use only square images for your application icons. You can edit or remove the uploaded custom icon.
-
Enter a Description for the application.
-
(Optional) To create a bookmark for this application, select Create bookmark for application.
Use the Bookmark option, where applicable, to allow the end user to copy the Application Details URI for use with other applications. For example, a TCP URI can be bookmarked to facilitate copy and paste into VNC or similar.
-
(Optional) To enable application discovery for this application, select Enable Application Discovery.
To use application discovery, your application must be defined as a wildcard-prefixed FQDN (for example, "*.example.com"). To learn more about application discovery, see Defining Applications and Application Groups.
-
(Optional) If you want to add the new application to an application group, select the Add to Application Group check box, and then select the required application group.
When using SAML authentication, make sure you add to a single application group only those applications that use the same SAML authentication source.
-
To save this application and create another application, select the Create another check box.
-
Click Create Application.
The new application appears in the list of applications.
Applications can also be added to the Controller during the Create Secure Access Policy workflow, see Workflow: Publishing Applications to nZTA Gateways.
After you have defined your applications in the Controller, you can publish the actual applications to your nZTA Gateways, see Workflow: Publishing Applications to nZTA Gateways.
Editing and Deleting Applications
To edit an existing application definition, select the corresponding check box and click Edit. nZTA shows the Edit Application form, populated with the details of the application. Use this form to update the name and other details of your application.
For SAML applications, you can use the Upload SAML Metadata form to replace the metadata definition file previously-uploaded with a new or modified version. However, be aware that that federation metadata files can be digitally-signed and, in that case, cannot be manually edited prior to upload back into nZTA. In this scenario, you must obtain a new digitally-signed metadata file from your SAML SP suitable for uploading through this page. The parameters in an unsigned metadata file can be edited before the file is re-uploaded.
To delete an existing application, select the corresponding check box and click Delete.
You cannot delete the Application discovery application.
Adding Application Groups to the Controller
Multiple applications can be referenced from an application group.
When you select an application group during any subsequent process, all applications in the group are included automatically.
That is:
- During the creation of a secure access policy, see Creating/Editing Secure Access Policies.
- During the Create Secure Access Policy workflow, see Workflow: Publishing Applications to nZTA Gateways.
For SAML authentication, make sure you add to a single application group only those applications that use the same SAML authentication source. A secure access policy can associate an application group with only one authentication method. Therefore, all applications added to the group must use the same SAML metadata for authentication.
To create an application group:
-
Log into the Controller as a Tenant Admin, see Logging in as a Tenant Administrator.
-
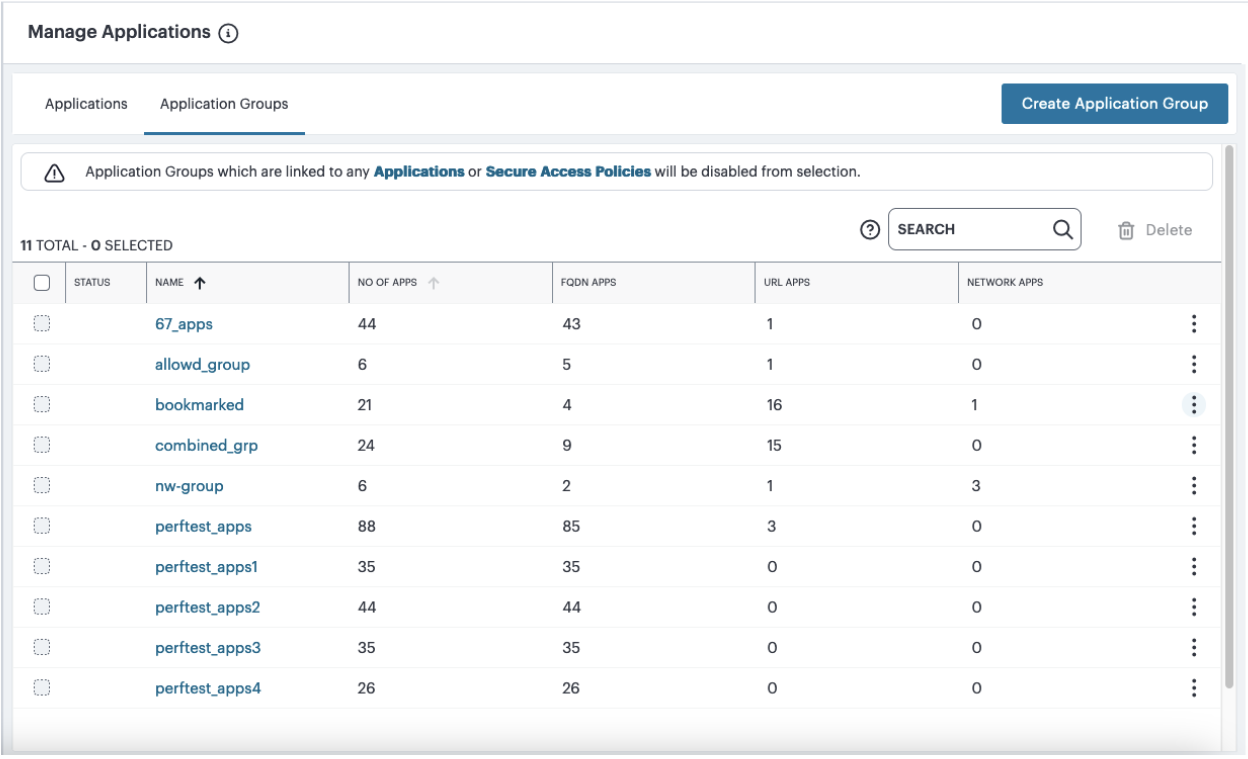
From the nZTA menu, click the Secure Access icon, then select Manage Applications > Application Groups.
The Applications Groups page appears. This page lists all application groups defined on the Controller.
-
Click Create Application Group.
The Create Application Group form appears.
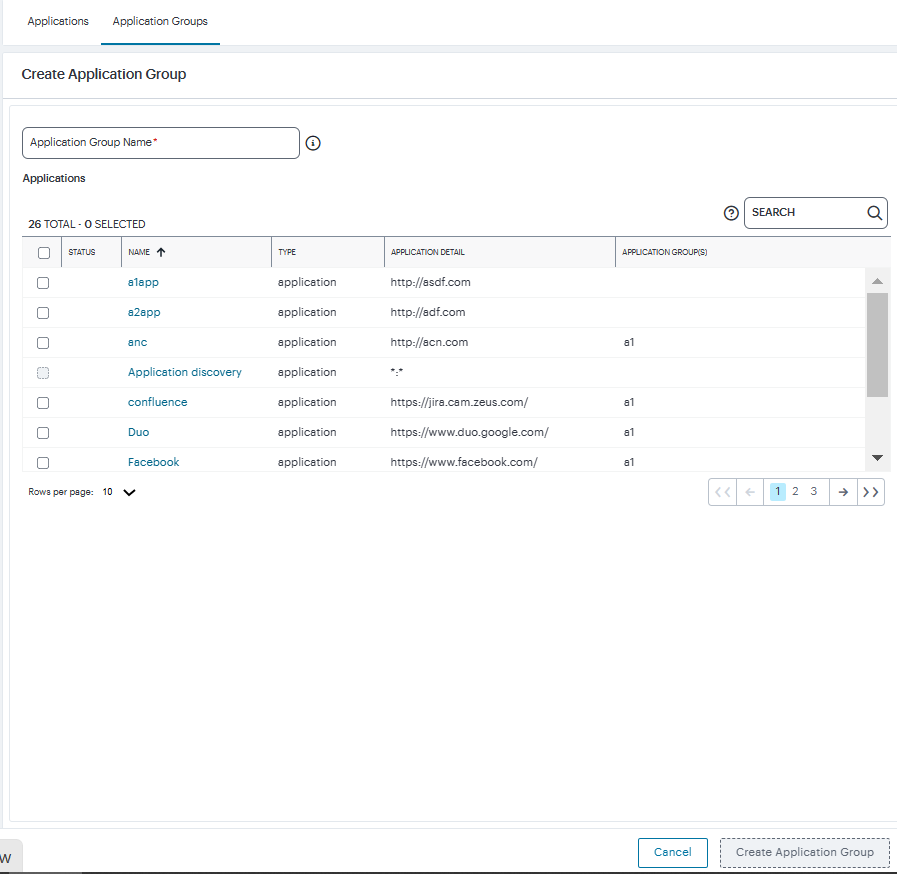
-
Enter the Group Name.
-
Select the Applications you want to add to the group.
You cannot add the Application discovery application to a group.
-
Click Create Application Group.
The application group is added to the list.
Workflow: Publishing Applications to nZTA Gateways
After you have added any required application definitions to the Controller, you can publish these definitions to your nZTA Gateway(s) so that they are available for use.
To do this, use the Create Secure Access Policy workflow.
To publish applications to the nZTA Gateway(s), start the Create Secure Access Policy workflow.
You can access the Create Secure Access Policy workflow from:
- The Secure Access Setup (Onboarding) wizard, see Working with the Onboarding Wizard.
- The toolbar at the top-right of each page, see below.
To start the Create Secure Access Policy workflow using the toolbar:
-
Log into the Controller as a Tenant Admin, see Logging in as a Tenant Administrator.
The Network Overview page appears.
-
Click the Workflows pull-down menu, and then select the Create Secure Access Policy workflow.
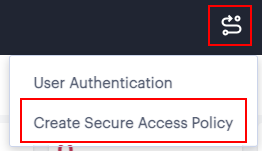
The Create Secure Access Policy workflow appears.
The Create Secure Access Policy workflow includes a multi-step workflow:
- Select or Create Applications that you want to publish, see Selecting Applications for Publication.
- Select Device Policies that apply to the application, see Selecting Device Policies for Applications.
- Select or Create User Rules that apply to the application, see Selecting User Rules for Applications.
- Select Gateways to which you want to publish applications, see Selecting a nZTA Gateway for your Applications.
- Summary, a confirmation-only step, see Confirming the Create Secure Access Policy Workflow.
After the Create Secure Access Policy workflow finishes, all selected applications are pushed to the selected nZTA Gateway.
If you are using multiple gateways, you will need to repeat the publication process for each gateway.
Selecting Applications for Publication
The Select or Create Applications step of the Create Secure Access Policy workflow enables you to create a new application, or to select an existing application that you want to publish.
You can also create applications independently of the Create Secure Access Policy workflow, see Adding Applications to the Controller.
To select an existing application:
-
Access the Create Secure Access Policy workflow, see Workflow: Publishing Applications to nZTA Gateways.
-
In the Create Secure Access Policy workflow, select the Select or Create Application step.
-
Click Select an Application and select the required application from the drop-down list.
-
(Optional) If you want to add the application to an application group, select the Add to Group check box, and then select the required application group.
The applications in a group can be published as a single action.
To learn more about the process of creating an application group, see Adding Application Groups to the Controller.
-
Click Next to continue to the next step of the workflow, see Selecting Device Policies for Applications.
To create a new application:
-
Access the Create Secure Access Policy workflow, see Workflow: Publishing Applications to nZTA Gateways.
-
In the Create Secure Access Policy workflow, select the Select or Create Application step.
-
Click Select an Application and select Add New Application.
The add new Application form appears.
-
To add a new Application, follow the steps described in Adding Applications to the Controller.
-
(Optional) If you want to add the new application to an application group, select the Add to Group check box, and then select the required application group.
The applications in a group can be published as a single action.
To learn more about the process of creating an application group, see Adding Application Groups to the Controller.
-
Click Next to continue to the next step of the workflow, see Selecting Device Policies for Applications.
Selecting Device Policies for Applications
The Select Device Policies step of the Create Secure Access Policy workflow enables you to select the required device policy for the application that you want to publish.
To create device policies, see Creating Device Policies and Device Policy Rules.
To select device policies:
-
Access the Create Secure Access Policy workflow, see Workflow: Publishing Applications to nZTA Gateways.
-
In the Create Secure Access Policy workflow, select the Select Device Policies step.
A list of existing device policies appears.
-
Select a device policy.
-
Click Next to continue to the next step of the workflow, see Selecting User Rules for Applications.
Selecting User Rules for Applications
The Select or Create User Rules step of the Create Secure Access Policy workflow enables you to compile a list of one or more user rules (and the groups to which they optionally belong) that apply to the applications you want to publish.
You can create user rules independently of the Create Secure
Access Policy workflow, see Creating User Rules.
You can create user groups independently of the Create Secure
Access Policy workflow, see Creating User Groups.
You can create authentication policies independently of the
Create Secure Access Policy workflow, see Working with User Authentication.
To create a user rule:
-
Access the Create Secure Access Policy workflow, see Workflow: Publishing Applications to nZTA Gateways.
-
In the Create Secure Access Policy workflow, select the Select or Create User Rules step.
-
For the user group, either:
- Click Select or Create User Group(s), and select the required user group.
- Click the plus symbol for the Select or Create User Group(s) property, and create the required user group using a Group Name, an Authentication Policy and (optionally) a Description.
-
For the authentication policy, either:
- Click Select an Authentication Policy, and select the required policy.
- Click the plus symbol for the Select an Authentication Policy property, and create the required authentication policy, see Working with User Authentication.
-
For the user rule, either:
- Click Select or Create Rule, and select the required user rule.
- Click the plus symbol for the Select or Create
Rule property, and create the required user rule:
- Enter a Rule Name for the rule.
- Click Select Attribute Type and select the required authentication attribute type. The following options are supported: Username, SAML (Azure AD) and Custom.
- Click Expression and select either Matching or Not Matching.
- Enter the required User match string for the selected Expression. Wildcard matches are supported. For example: *
- Click Add to List.
-
Click Add User Rule.
The new user rule is added to the list of rules.
-
(Optional) Repeat steps 3 to 6 to create additional rules, if required.
-
In the list of rules, select each rule that is required by enabling its check box.
-
Click Next to continue to the final step of the workflow, see .Confirming the Create Secure Access Policy Workflow
To select an existing user rule:
-
Access the Create Secure Access Policy workflow, see Workflow: Publishing Applications to nZTA Gateways.
-
In the Create Secure Access Policy workflow, select the Select or Create User Rules step.
The Select or Create User Rules page lists all existing user rules.
-
In the list of rules, select each rule that is required by enabling its check box.
-
Click Next to continue to the next step of the workflow, see Confirming the Create Secure Access Policy Workflow.
Selecting an nZTA Gateway for your Applications
The Select Gateways step of the Create Secure Access Policy workflow enables you to identify the nZTA Gateway to which you want to publish applications.
To select the required nZTA Gateway(s):
- Access the Create Secure Access Policy page, see Workflow: Publishing Applications to nZTA Gateways.
- On the Create Secure Access Policy page, select the Select Gateways step.
- Click Select Gateway and select the required nZTA Gateway.
- Click Next to continue to the next step of the workflow, see Confirming the Create Secure Access Policy Workflow.
Confirming the Create Secure Access Policy Workflow
After you have successfully completed all steps of the Create Secure Access Policy workflow, the final Summary step of the workflow becomes active.
This step displays all information that was defined/gathered during the Create Secure Access Policy workflow, and enables you to complete the workflow.
-
Access the Create Secure Access Policy workflow.
-
In the Create Secure Access Policy workflow, select the Summary step.
A summary page displays all information that was defined/gathered during the previous steps.
-
Examine the summary information.
-
Click Finish to confirm the summary and complete the Create Secure Access Policy workflow.
The applications are published to the selected nZTA Gateway.
After you have published applications to your nZTA Gateway(s), users can enroll their desktop and mobile devices, see Enrolling Mobile/Desktop Clients.