App Distribution Catalog
Use the App distribution > App catalog page to view a summary of configured apps and their deployment status. You can also create apps, packages, and bundles and distribute them. You can create an app using Manual or Wizard workflows.
-
Wizard Workflow – Allows you to create your app quickly and easily.
-
Manual Workflow – Provides you more flexible option if you are an advanced user, you can configure app settings on your own.
Choose the workflow that best suits your needs.
Follow these steps to create and distribute an app. Select links in the steps for more detail on that step.
- Select Distribution > Catalog.
- Click Add. The following options are displayed.
- Windows: This is a manual process for creating each installation package action. The Windows option allows applications to be deployed to a Microsoft Windows operating system. This option creates an app with no preconfigured actions, allowing the you to add actions manually.
Windows package manager (winget): This wizard allows you to select apps available in the Windows Package Manager API, known as winget. The Windows Package Manager provides access to a large library of application installers from the Windows Package Manager repository, enabling quick creation of apps in the App Distribution app catalog. The selected apps are installed on Windows 10/11 devices using the native winget application. Once an application is selected, its details are automatically populated in the Overview tab, and a corresponding Package Manager Action is created in the Package tab for that specific winget app.
Import EPM package: This wizard allows you to import Ivanti Endpoint Manager (EPM) packages into the Neurons App Distribution format. The Import EPM Package wizard enables the selection of locally saved Ivanti EPM packages that were exported in the *.ldms format.
Once a package is selected, the upload process uses the EPM package name in the Overview tab and translates the EPM package actions into corresponding Neurons App Distribution actions in the Package tab.
Bundle: This wizard allows you to select existing apps and bundles to group them into a new bundle. The Bundle option displays a filtered view of the App Catalog page. Apps that do not have any package actions, or bundles that already contain another nested bundle in their action list, will not be shown in the Bundle wizard. One or more of the displayed apps or bundles can be selected.
When the bundle is created, the Overview tab will display a comma-delimited list of the originally selected apps in the Description section. In the Package Manager, a separate Run App Package action will be created for each selected app.
If the selected apps have prerequisites or dependencies, the order of actions in the Package Manager can be adjusted to control the installation sequence.
For the steps to create bundles, see Bundling the apps section.
OS Deployment (MS Windows only): This wizard enables IT admins to partition and reinstall the OS on endpoints during a break-fix or similar situations. For more information, refer to Operating System Deployment (OSD).
- On the Overview tab, select Untitled (x) at the top and give your distribution a name. You can also enter a more detailed Description and specify whether this app should allow an On-demand install. You can initiate on-demand installs on the Devices page after creating an app distribution. For details, see Installing an app from the Devices page.
- On the Package tab, use the package actions builder to create your package.
- On the Distribution tab, specify the Targets, App configurations, and Installation Schedule.
Additional information
Here are some additional things to know about the App Catalog main page.
The Deployment status column shows these states:
- Compliant: The app was successfully installed or it was detected as previously installed.
- Pending: The app will be installed the next time the device checks in (by default every four hours), or the installation is in progress.
- Not compliant: The installation failed.
Selecting a deployment status item shows a filtered view containing all devices in that state targeted by that app.
The options menu (  ) on the right allows you to Edit, Rename, Clone, Enable, Disable, or Delete an app.
Cloning an app is useful for creating standardized app templates and does the following:
- Copies details from the Overview tab.
- Includes the latest package version only.
- Disables all distributions and removes targets from the "System - on demand" default distribution.
When adding or editing an app, the Overview tab lets you edit the package name and enter an app Description. You can also select whether the app should allow an On-demand install.
On-demand packages are available on the Device page for installation on the selected device. In a device's details page, use the Install app action from the Actions panel. For more information, see Installing an app from the Devices page.
When adding or editing an app, use the Package tab actions builder to configure when and how the app should be installed. The Package tab keeps track of package edits you have saved. Select a version and select Edit version to base your edits on that version.
In the package action editor, drag an action you want and drop it into the order you want it to happen. Select an action in the builder tree to configure it. The actions builder is flexible and allows you to have multiple Download, Execute, and other actions if your app requires it.

Generally, an app distribution should consist of at least one Download action and one Execute action. For more information on the available actions, see App Distribution Package Actions and Detection Rules.
The download action can download files from an HTTP(S) location you specify. If you have Azure Blob Storage or an Amazon S3 Bucket, use the download action's cloud file explorer to include files from there.
If you configure a Download action to use cloud storage, make sure your endpoints can connect to the storage location. For more information, see Required URLs, IP addresses and ports.
Package action properties include a Continue on failure option, defaulting to disabled. Normally, package processing stops when an action fails. In rare cases you may want to allow package processing to continue on failure. After enabling this option, any errors encountered will be logged as warnings, and package execution will continue as normal. For example, you may have an action that uninstalls an older version of an app, but an older version may not exist on all devices.
Preferred Servers for App Distribution
Preferred Servers are file shares on your internal network to host Ivanti Neurons content such as App Distribution packages, patches, agent downloads, and so on. This allows agents to download content efficiently within your network without going to cloud servers each time.
Learn more about Preferred Server Settings.
To ensure that you download the content from Preferred Servers, start the SHA256 hash value in the package download details with a #. If you don’t provide a hash, then Ivanti Neurons will always download from the source and not from the peers or preferred servers.
Package versions
When editing a package in the app catalog, the Package tab tracks your package revisions. When you edit a package version, saving it creates a new version. App distribution will use the latest package version for deployment when it runs.
An app that fails to install successfully will be retried two more times. Creating a new version resets this counter.
The package version that was installed on a device is displayed on the Deployment status page.
Use the Distribution tab to identify which devices will be targeted and how and when the distribution will occur.

You may want to add multiple distributions to an app. For example, you may want to stage your distributions by adding a distribution that first covers an initial test group and then add additional distributions that roll out the app later to the rest of your company. Or, you may want to create a distribution that targets initial devices week one, another distribution that targets additional devices week two, and so on.
Select the Add distribution button to add a new distribution, or select an existing distribution to edit it. When adding a new distribution, give your distribution a unique name by selecting the name at the top and editing it. You will not be able to save your changes until you do this.
Each distribution for an app contains:
- An Enabled/Disabled toggle. Disabling a previously enabled distribution does not change any distributions that have been completed. It only disables targeting for distributions that have not completed yet. It can take several hours for a toggle change to propagate to agents.
- Targets for this app.
- The App configuration profile you want to use, which specifies either install once or always require to be installed.
- The Schedule for this app.
You can target from these sources:
- Devices
- Neurons groups
- LDAP groups (users and devices)
- EntraID device group
Individual users, Neurons user groups, or Entra ID user groups are not currently supported.
Scheduling a distribution
All distributions include a schedule. There are two scheduling options:
-
Start on agent check in
-
Start an agent check in after the selected date and time
The default schedule is to Start on agent check in, which means the next time the app distribution agent runs on a targeted device, that application is installed.
By default, the app distribution agent on devices checks for package updates every four hours. In addition to this agent check interval, the cloud targeting service that resolves distribution targets runs every six hours. It is this combination of timing that determines how quickly a targeted device will react to application distribution changes.
When you initially create a distribution, the targeting service will resolve targets immediately. Primarily, revisions are made to an existing distribution and later on that are subject to a larger possible time interval, up to 10 hours.
With Start on agent check in after selected date and time option, the app distribution agent waits and installs the application after the specified time. The time can either be Local or UTC (Coordinated Universal Time).
- When Local is selected, each device will run the package after its local time reaches the selected date and time.
- When UTC is selected, all devices will run the package after the selected UTC date and time.
Allowing a real-time push of a distribution
An administrator may need to push packages to devices immediately. The Run Now feature performs full group resolution for a selected distribution and the resulting device targets are contacted to perform the app installation. To allow a push immediately, to all or appropriate targeted devices, administrators can choose from the following 2 options:
-
Run now on all devices: Attempts to run the application on all devices that resolve to the selected Distribution.
-
Run now on devices that are not compliant: Attempts to run the application on all resolved devices that are currently not compliant. Installation will be attempted even if the app retry limit has been previously reached.
Not compliant: Refers to any device with a status that is not 'Compliant'.
These options are available only for user created Distributions and applies to single Distributions of an application.
In the Distribution tab, click the desired Distribution list row menu and select the appropriate Run now option.
This operation resolves all groups targeted in the Distribution, as well as includes all individually targeted devices. The targeting service resolves to the latest package revision of the application. Once resolved, messages are sent to the agent on each device to immediately run the application's actions.
Only one Run now operation will be allowed within fifteen minutes, unless the number of initial devices is less than 5000. Any number of additional operations can be run during the following fifteen minutes, as long as the cumulative total is less than ten thousand.
Ivanti reserves the right to increase or decrease these numbers in the future by monitoring performance and use over time.
Understanding default distributions and distribution priorities
There are two default distributions that are always included and that can not be deleted:
- System - excluded devices: Devices that should never install this app. This distribution is empty by default. Each app has its own excluded devices distribution. Add devices you want to exclude here as necessary. If a device is in this distribution and also in other distributions that you add for this app, this distribution takes priority and the device will not be targeted.
- System - on demand installs: When installing an app on a device from the Device view, the device is added to this distribution. It is set to Install once (in contrast to Always require to be installed). You can also manually add devices to this distribution. If an added device is available, its app distribution agent is contacted directly so it can immediately begin the installation. Group targeting is not allowed in this distribution.
On the Distribution tab, distributions are sorted by priority. The priority affects which distribution a device gets targeted by if it is targeted by multiple distributions. If a device appears in multiple distributions, the highest priority distribution options will be used, such as those controlling when the app will be installed.
Bundling the apps
You can bundle the apps and their package contents. This bundled package simplifies distribution, installation, and management of the app, ensuring that all necessary parts are included and correctly structured for the app to function properly on a device or system.
-
Select App distribution > App catalog.
-
Select Bundle from the Add drop-down menu.
A bundle wizard of apps with packages configured is displayed. The Package type differentiates a normal app and a bundle in the list. This list of apps only shows apps that have packages configured. The nested bundles are not displayed in the list.
-
Select the apps and bundle you wish to add to a bundle.
A bundle can include another bundle, but they cannot be nested beyond that. Nesting refers to including a child app or bundle inside a parent bundle. For example, if you have a common apps bundle and then create a finance apps bundle that includes this common app bundle, the finance bundle is flagged as a nested bundle. This prevents the finance bundle from being included in another bundle.
-
Click Create bundle with run app actions.
The bundles are identical to regular apps in terms of the Overview and Distribution, with the only difference being that Run app actions are shown in the Package view.
- On the Overview tab, select Untitled (x) at the top and give your distribution a name. You can also enter a more detailed Description and specify whether this app should allow an On-demand install. You can initiate on-demand installs on the Devices page after creating an app distribution. For details, see Installing an app from the Devices page.
- On the Package tab, use the package actions builder to create your package.
- On the Distribution tab, specify the Targets, App configurations, and Installation Schedule.
The bundle is identical in terms of the Overview tab. For more information, see Overview.
When adding or editing a bundle, use the Package tab actions builder to configure when and how the app in the bundle should be installed. On the app package tab, each of the selected apps/bundles will be shown as Run app package actions. The Package tab keeps track of Run app package edits you have saved. Select a version and select Edit revision to base your edits on that version.
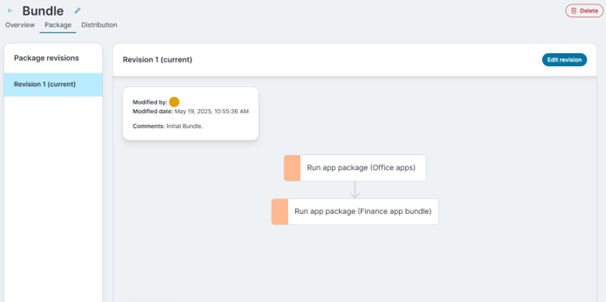
The order of the run app package actions is the exact order in which the app packages are executed. If there are prerequisites or dependencies for these packages, then the order of these actions must be altered. The actions can be moved up and down in the panel view and they will be executed in the order shown from top to bottom.
In the package action editor, drag and drop the action in the order that you want it to occur. Select an action in the builder tree to configure it. The actions builder is flexible and allows you to have multiple Download, Execute, and other actions if your app requires it.
Generally, an app distribution should consist of at least one Download action and one Execute action. For more information on the available actions, see App Distribution Package Actions and Detection Rules.
The download action can download files from an HTTP(S) location you specify. If you have Azure Blob Storage or an Amazon S3 Bucket, use the download action's cloud file explorer to include files from there.
If you configure a Download action to use cloud storage, make sure your endpoints can connect to the storage location. For more information, see Required URLs, IP addresses and ports.
Package action properties include a Continue on failure option, defaulting to disabled. Continue on failure is applicable to each action . In the case of a run app package action (Bundle), the continue on failure applies to the bundled app as a whole.
Package execution workflow
Action Statuses:
-
Success
-
Success; reboot required
-
Failure
-
Failure; reboot required
-
Success with Errors (for "Run app package" actions with partial failure and "Continue on Failure" enabled)
-
Success with Errors; reboot required
-
Rebooting
Execution Rules:
-
Reboot Triggers: If an action triggers a reboot, all further processing pauses until the reboot completes.
-
Deferred Reboots: If a reboot is required but not immediate, it is postponed until all packages finish.
-
Run app package - Child Failures:
-
Without Continue on Failure: Execution stops immediately; the whole action is marked as failed.
-
With Continue on Failure: Failing child actions are logged, but execution continues. If only such failures occur, the main action is marked as Success with Errors.
-
-
Success with Errors: Execution proceeds to the next action regardless of the Continue on Failure setting.
-
General Failure Handling:
-
Without Continue on Failure: Execution halts.
-
With Continue on Failure: Execution continues.
-
-
Success: Execution continues normally.
Use Continue on Failure only for non-critical actions. Failures are still recorded in their respective action statuses. A package/bundle is considered fully successful only if there are no unhandled errors.
Package versions
When editing a bundle in the app catalog, the Package tab tracks your bundle revisions. When an app used in a bundle is edited and saved, a warning will list the bundles that need manual updates. For nested bundles, update the child first, then the parent.
In the parent bundle, if an included app or bundle is outdated, the package editor will show this in the options panel when a run app package action is selected. The Update to latest revision button is displayed. If the revision is the latest, then the label will show Revision (latest).
The package version that was installed on a device is displayed on the Deployment status page.
The bundle is identical in terms of the Distribution tab. For more information, see Distribution.