Device actions
When you are viewing device details, the Actions panel allows you to perform actions on that device. The Actions panel automatically appears when you open the device details page, but if you don't see it, click the Actions button in the top right corner.
There are basic actions that are built-in, or you can execute custom actions that you configure yourself. This page describes the basic actions. To perform an action on multiple devices or to create a custom action, we recommend using Neurons. For more information, see Bots - Custom Action.
For information on other things you can do from the device details page, see Devices.
Prerequisites
-
This action requires the Global actions > Execute Script permission.
-
The device must have the Ivanti Neurons Agent with the Automation module installed.
Actions
Click the Execute Script action to open a panel where you select the environment for running the script, depending on the device type.
-
PowerShell: Choose this option for scripts written in Windows PowerShell syntax. Use it for advanced administrative tasks, system automation, and configuration management on modern Windows operating systems.
-
Command Prompt: Choose this option for traditional Windows Command Prompt (CMD) commands. Use it for simple file operations, batch files, and basic commands. Specify the user context for script execution on the remote device—critical for security and permissions:
-
System (Recommended for OS-level tasks): Execute the script with the highest privileges, typically as the LocalSystem account. Use this for operations that modify system files, services, or registry keys affecting all users.
-
Logged-on User: Execute the script with the permissions of the user currently logged into the device. Use this for tasks that modify user-specific settings or require access to the user’s profile.
-
Clicking Submit sends the script to the Ivanti Neurons Agent on the device, which then runs it. The script output is captured and displays in the command window. It may take a minute or two for the command results to display.

These actions require service management software such as Service Manager or ServiceNow. They also require a connector configured with action credentials.
When you create or update an incident, the information is sent to the service management software.
This action requires the Global actions > Detect Outages permission.
The device must have an Ivanti Neurons Agent installed.
Click the Detect Outages action to open a command window that shows the output of standard network troubleshooting commands you can run on the device, such as tracert, netstat, ping, ipconfig, and so on. For Domain Commands that require an IP address or domain name (such as tracert), type the address in the text box in order to run the command.
Increase your browser width if the output window is truncating results. To clear the output window, click Clear console below the network commands.
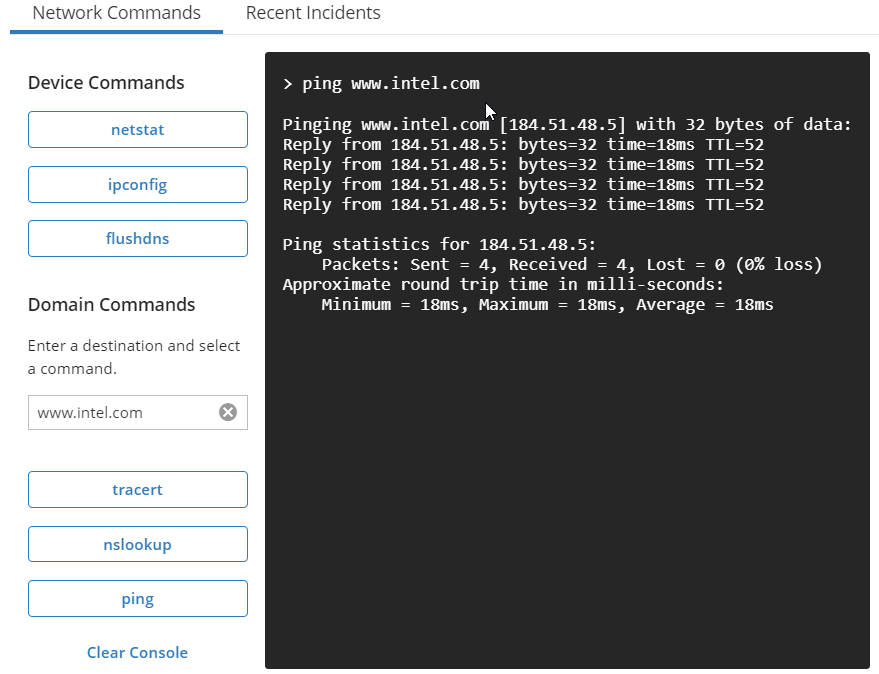
The Recent Incidents tab shows incidents imported from connected service management software, such as Ivanti Service Manager. The incidents are what have been created in service management software recently and are not necessarily related to the currently selected device. This allows you to see if other devices on the network have reported problems similar to what you may be seeing for the current device.
This action requires the Global actions > Remote Control permission.
The device must have an Ivanti Neurons Agent installed.
Click the Remote Control action to open a remote control session with the device in a new browser tab. For more information, see Ivanti Neurons Platform remote control.
Click the Remove device action to delete the device record from the Neurons Platform. If the device record was imported using a connector, the record may be imported again the next time the connector runs.
If you remove a device that was imported using a connector, it is usually imported again within 7 days. To restore the device sooner, you need to run the connector manually. For more information, see To run a connector on demand.
If you remove a device that has the Neurons Inventory engine installed, it is usually imported again within 10 days. To restore the device sooner, you need to run the Neurons Inventory engine on the device manually. To do this, in a command prompt on the device, run: C:\Program Files\Ivanti\Ivanti Cloud Agent\UNO.INVENTORY.ENGINE64\Inventory.Engine.exe" \runNow
This action requires the Global actions > Reboot Device permission.
The device must have an Ivanti Neurons Agent installed.
Click the Reboot action to send a reboot command to the agent on the device.
This action requires the Global actions > Install SWD Package permission.
To use this feature, the Connector Agent must be installed directly on the EPM Core Server"
Click the Install Ivanti Endpoint Manager package action to install an Endpoint Manager package on the device you're viewing. The target device must have an Endpoint Manager agent. The Ivanti Neurons Agent isn't required.
Before using the Install Endpoint Manager package action, you need to make sure your Neurons Platform Endpoint Manager connector configuration includes action credentials, which allows the Neurons Platform to perform actions on devices managed by Endpoint Manager. These credentials are configured separately from the credentials that let the Neurons Platform import Endpoint Manager data.
In the Endpoint Manager connector, enable Action Details and provide the following:
- Core Server: The core server's resolvable domain name or IP address, along with a username and password that can log on to the core server.
- Endpoint Manager: The username and password for an Endpoint Manager user.
For simplicity, users that are members of the LANDESK Administrators user group on the core server satisfy both credentials requirements.
There are two package installation methods you can choose from:
- Push a package: Installs the package on the targeted device. Will fail if the device is offline.
- Policy-supported push: Installs the package on the targeted device. Will retry automatically if installation fails or the device is offline.
To install an Ivanti Endpoint Manager package
- In the Neurons Platform, view the Device Details for the device you want.
- In the Actions list, click Install Ivanti Endpoint Manager package.
- Wait for the Neurons Platform to get the list of available packages from the connected core server.
- Select a package Install method.
- Select the package you want, and click Install. A notification tells you that the package install is scheduled.
- After the task is done, another notification tells you that the package install was complete, or if it failed it will tell you that. Use the Neurons Platform notification history if you think you might have missed the notification.
Intel vPro® "Chip-to-Cloud" integration harnesses Intel vPro® technology and Intel® Active Management Technology (Intel® AMT) to provide secure, remote management of enterprise devices directly through the Ivanti Neurons Admin Console. Operating at the hardware level, this out-of-band management solution empowers IT administrators with robust capabilities, even when devices are powered off or the operating system is unresponsive.
Key Features:
Remote Power Actions: Remotely power on, power off, restart, hibernate, or perform a hard reset on devices regardless of their OS state, ensuring continuous control and rapid response.
KVM-over-IP Sessions: Initiate advanced remote access with full Keyboard, Video, and Mouse (KVM) control, allowing administrators to securely view and interact with user screens, including at the BIOS or pre-boot level.
Cloud-Native Provisioning: Seamlessly activate and configure Intel vPro devices directly via the Ivanti Neurons agent, streamlining device onboarding and lifecycle management from the cloud.
By leveraging hardware-based out-of-band management, Chip-to-Cloud provides IT teams with an essential tool-set for secure, effective remote support, troubleshooting, and recovery across diverse enterprise environments.
Permissions
This action requires the following permissions under Global actions . Ensure your IT administrators are assigned the appropriate roles:
-
Provision devices for Intel Chip-to-Cloud: Allows users to perform both Provision and Un-provision actions.
-
Perform Intel Chip-to-Cloud Power Actions: Allows users to view and execute all power-state changes.
-
Perform Intel Chip-to-Cloud KVM Action Permission: Allows users to initiate remote KVM sessions.
Prerequisites
The Intel vPro® "Chip-to-Cloud" feature must be activated for the customer account in Ivanti Neurons.
Required engines for Intel vPro® "Chip-to-Cloud" features to work:
Automation Engine: Required to execute remote actions.
Inventory Engine: Collects inventory data, detects device type, operating system, and chipset information, and ensures actions apply only to supported hardware. You do not need to enable these actions manually in the UI; Neurons determines device eligibility through inventory data.
These engines are enabled through the agent policy. If the policy is not set to install these engines, chip-to-cloud actions will not be available, even if the hardware supports it.
To use Intel vPro® “Chip-to-Cloud” features, PCs must be Intel vPro® and meet the following hardware and software requirements:
| Component | Requirement |
| Processor | Intel 8th Generation or higher |
| Operating System | Windows 10 or 11 |
| Firmware | Minimum Intel® AMT firmware version required is 12.x. |
| Drivers | Current Intel® Management Engine Drivers for Windows® 10 and Windows 11. Click here for latest drivers. |
| Network | Intel® Management and Security Application Local Management Service must be running. |
|
Network Ports |
Outbound connection on ports 443 and 4433 |
|
Connectivity |
Intel wired or wireless vPro adapter with an active internet connection. Please note:
|
Device Provisioning and Un-provisioning
Provision: Use this action for activating or registering an eligible device for Intel AMT (Intel® Active Management Technology) remote management. Provisioning must be completed before other chip-to-cloud actions become available.
To provision a device navigate to the Device Details page. If the device is vPro-capable but not yet activated, the Provision action will be visible. Click Provision to initiate the activation process. Once successful, the Power and KVM actions are displayed.
Un-provision: Use this action for deregistering a device and deactivating its AMT remote management capabilities. This is crucial prior to device reassignment or OS reinstallation.
If the device agent ID changes without first unprovisioning the device, you may encounter issues when attempting to provision the device again. Common scenarios where the agent ID might change include re-imaging the device, reassigning the device to a different user, or recovering from a system failure such as a blue screen (BSOD). To prevent provisioning issues, always unprovision the device before performing any action that could change the agent ID.
These actions allow administrators to manage endpoints where you can control the device even if the operating system (Windows) is unresponsive, crashed, or powered off. Once a device is provisioned, you can perform the following hardware-level actions:
-
Connect to KVM: Initiates a remote desktop session at the hardware level. This allows an admin to see and control the screen during the boot process, BIOS/UEFI configuration, or OS crashes (BSOD).
KVM allows you to take control of the remote screen. Click Connect to KVM. In the confirmation pop-up, click Continue. A new browser tab opens. Click Connect KVM in the new tab to establish the session. One-Time Access Code: To initiate a remote KVM session, a unique 6-digit code is generated on the end-user device. The physical user must share this code, ensuring only authorized access.
-
Power on: Sends a hardware command to turn on a device that is currently powered off or in a sleep state.
-
Power off: Performs a hard power-off, equivalent to holding the physical power button. Use this when the OS is completely frozen.
-
Soft Power off: A warning is displayed to the user before the reboot. On proceeding, the system shutdown.
-
Hibernate: Commands the OS to save the current state to the hard drive and power down.
-
Power Cycle: Forces the device to shut down and immediately restart at the hardware level.
-
Reboot: Initiates a standard hardware-level restart.
-
Soft Reboot: A warning is displayed to the user before the reboot. On proceeding, the system requests the Operating System to perform a standard restart.
-
Unprovision: Removes the Intel AMT/vPro configuration from the device, effectively disconnecting it from Intel EMA management.
Troubleshooting
-
Check prerequisite list. Intel strongly recommends checking that firmware and drivers are updated to the current versions. For the latest Intel® Management Engine drivers for Windows® 10 and Windows 11, click here.
-
Intel® AMT utilizes Client Initiated Remote Access (CIRA) to remotely manage Intel vPro® platforms behind a firewall.
-
CIRA (Client Initiated Remote Access) requires a continuous TCP connection. Any internet interruptions or downtime during that period may have affected the connection.
-
Depending on your network configuration, you may have to allow traffic on TCP 443 and TCP 4433 to pass through. This will enable Intel® AMT to establish the CIRA connection.
-
-
Connectivity may be verified with the following PowerShell commands:
-
Test-NetConnection -ComputerName endpointcloudservices.intel.com -Port 443
-
Test-NetConnection -ComputerName amt.endpointcloudservices.intel.com -Port 4433
-
If you have an EPM connector configured with action credentials, and an EPM agent installed on the device you can perform the actions such as asking the device to check in or wiping the device. The actions available depend on the device operating system. For information about the actions, see Device actions in the Endpoint Manager help.
If you have a MobileIron connector configured with action credentials, you can perform MobileIron actions from the device details page. The actions available depend on the device operating system. The device must have a MobileIron client installed.
- Force check-in: Send a request for the device to check in immediately so that you can see if it is responding and so that it gets the latest policies. Supported for Android, iOS, and macOS.
- Send message: Sends a message to the device user. Supported for Android, iOS, and macOS.
- Unlock: Unlocks the device. Supported for Android, iOS, and macOS.
- Lock: Locks the device. Supported for Android, iOS, and macOS.
- Reboot: Reboots the device. Supported for iOS.
- Shutdown: Powers off the device. Supported for iOS.
- Reset PIN: Sets the PIN on the device to 0000.
- Wipe: Performs a factory reset on the device, erasing personal and company information. Supported for Android, iOS, and macOS.
To perform Avalanche actions from the device details page, you must have an Avalanche connector configured with action credentials, and the connector server must have an agent policy applied that includes the Avalanche engine. The device must have an Avalanche Enabler installed. The actions are only supported on Android.
- Force check-in: Send a request for the device to check in to Avalanche immediately so that you can see if it is responding and so that it gets the latest settings.
- Reboot: Reboots the device.
- Send message: Sends a message to the device user in the Enabler. If the Enabler is not in the foreground on the device, the Enabler shows a notification.
This action requires:
-
The Global actions > BitLocker> View BitLocker Key permission.
-
The BitLocker setting must be enabled in the Inventory Scanner.
-
This is applicable only for the Windows devices.
To view and retrieve BitLocker Recovery Keys:
-
Click Encryption Key in the Actions menu.
The Encryption Key dialog will display the Recovery Key IDs, which are unique identifiers for each BitLocker recovery key associated with the device. A device may have multiple Recovery Key IDs.
-
Select a Recovery Key ID to view its corresponding Recovery Key.
When the standard authentication fails, you can copy the recovery key and provide it to the user to unlock the BitLocker-encrypted device.