Working with Trusted Updater
A Trusted Updater policy allows an administrator to designate an application updater, which can add, modify or replace files on an endpoint. The files it adds or updates are added to the endpoint's whitelist and are therefore allowed to execute.
Trusted Updater is the only trusted change policy that can add files to an endpoint's whitelist.
When administrators create a Trusted Updater policy, they have the option to create updaters from a known source or to define their own. A Trusted Updater policy may contain one or more application updaters.
You can add application updaters for multiple versions of the same executable. This allows the same generalized policy to be applied to large numbers of endpoints without having to know which version of that application updater is running on a given endpoint.
Trusted Updaters are displayed on the Trusted Change tab of the Application Control Policies page. You can filter the Policy Type column to display only Trusted Updater policies.
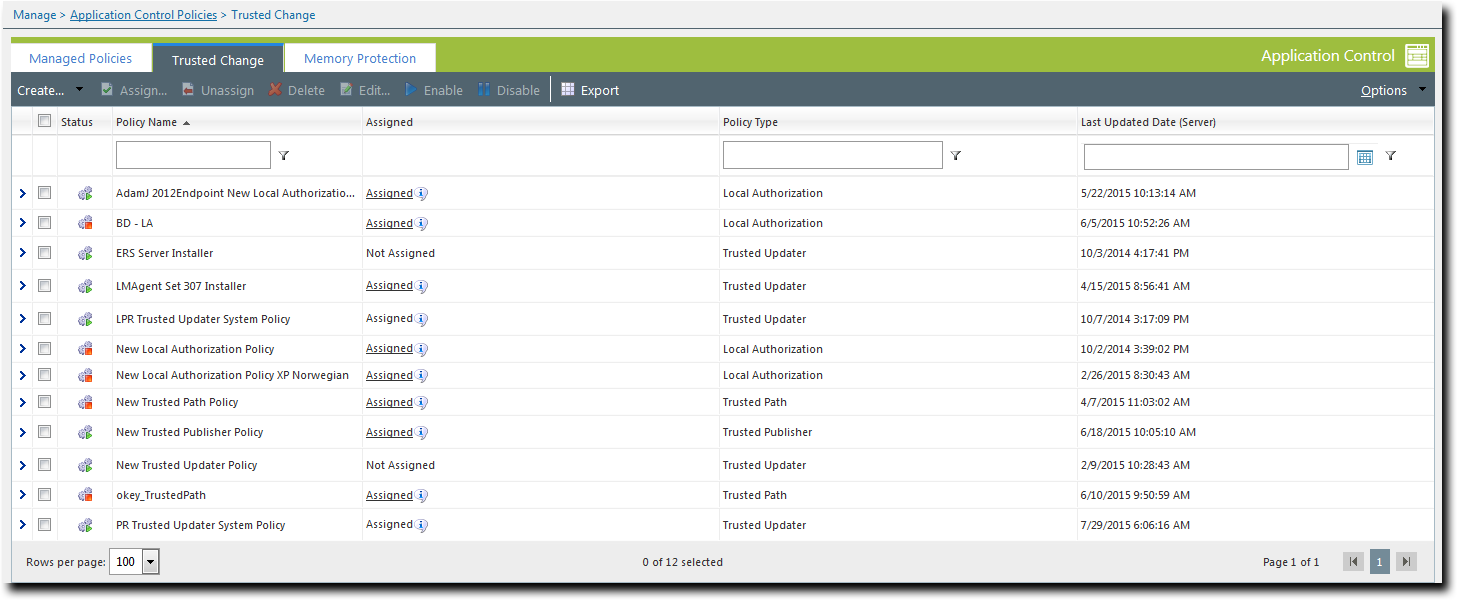
When both Patch and Remediation and Application Control modules are installed, the Patch and Remediation module is treated as a Trusted Updater. It is displayed on the Trusted Change page as PR Trusted Updater System Policy, and is assigned to all endpoints that have Application Control installed.
The Patch and Remediation Trusted Updater differs from other Trusted Updater policies in that it cannot be edited.
Trusted Updater in Practice
A Trusted Updater policy designates a file as an updater, a file that can run and that can add other executable files to the endpoint’s whitelist.
The primary purpose of Trusted Updater is to enable administrators to automatically install and authorize software patches to update applications that are already installed on the endpoint.
Trusted Updater is the preferred trust mechanism for the following scenarios:
- Ivanti Patch and Remediation installing patches or software from content feeds or customer packages
- Third-party package managers installing patches or software
- An antivirus product updating its engine
- Adobe Updater installing updates to Adobe applications
-
Apple Updater installing updates to QuickTime, iTunes, and Safari
Trusted Updater is not intended for installing and authorizing individual software installation packages, such as the setup.exe file for a software installer.
There are some situations where Trusted Updater cannot be used to install an application. The most common is where an ActiveX component is loaded in a browser as part of the installation. The solution here is to use Trusted Publisher to run the application.
The popular online collaboration program WebEx is an example of the type of program that needs Trusted Publisher to run. See Trusted Publisher in Practice for more information.
Identifying the Updater File(s) to Add to a Policy
Many applications include a built-in component that periodically checks for updates, then downloads and installs them automatically.
If an application is installed on an endpoint that is then locked down via Easy Lockdown, it is important that its updater component is defined as a Trusted Updater.
- In some cases the updater's name and location is documented by the application vendor
- The updater component is usually located in the install directory hierarchy of the application e.g. C:\Program Files\manufacturer\application name
- It may be necessary to add more than one file to the Trusted Updater policy in order for the update to be successful
Identifying the Correct Version of Updater File
It is vital to identify the correct version of the updater file for the Trusted Updater policy, or it will not update the system correctly.
If an updater file in the policy does not exactly match the updater file on the endpoint, it will not update the system correctly. For any given application updater, there is likely to be more than one version on the customer’s network. This can happen for a number of reasons:
- Different operating system versions
- 32- and 64-bit versions of the same operating system
- Older, out-of-date machines
The Ivanti Endpoint Security administrator must ensure that the Trusted Updater policy for a given application contains all versions of the application updater files that are present on the endpoints to which the policy is applied.
Trusted Updater and Windows Update
Even after being whitelisted, Windows Update files are not allowed to execute unless they are also Trusted Updaters. This ensures that any new system files they add or modify are automatically whitelisted. You must add the Windows Updates files to a Trusted Updater policy to enable Windows Update to run.
Windows Update is a service that updates Microsoft Windows operating systems and components, using multiple executables. When Easy Lockdown is applied to an endpoint, these executables are added to the whitelist. However, any files that they subsequently add or modify during an update are not automatically added to the whitelist. This would cause endpoint stability issues, so as a precaution Ivanti Application Control does not allow these executables to run unless they are also Trusted Updaters.
If you try to run Windows Update when its files have not been added as Trusted Updaters you get a message saying that Windows Update cannot currently check for updates, or it may check for updates but then fail to install them (the exact message/action depends on the operating system). The attempt is recorded in the All Denied Application Events log.
To allow Windows Update to run, you must add the Windows Update executables as Trusted Updaters. This ensures that any files they add or modify are added to the whitelist and so can execute on locked- down systems.
The following Windows Update files should be added to a Trusted Updater policy:
- WgaTray.exe
- wuapp.exe
- wuauclt.exe
- wuaueng.dll
- wups2.dll
- wusa.exe
- WuSetupV.exe
Note:
- Different versions of these files exist on different endpoints. You must add all versions of each file to the Trusted Updater policy.
- Each Windows system uses a combination of the listed files, but not all of them.
- Files can be added to a Trusted Updater policy directly from the All Denied Application Events log.
Trusted Updater Security Risks
When you add a file to a Trusted Updater policy, every executable file it creates or modifies is added to the whitelist and trusted. This can present a security risk for certain types of files.
There are certain types of executables you should never assign as Trusted Updaters.
Antivirus Scan Engines: Antivirus products often have an updater mechanism that is separate from the virus scanning mechanism. It is important to only trust the updater and not the virus scanner. If you trust the scanner, any time it detects new malware and writes that malware to a quarantine area, that malware would get whitelisted. You would then be relying solely on the antivirus engine to contain that malware.
Web Browsers: Web browser often have an updater mechanism separate from the browser itself. You should only trust the update mechanism, not the browser. If you trust the browser and a user navigates to a site with malicious content, that content could be downloaded and then whitelisted.
Email/Instant Messaging Clients: Only trust the email/IM client's update mechanism, if it has one. If you trust the client itself, mail-borne malware could end up whitelisted on the endpoint.
Media Applications: Media applications frequently download various types of file from the Internet. Such files could contain malware and should not be whitelisted. Trusting the updater rather than the application itself is the correct procedure.
File Sharing Applications: Downloaded files could contain malware so only the application updater mechanism should be trusted, rather than the application itself.
Important: In general, any application that has the capability to add files to the endpoint from the network or Internet is a bad candidate for adding as a Trusted Updater.
Creating a Trusted Updater Policy
A Trusted Updater policy specifies an executable file that is allowed to run on an endpoint. Any executable files added through the trusted executable will also be allowed to run on the endpoint.
Important: Defining an executable file as a Trusted Updater gives a significant capability to that file. Before creating a Trusted Updater policy, make sure you understand the information in Trusted Updater in Practice and its related topics, especially Trusted Updater Security Risks.
You can also create a new Trusted Updater Policy from the Application Library. See Trusting Files from the Application Library.
- Select Manage > Application Control Policies.
- Click the Trusted Change tab.
- Select Create > Trusted Updater.
The Trusted Updater Wizard opens to the Add Application Updaters page.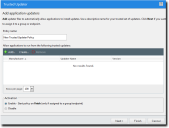
- Type a Policy Name for the new Trusted Updater.
- Click Add.
The Add Updaters dialog is displayed.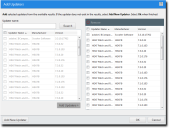
- Search for existing Trusted Updaters using either of the following methods:
- Type a Trusted Updater name in the Updater name field.
Sub-string matching is supported, so you do not have to type the full name. Typing a partial name may result in multiple matches
- Click Search.
- Select one or more Trusted Updaters.
- Click Add Updaters.
The Trusted Updaters are added to the policy. - Click OK.
The Add Updaters dialog closes. - [Optional] Edit the Activation options.
- Click Next.
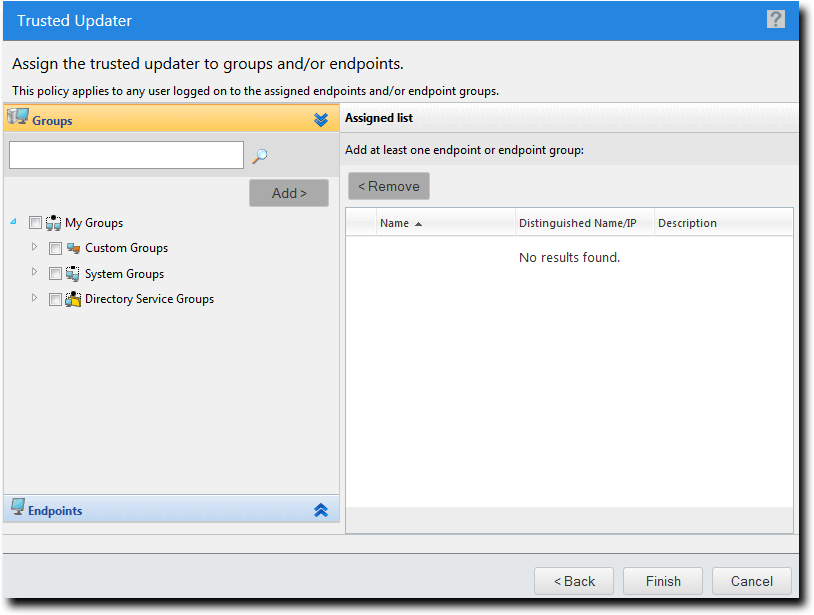
- [Optional] Edit the list of targets (groups or endpoints) for the policy, using any of the following methods:
- Select a group or groups from the Groups list.
- Click Add >.
- Select an endpoint or endpoints from the Endpoints list.
- Click Add >.
- Select a group or groups from the Assigned List.
- Click < Remove.
- Select an endpoint or endpoints from the Assigned List.
- Click < Remove.
- Click Finish.
The Trusted Updater policy is created and assigned to selected groups or endpoints.

Give the policy a descriptive name. For example, if this Trusted Updater policy relates to particular applications used by the graphics department you could name it Graphics Applications.

|
Option |
Steps |
|
|---|---|---|
|
Search for >all Trusted Updaters |
Leave the Updater name field blank and click Search. |
|
|
Search for one or more selected Trusted Updaters |
|
|
One or more Trusted Updaters appears in the results list.
If the list is empty, or you cannot see the updater you want, you will have to add the updater yourself. See Adding a New Trusted Updater for more information.
If you accidentally add an updater, select it and click Remove.
|
Option |
Description |
|---|---|
|
Enable |
The policy will be enabled once it is created, as long as you assign it to a group or endpoint. |
|
Disable |
The policy will be disabled once created, even if it is assigned to a group or endpoint. You can enable it at a later time. |
If you click Finish at this point, the policy will be created but not assigned to any endpoints. You can assign the policy to endpoints at a later time.
The Trusted Updater Wizard opens to the Assign Groups and Endpoints page.
|
Method |
Steps |
|---|---|
|
To add groups of endpoints: |
|
|
To add individual endpoints: |
|
|
To remove groups of endpoints: |
|
|
To remove individual endpoints: |
|
Use the double-arrows (![]()
![]() ) to switch between groups and endpoints.
) to switch between groups and endpoints.
Adding an Existing Trusted Updater
An existing Trusted Updater is added to a policy using the Add Updaters dialog.
This dialog is accessed by clicking the Add button on the Trusted Updater Wizard.
- Search for existing Trusted Updaters using either of the following methods:
- Type a Trusted Updater name in the Updater name field.
Sub-string matching is supported, so you do not have to type the full name. Typing a partial name may result in multiple matches
- Click Search.
- Select one or more Trusted Updaters.
- Click Add Updaters.
The Trusted Updaters are added to the policy. - Click OK.
The Add Updaters dialog closes and you are returned to the Trusted Updater Wizard.
|
Option |
Steps |
|---|---|
|
Search for all Trusted Updaters |
Leave the Updater name field blank and click Search. |
|
Search for one or more selected Trusted Updaters |
|
One or more Trusted Updaters appears in the results list.
If the list is empty, or you cannot see the updater you want, you will have to add the updater yourself. See Adding a New Trusted Updater for more information.
Adding a New Trusted Updater
A new Trusted Updater is added by identifying an executable file and adding it to the list of known updaters. This is done using the Add New Updater dialog.
This dialog can be accessed from different locations.
- If you know that the application file has not yet been defined as a Trusted Updater you can access it directly from the Trusted Updater Wizard.
- If you are on the Add Updaters dialog and you find that the application file has not yet been defined as a Trusted Updater, you can access it from there as well.
- Open the Add New Updater dialog.
- Add a new updater by identifying the appropriate application file. Use one of the following methods:
- Click Browse.
Browsing occurs on the local file system, but you may also browse network devices if you have valid credentials. The text below the Browse button provides useful information for locating updater files.
- In the file upload dialog that opens, select the desired file as a Trusted Updater.
- Click Open.
The filename and path appear in the Application field. - Type an appropriate name for the application in the Updater Name field.
- Click OK.
The application file is added to the list of Trusted Updaters.
|
Context |
Steps |
|---|---|
|
From the Trusted Updater Wizard: |
Click Create. |
|
From the Add Updaters dialog: |
Click Add New Updater. |
The Add New Trusted Updater dialog opens.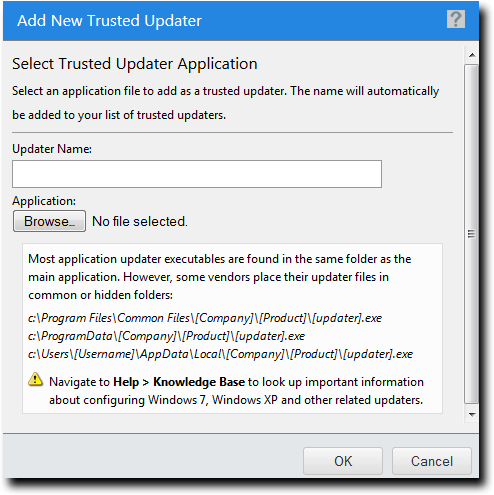
|
Method |
Steps |
|
|---|---|---|
|
Enter the file path and name |
Type the filename and path in the Application field. |
|
|
Browse for the file |
|
|
When you add a new Trusted Updater, the application file is hashed, which means that a unique value is created from it and stored on the server.
Important: You can define very large files (up to 1 GB) as Trusted Updaters. When you add a very large file, however, it may take an appreciable time to upload the file and create its hash.
The application file has been added to the list of Trusted Updaters. The next time you create or edit a Trusted Updater policy, this application will be available from the Add Updaters dialog.
Self-Updating Trusted Updaters
A trusted updater file that updates itself is automatically added to the endpoint’s whitelist. The administrator can then manually update the Trusted Updater policy on the server by adding the updated file.
A trusted updater can add new files or update existing files on an endpoint. It also adds them to the endpoint’s whitelist so that they can run when the endpoint is locked down. The trusted updater itself is on the whitelist.
Many trusted updaters can update themselves by downloading update information from their manufacturer. These are called self-updating trusted updaters. When a trusted updater updates itself, the file itself changes and its corresponding hash value changes too. But when this happens it no longer matches the value stored on the endpoint’s whitelist.
Ivanti Application Control can handle this scenario, however. The updated file is added to the endpoint’s whitelist. It is also added to the endpoint’s version of the Trusted Updater policy that listed the original version of the file.
Although the policy on the endpoint is updated automatically, the administrator must update the Trusted Updater policy on the server manually. For more information on how to do this, see Identifying Self-Updated Trusted Updaters and Adding a Self-Updated Trusted Updater.
Identifying Self-Updated Trusted Updaters
You can identify the trusted updaters that updated themselves on the endpoint and use the information to update the Trusted Updater policy on the server.
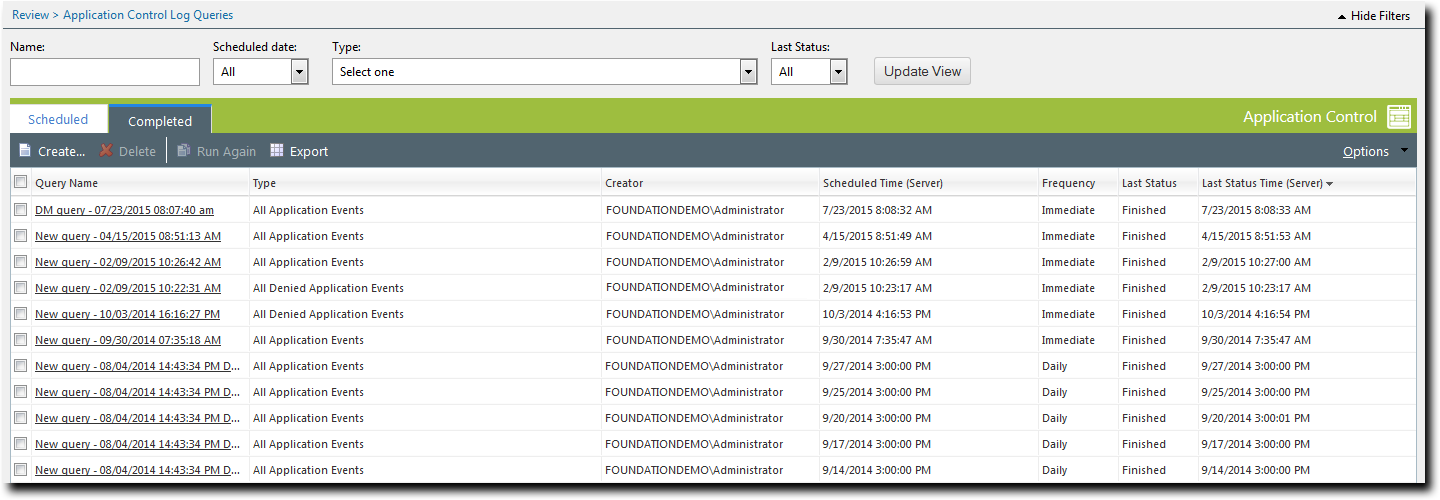
You have run an application event log query to determine if any trusted updaters have updated themselves. For information on how to do this, see Creating an Application Control Log Query.
- Select Review > Application Control Log Queries.
- Click the Completed tab.
The Application Control Log Queries page displays a list of completed queries.
- If necessary, sort the list to find the query you want to view (it will be of type All Updaters Added by Trusted Updater.
- In the Query Name column, click the name of the query.
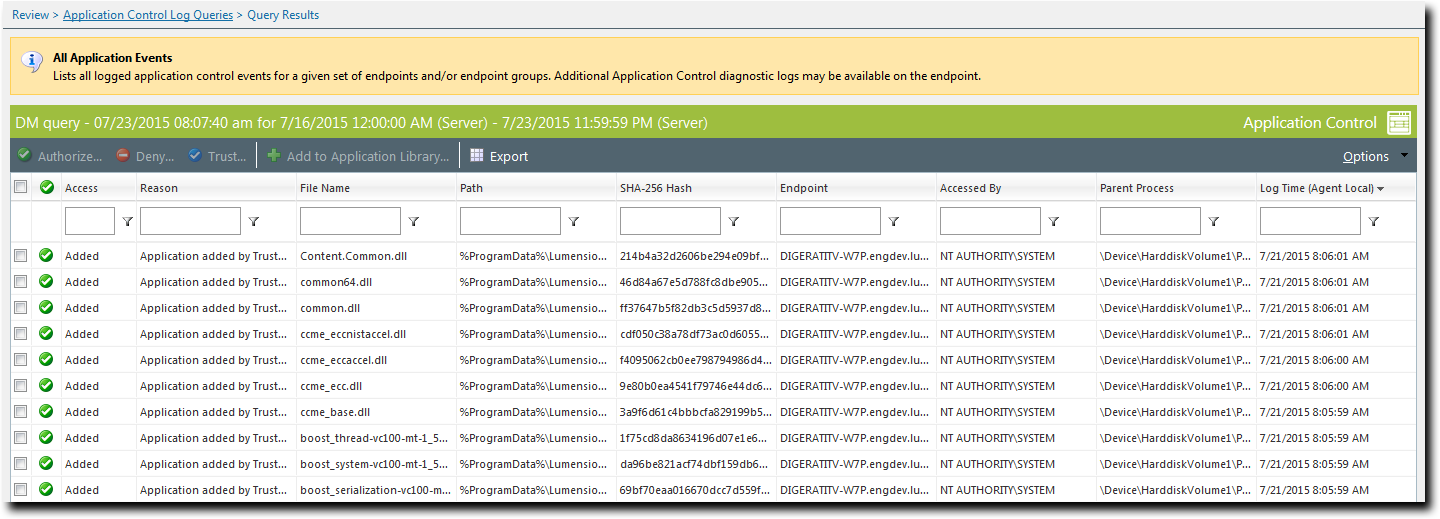
The Query Results page opens, displaying the detailed results.
- Record the information on the updated trusted updaters (file name, path, endpoint and so on).
You can use the trusted updater information to find the Trusted Updater policies on the server that apply to these updated files.
Adding a Self-Updated Trusted Updater
A self-updated trusted updater is added to server policy by identifying the correct executable file and adding it to the list of known updaters. This is done using the Add New Updater dialog.
You have identified one or more trusted updaters that have updated themselves on the endpoint.
- Select Manage > Application Control Policies.
- Click Trusted Change.
A list of Trusted Change policies is displayed. - Select the Trusted Updater policy to be edited (the policy that contains the original trusted updater that has updated itself).
- Click Edit.
The Trusted Updater Wizard opens to the Add Application Updaters page. - Click Create.
The Add New Trusted Updater dialog opens.
- Add the updated trusted updater by identifying the appropriate application file:
- Click Browse. Browsing occurs on the local file system, but you may also browse network devices if you have valid credentials. The text below the Browse button provides useful information for locating updater files.
- In the file upload dialog that opens, select the desired file as a Trusted Updater.
- Click Open. The filename and path appear in the Application field.
- Type an appropriate name for the updated file in the Updater Name field.
- Click OK.
The updated file is added to the list of trusted updaters.
Filter the Policy Name and Policy Type columns to locate the policy. You can only edit one policy at a time.
The selected policy is highlighted.
If the file is very large, it may take an appreciable time to upload it and create its hash.
The self-updated trusted updater file has been added to the list of Trusted Updaters.
Assigning a Trusted Updater Policy
You can select a Trusted Updater policy and assign it to endpoints and/or groups of endpoints.
- Select Manage > Application Control Policies.
- Click the Trusted Change tab.
- Select a Trusted Updater policy.
- Click Assign.
The Trusted Updater dialog is displayed. - Build a list of targets (groups or endpoints) for the policy, using any of the following methods:
- Select a group or groups from the Groups list.
- Click Add >.
- Select an endpoint or endpoints from the Endpoints list.
- Click Add >.
- Select a group or groups from the Assigned List.
- Click < Remove.
- Select an endpoint or endpoints from the Assigned List.
- Click < Remove.
- Click OK.
The Trusted Updater policy is assigned to endpoints and/or groups of endpoints.
Filter the Policy Name and Policy Type columns to locate the policy.
The selected policy is highlighted.
|
Method |
Steps |
|---|---|
|
To add groups of endpoints: |
|
|
To add individual endpoints: |
|
|
To remove groups of endpoints: |
|
|
To remove individual endpoints: |
|
Use the double-arrows (![]()
![]() ) to switch between groups and endpoints.
) to switch between groups and endpoints.
The selected groups and endpoints are displayed in the Assigned List.
Assigning a Trusted Updater Policy to a Group
You can assign a Trusted Updater policy to a selected group of endpoints using the Assign Policy dialog.
The Assign Policy dialog is also used to assign a Trusted Updater policy to a selected endpoint. See Assigning a Trusted Updater Policy to an Endpoint if you are assigning the policy to an endpoint.
- Select Manage > Groups.
The Groups page is displayed. - Select a group from the Browser tree.
- From the View list, select Application Control Policies.
The Application Control policies for the selected group are displayed.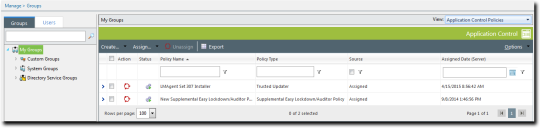
- From the toolbar, select Assign > Trusted Updater.
The Assign Policy dialog is displayed, listing existing Trusted Updater policies. - Select one or more Trusted Updater policies.
- Click OK.
The Trusted Updater policy is assigned to the group.
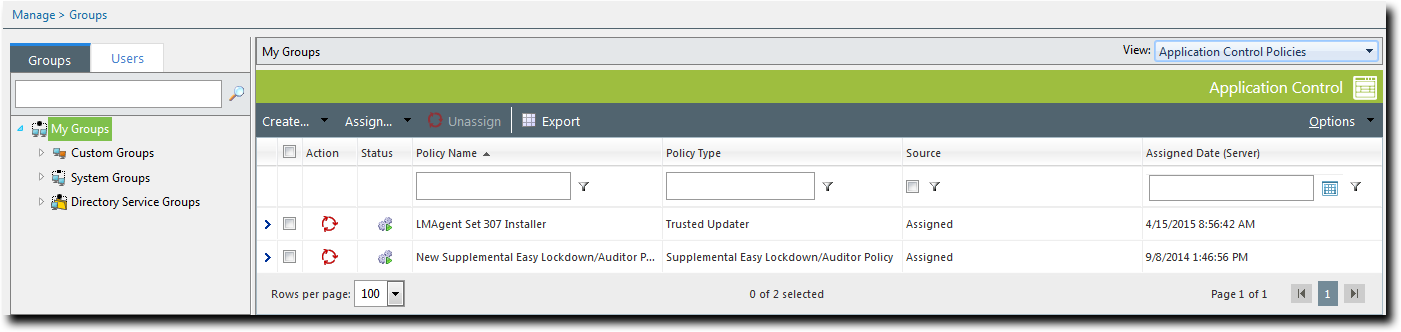
Inherited policies can not be selected. In addition, the Source column reads Inherited.
Assigning a Trusted Updater Policy to an Endpoint
You can assign a Trusted Updater policy to a selected endpoint.
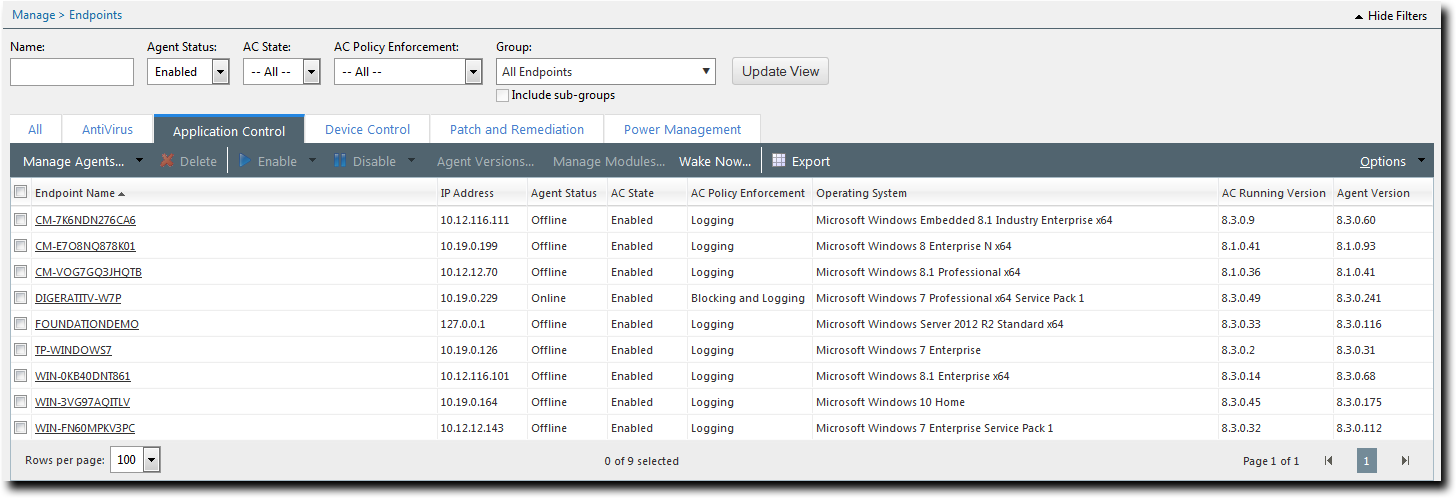
- Select Manage > Endpoints.
The Endpoints page opens to the All tab. - In the Endpoint Name column, click an endpoint link.
Detailed information for the selected endpoint is displayed. - Select the Application Control Policies tab.
A list of Application Control policies assigned to the endpoint is displayed.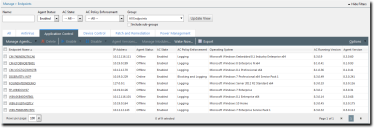
- From the toolbar, select Assign > Trusted Updater.
The Assign Policy dialog is displayed, listing existing Trusted Updater policies. - Select one or more Trusted Updater policies.
- Click OK.
The Trusted Updater policy is assigned to the endpoint.
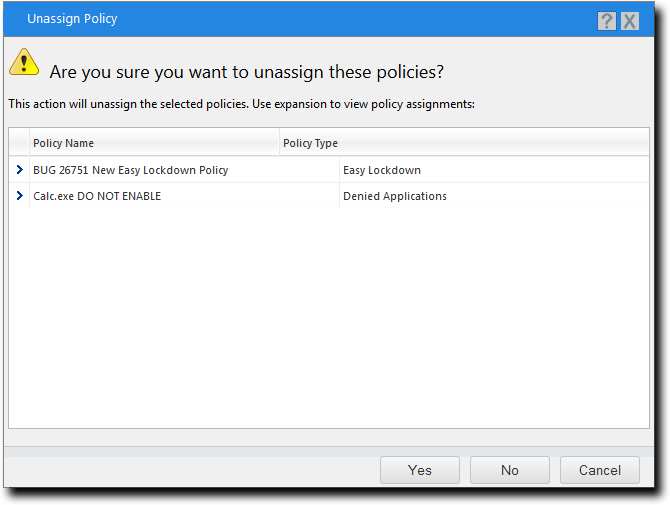
Unassigning a Trusted Updater Policy
You can unassign a Trusted Updater policy, removing the association between it and any endpoints. Policies that are no longer assigned to an endpoint remain in the system as unassigned policies, which you can re-assign to endpoints at a later time.
- Select Manage > Application Control Policies.
- Click the Trusted Change tab.
- Select one or more Trusted Updater policies.
- Click Unassign.
One of two confirmation dialogs is displayed, depending on whether you selected a single policy or multiple policies.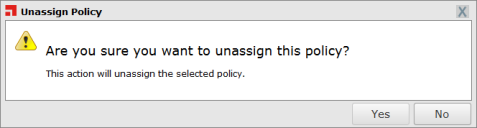
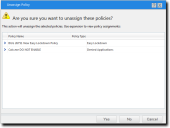
- Click Yes.
One or more Trusted Updater policies are unassigned.
Filter the Policy Name and Policy Type columns to locate the policy.
The selected policies are highlighted.

Note: When a Trusted Updater policy is unassigned, the application can no longer run as a trusted updater. However, it may still be able to run as an application, depending on when the Trusted Updater policy was created:
- If the policy was created before an Easy Lockdown, the application will still be able to run as an application (though not as a trusted updater). In this case, if you want to block the application from running, you must apply a Denied Applications policy to it.
- If the policy was created after an Easy Lockdown, the application will no longer be able to run in any capacity.
Editing a Trusted Updater Policy
You can edit a Trusted Updater policy and, for example, add or remove trusted updaters or change the endpoints to which the policy is assigned.
If both Patch and Remediation and Application Control modules are installed, an PR Trusted Updater System Policy is automatically created. Although you can select this policy and click Edit, you cannot change any of the policy's options or settings. See Working with Trusted Updater for more information.
- Select Manage > Application Control Policies.
- Click the Trusted Change tab.
- Select the Trusted Updater policy to be edited.
- Click Edit.
The Trusted Updater Wizard opens to the Add Application Updaters page. - [Optional] Edit the Policy Name.
- [Optional] Add a Trusted Updater to the policy using one of the following options:
- Click Add to open the Add Trusted Updater dialog.
- Select a Trusted Updater from the Trusted Updaters drop- down list.
- Click OK.
- Click Add to open the Add Trusted Updater dialog.
- Click Add New Trusted Updater to open the Add New Trusted Updater dialog.
- In the Add New Trusted Updater dialog, type a name in the
Updater Name field.
- Click Browse.
- Locate the updater .exe and click Open.
- Click OK.
- Click OK.
- [Optional] Remove a Trusted Updater from the policy:
- Select a Trusted Updater.
- Click Remove.
The Remove Trusted Updater dialog is displayed. - Click Yes.
- [Optional] Edit the Activation options.
- Click Next.
The Trusted Updater Wizard opens to the Assign Groups and Endpoints page. - [Optional] Edit the list of targets (groups or endpoints) for the policy, using any of the following methods:
- Select a group or groups from the Groups list.
- Click Add >.
- Select an endpoint or endpoints from the Endpoints list.
- Click Add >.
- Select a group or groups from the Assigned List.
- Click < Remove.
- Select an endpoint or endpoints from the Assigned List.
- Click < Remove.
- Click Finish.
The Trusted Updater policy is edited.
Filter the Policy Name and Policy Type columns to locate the policy. You can only edit one policy at a time.
The selected policy is highlighted.
|
Option |
Steps |
|---|---|
|
Add an existing Trusted Updater |
|
|
Add a new Trusted Updater |
|
When you add a new Trusted Updater, the application file is hashed, which means that a unique value is created from it and stored on the server.
Important: You can define very large files (up to 1 GB) as Trusted Updaters. When you add a very large file, however, it may take an appreciable time to upload the file and create its hash.
One or more Trusted Updaters appears in the results list.
If the list is empty, or you cannot see the updater you want, you will have to add the updater yourself. See Adding a New Trusted Updater for more information.
When a Trusted Updater is removed from the policy, any running processes associated with that updater lose their trusted status when the policy is applied.
The Remove Trusted Updater dialog is closed.
|
Option |
Description |
|---|---|
|
Enable |
The policy will be enabled once it is created, as long as you assign it to a group or endpoint. |
|
Disable |
The policy will be disabled once created, even if it is assigned to a group or endpoint. You can enable it at a later time. |
|
Method |
Steps |
|---|---|
|
To add groups of endpoints: |
|
|
To add individual endpoints: |
|
|
To remove groups of endpoints: |
|
|
To remove individual endpoints: |
|
Use the double-arrows (![]()
![]() ) to switch between groups and endpoints.
) to switch between groups and endpoints.
Disabling a Trusted Updater Policy
You can disable policies without deleting them. The details of the policies are retained and you can enable the policies at a later time.
- Select Manage > Application Control Policies.
- Click the Trusted Change tab.
- Select the enabled Trusted Updater policies that you want to disable.
- Click Disable.
The selected Trusted Updater policies are disabled.
Filter the Policy Name and Policy Type columns to locate the policy/policies.
The selected policies are highlighted.
Enabling a Trusted Updater Policy
You can enable policies that are currently disabled.
- Select Manage > Application Control Policies.
- Click the Trusted Change tab.
- Select the disabled Trusted Updater policy or policies that you want to enable.
- Click Enable.
The selected Trusted Updater policies are enabled.
Filter the Policy Name and Policy Type columns to locate the policy.
The selected policies are highlighted.
Deleting a Trusted Updater Policy
You can delete a Trusted Updater policy, as long as it is not assigned to an endpoint.
- Select Manage > Application Control Policies.
- Click the Trusted Change tab.
- Select the Trusted Updater policy you want to delete, ensuring it is not assigned to an endpoint (Assigned column value of Not Assigned).
- Click Delete.
A confirmation dialog is displayed. - Click Yes.
The Trusted Updater policy is deleted.
Filter the Policy Name and Policy Type columns to locate the policy.
The selected policy is highlighted.
If the policy is currently in use, a message is displayed telling you that the policy can not be deleted until it has been unassigned.
Exporting Trusted Updater Policies
You can export a list of policies to a CSV (Comma Separated Value) file. To export data, refer to Exporting Data.
The list of policies is saved as a CSV file with the following columns:
|
Name |
Description |
|---|---|
|
Status |
Enabled or Disabled |
|
Policy Name |
The name of the policy |
|
Assigned |
Assigned/Not Assigned (if assigned, export includes the groups and endpoints that the policy is assigned to) |
|
Policy Type |
The type of policy (Easy Lockdown, Trusted Updater, and so on) |
|
Last Updated Date (Server) |
The date and time (on the server) that the policy was last changed |