Using the License Manager
About the License Manager
Use the License Manager to track your license usage.
For the Demonstration or Proof-of-Concept Deployment and Minimum Production Deployment , the License Manager is installed on the Neurons for ITSM server along with the other Neurons for ITSM components.
For the Enterprise Production Deployment, the License Manager is installed on the Neurons for ITSM processing servers along with the other Neurons for ITSM components.
During installation, the System Configuration Wizard enabled you to import one production license, one non-production license, or both, depending on your landscape environment. You can import additional licenses, if needed. See Importing Licenses.
Types of Licenses
Neurons for ITSM mainly uses production and non-production licenses:
| License Type | Description | Expiration |
|---|---|---|
| Production | Used to access the production landscape of a tenant. | Does not expire unless the MAC address is unspecified. In that instance, the license expires after 30 days. If you move the license to a new server with a different MAC address, then you must acquire a new license tied to the new MAC address. |
| Development | A non-production license used to access the staging and UAT landscapes. | Expires according to the maintenance agreement between your organization and Neurons for ITSM. |
| Not For Resale | A non-production license, mainly used by Ivanti Service Manager partners. It can also be used for staging, UAT, or testing if you already have development licenses. | Expires after 30 days if you do not specify the MAC address. After you set the MAC address, it expires according to the maintenance agreement between your organization and Neurons for ITSM. |
| Evaluation | A non-production license used by potential customers. Has the maximum number of named and concurrent user licenses. | Expires after 30 days. Is not associated with a MAC address. |
There are two types of user licenses, for both production and non-production licenses:
•Concurrent licenses: For any user who is currently logged into the system. This is a shared pool of licenses. The concurrent license that is used is specified by the bundle that is specified for each role.
•Named user licenses: Specific to a certain user. The user can log in to the system from many places at one time and it is counted as only one license. You specify which users are named users in the employee record, and you can change which employees get a named user license at any time.
About License Bundles
•List of License Bundles and Components
•Assigning a Bundled License to a Role
•License Tracking in Neurons for ITSM
Neurons for ITSM has defined several license bundles, which are sets of modules, or user interfaces. Each role is associated with a license bundle.
List of License Bundles and Components
| License Bundle | Components |
|---|---|
| Help Desk |
•Dashboards and Reporting •Incident Management •Knowledge Management •Mobile •Self Service •Service Catalog •Survey •Voice Automation (optional add-on) •Workflow Automation |
| Service Desk |
•Dashboards and Reporting •Incident Management •Knowledge Management •Mobile •Self Service •Service Catalog •Survey •Voice Automation (optional add-on) •Workflow Automation •Change Management •CMDB •Configuration Management •Problem Management •Service Level Management |
| Service Management |
•Dashboards and Reporting •Incident Management •Knowledge Management •Mobile •Self Service •Service Catalog •Survey •Voice Automation (optional add-on) •Workflow Automation •Change Management •CMDB •Configuration Management •Problem Management •Service Level Management •Availability Management •Event Management •Financial Management •Portfolio and Project Management •Release Management |
The following are considered license add-on modules:
| Add-on Module | Components |
|---|---|
| Discovery | Discovery |
| Voice | Voice |
| Mobile | Mobile |
Assigning a Bundled License to a Role
To assign a bundled license to a role, follow the procedure in the "Assigning a Bundled License to a Role" topic in the Neurons for ITSM online help. By default, roles do not have a license bundle associated with them, so you must assign a license bundle to each role manually. If you do not, you may get license violation errors logged in your system even though you have the correct licenses.
If you have imported licenses but do not see the correct license bundles displayed in the Configuration Console, clear the validation cache.
Go to Configure > Cache Management and then click Reset cached validation lists only.
See the Neurons for ITSM online help for more information.
License Tracking in Neurons for ITSM
You cannot use Neurons for ITSM unless you have a license. When you purchased Neurons for ITSM, you also purchased a set number of licenses. If needed, you can purchase additional licenses.
If you consume more seats than you have licenses for, the system does not log you out. It does, however, log an event into a log file. For example, if you have 10 concurrent licenses and try to log in 11 times, the system allows it.
Due to the way that web browsers work, it is very possible for one user to consume more than one license. For example, if a user logs in to Neurons for ITSM using Microsoft Internet Explorer and then opens Google Chrome and logs in again, another license is consumed. If this happens, the system logs a license violation error that you can view in the License Manager in the System Audit Information workspace.
Using the License Manager
•Logging Into the License Manager
•Configuring Landscape Information
•Viewing the Discovery Node Count
•Configuring the Email Address for Notifications
•Configuring the SMTP Settings
Logging Into the License Manager
The License Manager uses the same credentials that are used to access the configuration database.
To log into the License Manager, follow these steps:
1.In the Start menu, click the down arrow to see the Apps menu, and then click License Server.
2.Select a landscape.
3.Enter your user ID and password. This is the same user ID and password that you use for the configuration database.
4.Click Continue.
Configuring Landscape Information
You can create, edit, and delete information about the landscapes to which the License Manager is associated.
1.Log into the License Manager.
2.Click either Configure Landscapes in the top right corner of the login page or click Configure Landscape Information from any page in the License Manager. The system opens a new browser window and displays the Enter Landscape Information page.
Enter Landscape Information Page
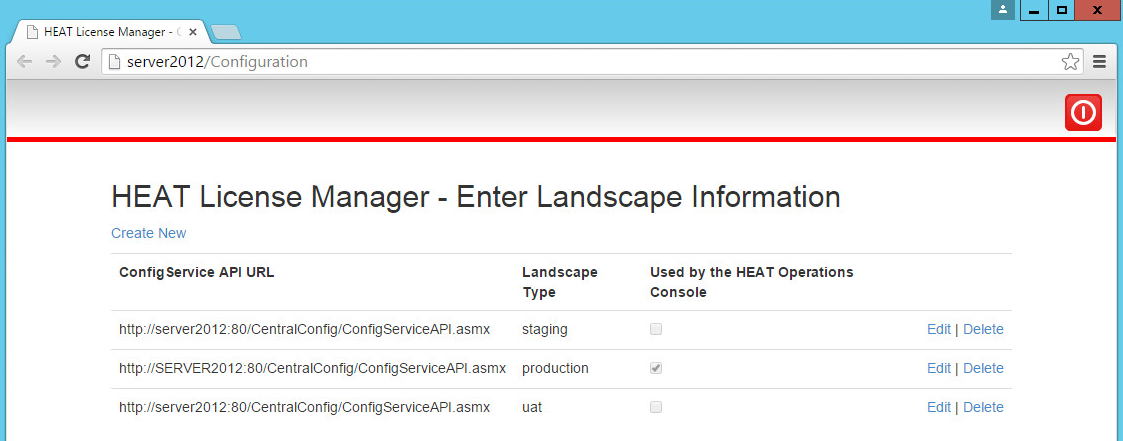
3.To allow the Operations Console to use this landscape, check Used by the Operations Console on the line associated with the landscape.
The Operations Console can only use one landscape at a time.
4.To edit the information for an existing landscape, do the following:
| a. | Click Edit on the line associated with the landscape. The system displays the Edit Landscape page. |
| b. | Make changes as needed. |
| c. | Click Save. |
5.To delete the landscape information, do the following:
| a. | Click Delete on the line associated with the landscape. |
| b. | Click Delete at the confirmation message. |
6.When you configured Neurons for ITSM using the System Configuration Wizard, the system automatically created a link to the landscape.
Therefore, in general, you do not need to add a link to a landscape. However, if you do need to add a new link to a landscape, follow these steps:
| a. | Click Create New. The system displays the Create Landscape page. |
| b. | In the ConfigService API URL field, enter the URL of the configuration server. |
| c. | Check Used by the Operations Console if the system should use this link to connect with the Operations Console. The Operations Console can only connect to one landscape. |
| d. | Click Load Landscape Types and then select a landscape from the drop-down list. |
| e. | Click Create. |
Importing Licenses
When you initially configured the License Manager in the System Configuration Wizard, you imported either one production license file, one non-production license file, or both. (See Configuring Neurons for ITSM .)
If your deployment has multiple License Managers, when you import a license, ensure that you are importing it on the server that has the same MAC address as the license file.
For example, say you installed License Managers on the following:
•Application Server 1 with a MAC address of AA:10:23:10:00
•Application Server 2 with a MAC address of BB:10:23:10:00
Then you ask for and receive a production license for MAC address AA:10:23:10:00. You import the license from the License Manager that is installed on Application Server 1. After you have imported the license, the License Managers on both Neurons for ITSM application servers respect the license. You do not need a second license for the second Application Server.
To import additional license files, follow these steps:
1.Log into the License Manager.
2.Click Licensing > Import License Files. The system displays the Licensing - Import License Files page.
Import License Files Page
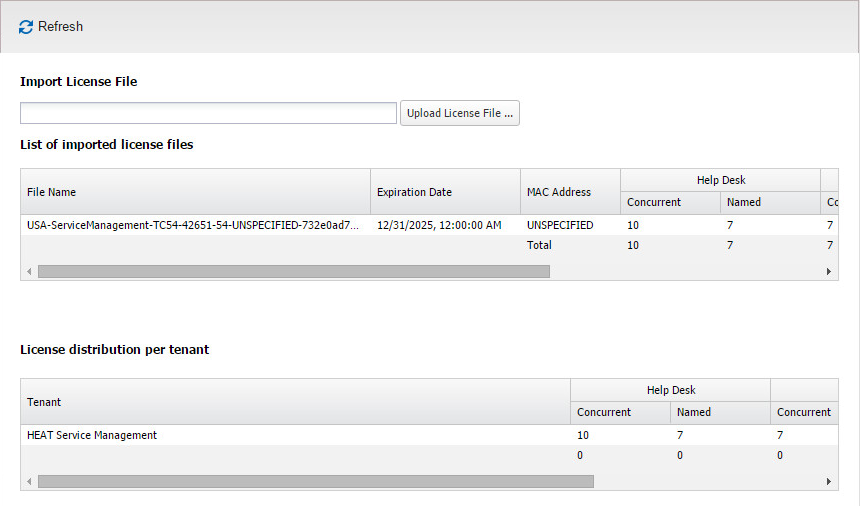
3.Click Upload License File....
4.Navigate to and select a license file and click Open.
The system adds the license to the system. This page shows the following information:
| Field | Description |
|---|---|
| File Name | The name of the license file that you uploaded. |
| Expiration Date | The expiration date of the license file. |
| MAC Address | The MAC address associated with the license file. |
| Self Service | Self Service is the bundle name. The number of Self Service licenses contained in the license file. Broken into concurrent and named licenses. |
| Service Catalog | Service Catalog is the bundle name. The number of Service Catalog licenses contained in the license file. Broken into concurrent and named licenses. |
| Service Management | Service Management is the bundle name. The number of Service Management licenses contained in the license file. Broken into concurrent and named licenses. |
5.Click the delete icon to remove the license file and its associated licenses from the License Manager.
6.Click the show details icon ![]() to display the details. The details contain the following information:
to display the details. The details contain the following information:
| Field | Description |
|---|---|
| Bundle | The name of the bundle. |
| Name | The name of the module. |
| Named Licenses | The number of named licenses contained in the license file. |
| Concurrent Licenses | The number of concurrent licenses contained in the license file. |
| Expiration Date | The date when the license expires. |
If your deployment only has one tenant, the information displayed here is the same as in the List of imported license files section.
If your deployment has more than one tenant, this table displays the license distribution across the tenants.
| Field | Description |
|---|---|
| Tenant | The name of the tenant. |
| Self Service | The number of Self Service licenses allocated per tenant. Broken into concurrent and named licenses. |
| Service Catalog | The number of Service Catalog licenses allocated per tenant. Broken into concurrent and named licenses. |
| Service Management | The number of Service Management licenses allocated per tenant. Broken into concurrent and named licenses. |
7.To distribute licenses among multiple tenants, click in a cell and change the number of licenses to allocate to a tenant. The total number of licenses across the tenants cannot exceed the total number of licenses. See Allocating Licenses Across Tenants.

Viewing the Discovery Node Count
This information tracks the trend associated with the Discovery licenses and is based on the Discovery Count scheduled job.
1.Log in to the License Manager.
2.Click Licensing > Discovery. The system displays the Licensing - Discovery page.
This page shows the following information:
| Field | Description |
|---|---|
| Tenant Name | The name of the tenant. |
| Last Scan Date | The date and time when the job was run. |
| Nodes Count | The number of configuration items found during the job. |
Viewing the Active Licenses
This page displays the active sessions on Neurons for ITSM. It does not show active sessions on the configuration database.
1.Log in to the License Manager.
2.Click Licensing > Active Licenses. The system displays the Licensing - Active Licenses page.
Active Licenses Page
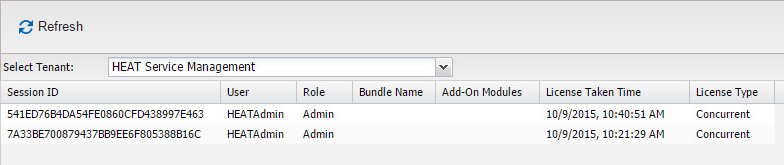
3.Select a tenant from the drop-down list. This page shows the following information:
| Field | Description |
|---|---|
| Session ID | The session ID associated with the logged-in user. |
| User | The user name of a logged-in user. |
| Role | The role with which the user is logged in. |
| Bundle Name | The bundle associated with the license associated with the user. See About License Bundles. |
| Add-On Modules | Any add-on modules associated with the bundle. See About License Bundles. |
| License Taken Time | The time when the system used the license. |
| License Type | The license type. Can be named or concurrent. |
Configuring the Email Address for Notifications
1.Log in to the License Manager.
2.Click Configuration > Email Address. The system displays the Configuration - Email Address page.
Email Address Page
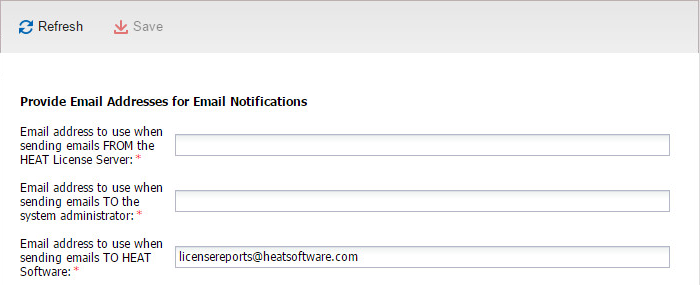
3.Enter the following information:
| Field | Description |
|---|---|
| Email address to use when sending emails from the License Server |
The email address to use as the FROM email address for emails sent from the License Manager. |
| Email address to use when sending emails to Ivanti Software |
The email address to use as the TO email address for emails sent from the License Manager to Ivanti Software. The system sends license usage information based on the License Violation Notification to Frs scheduled job. |
| Email address to use when sending emails to the system administrator |
The email address to use as the TO email address for emails sent from the License Manager to the system administrator of your organization. The system sends license usage information based on the License Violation Notification to Admin scheduled job. |
4.Click Save.
Configuring the SMTP Settings
Use this page to view and edit the SMTP settings used to send emails. The information on this page comes from the System Configuration Wizard.
1.Log into the License Manager.
2.Click Configuration > SMTP Setting. The system displays the Configuration - SMTP Setting page.
SMTP Setting Page
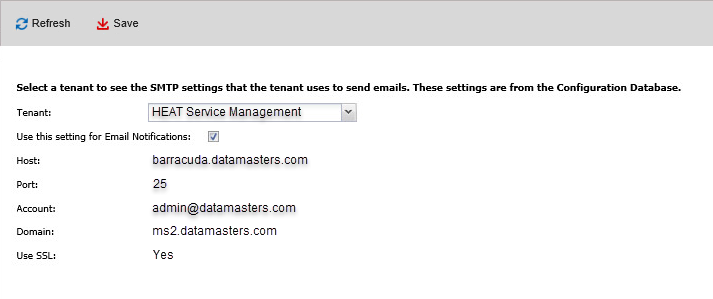
The system displays the following information:
| Field | Description |
|---|---|
| Host | The email server host. |
| Port | The port associated with the email server. |
| Account | The account associated with this tenant. This is the same as the value in the Username field on the Email Configuration workspace in the Service Desk Console. |
| Domain | The domain associated with the account. |
| Use SSL | Specifies if this account should use SSL. |
3.Select a tenant from the Tenant drop-down list.
4.Check Use this setting for Email Notifications to use these SMTP settings for emails.
5.Click Save.
Working with Scheduled Jobs
The License Manager has several predefined scheduled jobs. These are used to send information to the administrator on a regular basis instead of sending an email every single time there is an event. All violations are listed on the System Audit Information page.
The following are the predefined scheduled jobs that cannot be changed:
•License Capacity Allocation Notification Job: Determines if your licenses are valid and that you actually have the licenses that you are allocating.
•Named License Violation: Determines if you have more users listed as named users than you have named user licenses.
•Data Integrity Verification: Determines if the licenses have been modified.
•Discovery Count: Determines if the licenses for your configuration items are valid.
The following are the predefined scheduled jobs that you can edit:
•License Violation Notification to FRS: Sends an email to Ivanti Software with information about license violations. By default, this job is disabled.
•License Violation Notification to Admin: Sends an email to your system administrator with information about license violations.
1.Log in to the License Manager.
2.Click System Jobs. The system displays the System Jobs - Scheduled Jobs page.
Scheduled Jobs Page
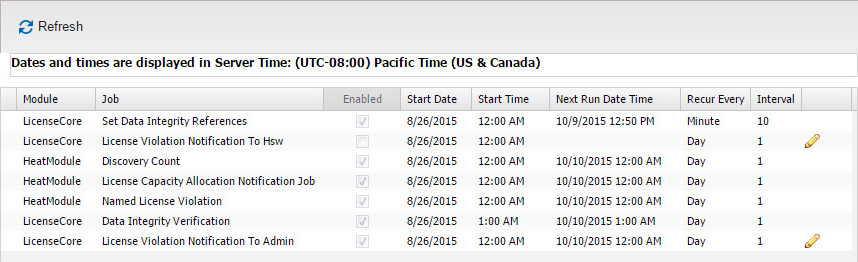
This page contains the following information:
| Field | Description |
|---|---|
| Module | The name of the module. Can be either LicenseCore or HeatModule. |
| Job |
The name of the job. |
| Enabled | Specifies if the scheduled job is enabled. |
| Start Date | The start date of this scheduled job. |
| Start Time | The start time of this scheduled job. |
| Next Run Date and Time | The next date and time when the scheduled job runs. |
| Recur Every | The time period for the recurrence. Can be day, hour, or minute. |
| Interval | The interval for the recurrence. |
For each entry, the system displays additional information at the bottom of the page:
| Field | Description |
|---|---|
| Module | The name of the module. Can be either LicenseCore or HeatModule. |
| Job |
The name of the job. |
| Run Time | The date and time when the scheduled job was run. |
| Details | Details of the job. If the job is not successful, contains detailed information. |
3.To see the job details in a larger format, click the show details icon at the end of the row.
4.You can edit the details associated with the License Violation Notification To Frs and the License Violation Notification to Admin scheduled jobs.
To edit a scheduled job, do the following:
| a. | Click the Edit icon at the end of the row. The system displays a dialog box. |
| b. | Enter or change any of the following information: |
| Field | Description |
|---|---|
| Job | The name of the scheduled job. You cannot change this name. |
| Description | A description of the scheduled job. |
| Start Date | The start date and time. |
| Enabled | Specifies if the scheduled job is enabled. |
| Next Run Date Time | The next date and time when the scheduled job runs. |
| Recur Every | Specifies the recurrence for this job. |
5.Click Save.
Viewing Reports
You can view two types of reports in the License Manager:
•System audit information
•Logs
Follow these steps to view the reports.
1.Log in to the License Manager.
2.Click Reports.
3.To view the system audit information, click System Audit Information. The system displays the Reports - System Audit Information page. See System Audit Information Page. Examples of the information on this page include license upgrades and license violations.
We recommend that you review the information on this page if you have any problems and then review the information on the Log page. See Log Page .
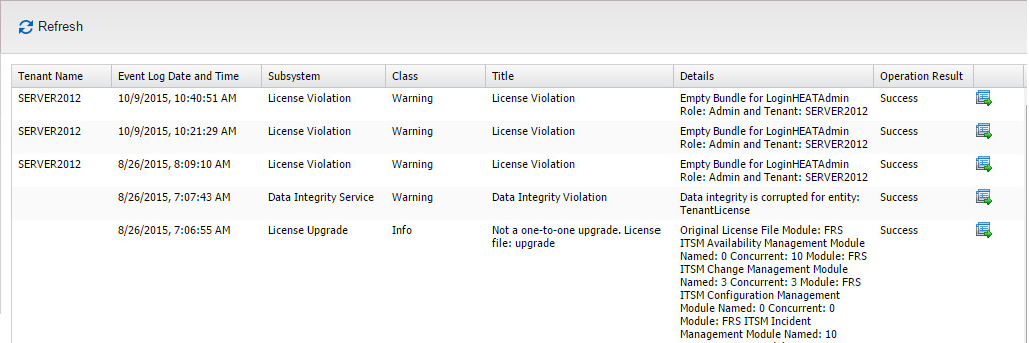
This page contains the following information:
| Field | Description |
|---|---|
| Tenant Name | The name of the tenant. |
| Event Log Date and Time | The date and time of the log event. |
| Subsystem | The specific area. Can be license violation, license upgrade, or data integrity service. |
| Class | The type of information. Can be warning, info, debug, fatal, or error. |
| Title | A short description of the event. |
| Details | A longer description of the event. |
| Operation Result | The result of the operation. Can be success or failure. |
If you cannot see all of the columns, resize the columns that you can see so that the remaining columns are displayed.
4.Click the show details icon at the end of the row to see the details. If you cannot see the Show Details icon, resize the columns until it is displayed.
5.To view log information, click Log. The system displays the Reports - Log page. Use this information for troubleshooting.
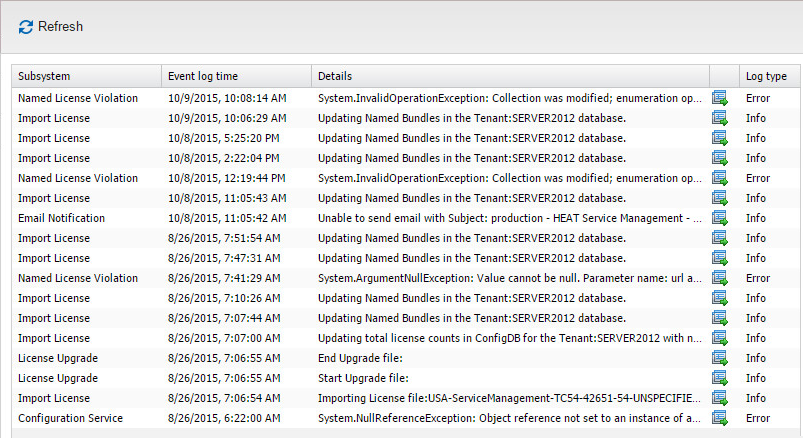
This page contains the following information:
| Field | Description |
|---|---|
| Subsystem | The name of the subsystem. Can be email notification, import license, license upgrade, named license violation, or configuration service. |
| Event Log Time | The time and date of this log event. |
| Details | Information about this log event. |
| Log Type | The type of log. Can be info, error, or warning. |
6.To see the log details in a larger format, click the show details icon  at the end of the row.