Viewing Power Status Scan Results
Power status scan results are available immediately following a successful scan by clicking the View results link on the Operations Monitor dialog (see Performing a Power Status Scan). The scan results are also available when you select a scan from the Results pane.
TIP: Another option for viewing results is to generate a Power Status report.
You use the Power Status column to determine the current power state of the scanned machines. Machines will be categorized as either offline or online. The summary table contains a number of other columns that uniquely identify each machine. You can click on a column heading to sort the table by that information. You can also specify what information is presented by right-clicking the table heading and using Column Chooser to add or clear items.
Finally, you can right-click one or more machines and perform the following actions:
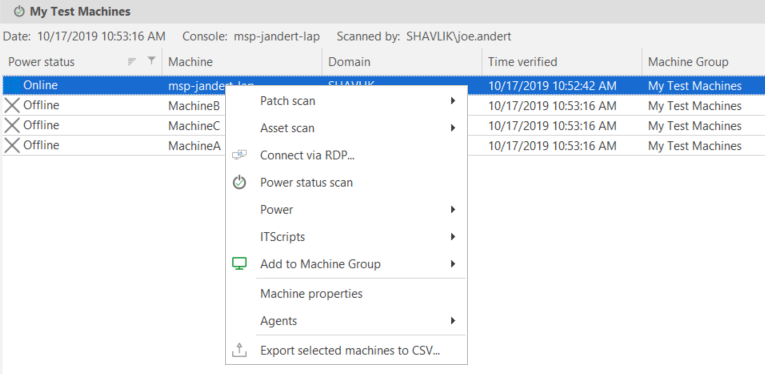
|
Field |
Description |
|---|---|
|
Patch Scan |
Enables you to initiate a patch scan of the selected machines using any of the available patch scan templates. |
|
Asset Scan |
Enables you to initiate an asset scan of the selected machines using any of the available asset scan templates. |
|
Connect via RDP |
Enables you to make a Remote Desktop connection to the selected machine. See How to Initiate a Remote Desktop Connection for more details. |
|
Power status scan |
Enables you to perform a power status scan on the selected machines. |
|
Power |
Enables you to modify the power state of the selected machines. |
|
ITScripts |
Enables you to either open a Windows PowerShell™ prompt or select and execute an approved script. See How to Execute a Script for details. |
|
Add to Machine Group |
Enables you to add the selected machines to a new machine group or to an existing machine group. See Creating A New Machine Group for more information. IMPORTANT! Machines you add to the machine group are automatically assigned the associated machine credentials. (Hosted virtual machines are the exception, they are assigned the last known machine group credentials.) If no machine credentials are available, no credentials will be assigned and the default credentials will be used in any subsequent scans. If the default credentials are not valid for the machines, and if the account credentials of the person currently logged on to the program are also not valid for the machines, scans of the machines you just added to the group will fail. To prevent scanning errors, always supply credentials for machines you add to a machine group. See Supplying Credentials for more information. |
|
Machine Properties |
Enables you to view and edit machine properties. See Managing Individual Machine Properties for more information. |
|
Agents |
Enables you to:
|
|
Export selected machines to CSV |
Export information about the selected machines to a Comma Separated Values (CSV) file. The CSV file can then be used within a spreadsheet program. |