Business units
Now that we have users of the system and we can log in, let's take a look at business units. Although it's not absolutely necessary for us to look at business units at this point, it will give us an opportunity to become more familiar with some other features of License Optimizer, and will also help us to get some value out of the system more quickly.
We don't recommend that you try to create an estimated license position for all vendors and for your entire organization immediately. It is much better to target a specific vendor and a specific area of your business first. Business units enable you to target your investigations to specific areas of your business. By targeting a specific business unit and a specific vendor, you can get some useful information more quickly, and learn how to use License Optimizer without swamping yourself in a huge amount of data.
The most successful users of License Optimizer have used the system to gain an understanding of their license position, rather than using it just to give them an answer to a closed question. The insights into your license position that License Optimizer can give you are potentially more useful than answers themselves. At every point, try to think about what the information you are being given means to your organization.
Importing business units
The easiest way of adding business units to your system is to create a spreadsheet of your business unit structure and to import that. This will also introduce us to the data import functionality of License Optimizer.
You can define a business unit structure in the spreadsheet that you import by adding a value for the Parent Business Unit for each row. You can download the spreadsheet that is used in the procedure below and which is similar to that used in the video above (but with an additional company above the UK and US countries) using this link:
Download the CSV
This spreadsheet contains a deliberate mistake that we will fix later. Have a look at the spreadsheet and see if you can identify the problem and work out what you think will be the result of the mistake.
To create the new business units data source:
1.On the menu bar, expand Data Management, then click Data Import.
The Data Import page appears.
2.Under Import Types, click the Organisational Data tile.
The Organisational Data Sources page appears, which enables you to import either business units or locations. The page shows a data grid of existing data sources that you have set up.

You can see previous imports for each data source by clicking  . Clicking
 ![]() enables you to edit or delete a data source, or download any relevant log or exception files that are available. You can also download a template spreadsheet with the appropriate columns from this menu.
enables you to edit or delete a data source, or download any relevant log or exception files that are available. You can also download a template spreadsheet with the appropriate columns from this menu.
3.Click New Organisational Data.
The Create New Organisational Data Import page appears.
4.In the Import Name box, type a name for the data source.
This is the name that will appear in your list of data sources.
5.In the Organisational Data Type list, select Business Unit List.
The Select your sources section appears. For business units only one option, Business Unit List, is available in this section. For other import types there are more options.
After you have selected the type, a Download Template link appears, which enables you to download an appropriate template spreadsheet. In our example, however, we are going to use the CSV from earlier on this page.
6.Select the Business Unit List check box, then click Save.
The new data source is saved and the Choose data sources page appears. This is the page where you select the file containing your data and upload it to the License Optimizer server for processing.
Now that we have created the data source, we need to upload the spreadsheet containing the business unit structure to the server.
To configure the data source:
1.On the Choose data sources page, click Select, then browse to and open your spreadsheet.
The file appears in the Select file field.

2.Click Upload.
The file is uploaded to the License Optimizer server.
3.Click Next.
The Map Business Unit List page appears, where you can map columns from your spreadsheet to columns in the License Optimizer database. However, because our spreadsheet has column titles that match their corresponding column names in the database, the mappings are automatically created for us.
If you click Preview Data, a new window opens showing you what data will be imported.
4.Click Next.
The Settings page appears.
5.In the Import Method drop-down, select Merge.
For this import type, Merge is the only option.
6.Click Save & Test Import.
The configuration is saved and validated, then the Test Import page appears, reporting that the import files have been validated OK.
Now that we have configured our data source, we can test it, and queue a data import. The test mode completes all the operations of the real import apart from the actual import into the database – unless you select the Commit check box. If you are importing a large amount of inventory information, it is much better to queue an import so that you can continue using the system while the import happens. For this small import of a limited number of business units we can risk committing our test import.
To import the data:
1.On the Test Import page, select the Commit check box, then click Run Test.
The import is tested and its results committed to the database. The Test Import page updates to show the results of the test import. Initially. the import log appears but we can use the drop-down above the data grid to show the imported data.
2.In the drop-down above the data grid, choose ImportBusinessUnit.
The data grid updates to show the business units that you have imported.
3.Click Close.
The Test Import page closes, and the Organisational Data Sources page appears, showing your new data source.
4.Click to view the details of your data import, including the log files.
Viewing the business units
Now that we have imported our business units, we can look at them in License Optimizer. Remember that the spreadsheet we used had a mistake in it. We will fix that now.
To view the business units:
1.On the menu bar, under Estate Management, click Business Units.
The Business Units page appears.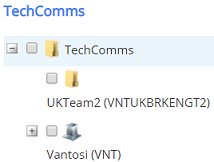
We can see the mistake. The final row in the spreadsheet, which contained UKTeam2, didn't include an entry in the Parent Business Unit column. It should have said Engineering_BRK. As a result, it has appeared at the top level of the business unit structure, and not under Engineering_BRK.
2.See if you can fix this problem. There are several options. The quickest way is to expand the tree and drag UKTeam2 to the Engineering_BRK branch:
...but this leaves your original data source wrong. You could delete the business units you have imported, fix your spreadsheet, upload the new version, and import it again. Or you could just fix, upload, and re-import your spreadsheet – if you choose this option, you'll need to delete the instance of UKTeam2 at the top of the tree structure.
Notice that the business unit names have a string of characters in brackets after their name. This is the unique business unit Code that was imported with the business units. We recommend adding a Code for each business unit, because it enables you to map OSIs to business units more easily by importing these mappings from a spreadsheet. We will learn about this in Hardware.
What next?
Now that we've dealt with a lot of the initial housekeeping and become a little familiar with how things work, let's make a start on getting our inventory data into the system: Inventory.
More information
•Business units – learn more about business units
•Importing data – learn more about additional features of Data Import