Integrating with Ivanti Identity Broker
You have the option of integrating Xtraction with the Ivanti Identity Broker web application that is part of the Ivanti Identity Director installer.
Integrating with Identity Broker enables you to tie your Xtraction user accounts to the corresponding user accounts of an external system (known as an identity provider). Identity Broker acts as a "broker" to process authentication requests between Xtraction and a configured identity provider using the standard OpenID Connect protocol. For Xtraction, supported identity providers are:
•Microsoft Entra ID, using your Azure Active Directory (includes Microsoft 365)
•Okta, using your Okta instance
You do not need to own Identity Director in order to use the Identity Broker web application. You can install just Identity Broker and still be within license compliance.
Integration with Identity Broker works only with Xtraction 2022.3 or higher.
This authentication method is being deprecated, because native authentication using Okta and Entra ID is available as of Xtraction 2023.2. For details, see Authenticating with Microsoft Entra ID or Okta.
Getting started
This topic guides you through the process of integrating Xtraction with Identity Broker. It assumes that:
•You've already set up Identity Broker, which is part of the installer for Identity Director 2020.0 and higher. For details, see the Identity Broker topic Install the Identity Broker.
•You're currently set up to use Entra ID, Okta, or both.
Once the above conditions are met, the broad steps to integrate Xtraction with Identity Broker are as follows:
•Create Xtraction as an application in Okta, Entra ID, or both. See procedures below.
•Configure Okta, Entra ID, or both as identity providers within Identity Broker. For details about configuring Entra ID, see the Identity Broker topic Configure Identity Providers > Azure Active Directory. To configure Okta as an identity provider, see the procedure below.
•Configure Xtraction as an identity consumer within Identity Broker. For details, see the Identity Broker topic Configure Identity Consumers. When adding Xtraction as an identity consumer, we suggest using Xtraction as the Name and ID and entering the Redirect URIs as follows:
•Redirect URI: https://<XtractionServer>/api/auth/signin-oidc
•Post Logout Redirect URI: https://<XtractionServer>/xtraction/#/logout
•Set up Identity Broker custom authentication within the Xtraction Settings utility. (This only needs to be done once, as it applies to both Okta and Entra ID connections.) See the procedure below.
•Update the appsettings.Production.json file on your Xtraction server. See the procedure below.
•Test the Identity Broker configuration. See the procedure below.
To view an Ivanti video of this procedure, see Identity Director SSO component - Configuring the Providers (Okta).
1.Log in to your Okta account.
2.In the left navigation pane, expand Applications > Applications. On the resulting page, click Create App Integration.
3.On the Create a new app integration page:
•For sign-in method, click OIDC - OpenID Connect.
•For application type, click Web Application.
•Click Next.
4.On the New web app integration page:
•For app integration name, enter Xtraction.
•For grant type settings, select Client Credentials, Refresh Token, and Implicit (hybrid).
•For sign-in/sign-out redirect URI's, enter https://<ServerName>/identitybroker/ids/okta (sign-in) and
https://<XtractionServer>/xtraction/#/logout (sign-out).
•For assignments, click Allow everyone in your organization to access and Enable immediate access with Federation Broker Mode.
•Click Save.
1.Log in to your Entra ID account.
2.Create a new tenant (or use an existing one if available).
3.On the Welcome to Azure! page, under Azure services, click Azure Active Directory.
4.In the left navigation pane, navigate to Manage > App registrations to create a new app registration of type Web.
5.Access your new Xtraction app, then navigate to Authentication to add a web platform (if not added already):
•Set the Web Redirect URIs to match your Identity Broker server name: https://<ServerName>/identitybroker/ids.
•Set the Front-channel logout URL to be your logout page in Xtraction: https://<XtractionServer>/xtraction/#/logout.
•Click ID tokens (used for implicit and hybrid flows).
6.Navigate to Certificates & secrets to add a new client secret.
7.Navigate to API permissions to add new permissions for the Microsoft Graph option:
•Click Application Permissions. In the search bar, type Directory to open the directory permissions. Select the permissions Directory.Read.All and Add Permissions.
8.Navigate to Owners to add any users who may need to access Xtraction.
1.Log in to your Identity Broker instance.
2.Navigate to the Identity Providers page and click Add (located at the bottom of the page).
3.On the New providers page, select type Okta, then specify the following fields:
•Name: Enter a name for the provider to be displayed in the Identity Broker Management Portal.
•Caption: Enter a caption for the button that is displayed to users when they select how to authenticate. This caption will only be shown if more than one identity provider is configured in Identity Broker.
•Authority: Enter your Okta instance name, for example https://<ServerName>-admin.okta.com.
•Client ID: Enter the assigned ID for Xtraction that you created in Okta.
•Client Secret: Entere the client secret for Xtraction that you created in Okta.
•Login/logout Redirect URI: Specify the URIs that you used in Okta earlier:
•Login redirect URI: https://<ServerName>/identitybroker/ids/okta
•Logout redirect URI: https://<XtractionServer>/xtraction/#/logout
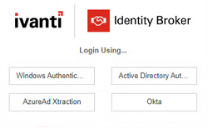
4.Click Save. The Identity Broker login page will now display the option to log in to Xtraction using Okta.
To verify that the configuration was executed correctly, see the Identity Broker topic Resulting behavior if configured correctly.
Do this after installing Xtraction, from the Xtraction Settings utility. This procedure only needs to be done once, as it applies to both Okta and Entra ID connections.
1.Open the Xtraction Settings utility, located by default at C:\Program Files (x86)\Xtraction Software\Xtraction\Tools.
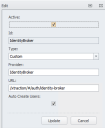
2.Open the Authentication tab, then click the top row to create a new authentication provider for Xtraction.
3.Click the Active box to enable the provider.
4.Enter an ID (such as Identity Broker), select type Custom, enter a Provider name (such as Identity Broker), and enter this URL exactly as shown: /xtraction/#/auth/identity-broker.
5.Click the Auto Create Users option.
6.Click Update to store the new authentication provider.
7.Click OK.
The information in this .json file needs to be identical to the settings you created in Identity Broker when setting up Xtraction as an identity consumer.
1.On the Xtraction server, navigate to C:\Program Files (x86)\Xtraction Software\Xtraction\Web\Server.
2.Open the appsettings.Production.json file with Notepad or a similar application. Scroll down to the IdentityBroker section and set the following values:
•Authority is the URI configured in Identity Broker for the identity provider (for example, https://<ServerName>/identitybroker/ids).
•ClientId is the ID of the Xtraction identity consumer from Identity Broker.
•ClientSecret is the secret of the Xtraction identity consumer from Identity Broker.
•RedirectUri is the redirect URI of the Xtraction identity consumer (https://<XtractionServer>/api/auth/signin-oidc).
•PostLogoutRedirectUri is the post logout redirect URI of the Xtraction identity consumer (https://<XtractionServer>/xtraction/#/logout).
•PostAuthenticatedRedirectUri is https://<XtractionServer>/xtraction/#/authenticated.
•AuthenticationProviderName is IdentityBroker.
3.Save the file.
Finally, execute an IISRESET from an administrator command prompt. This will prevent SSL/TLS errors when using Identity Broker with the identity provider to authenticate with Xtraction.
1.Open Xtraction.
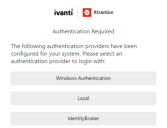
2.On the Authentication page, click Identity Broker. 
3.Depending on your configuration, Entra ID and/or Okta will display as identity providers. Select whichever identity provider you want to use, then sign in and authenticate as required. 
If sign-in is successful and the Xtraction UI displays, integration is fully working.
Troubleshooting tips
When starting Xtraction via Identity Broker, you may encounter the following issues:
•SSL/TLS errors.
To fix: On the Xtraction server, run the following two PowerShell commands to enable SSL. A reboot will be necessary after:
Set-ItemProperty -Path 'HKLM:\SOFTWARE\Wow6432Node\Microsoft\.NetFramework\v4.0.30319'
-Name 'SchUseStrongCrypto' -Value '1' -Type DWord
Set-ItemProperty -Path 'HKLM:\SOFTWARE\Microsoft\.NetFramework\v4.0.30319' -Name
'SchUseStrongCrypto' -Value '1' -Type DWord
•The following error message: "The client application is not known or is not authorized."
To fix: The ClientId and/or ClientSecret in the appsettings.Production.json file must be identical to the ones that you set for the Xtraction identity consumer in Identity Broker. Modify the .json file with the correct values (located by default at C:\Program Files (x86)\Xtraction Software\Xtraction\Web\Server), save, reset IIS, and then try again.
•An error message similar to the following after entering your Entra ID or Okta credentials:
{"type":"https://tools.ietf.org/html/rfc7235#section-3.1","title":"Unauthorized","status":401,"traceId":"00-d5cd303132c8d04bb322cf100c66f53a-0d7ca7ca9040ba4a-00"}
To fix: Copy the Identity Broker certificate and install it on the Xtraction server, under the Trusted Root Certificate Authority.