Creating Applications and Application Groups
Introduction
Application publishing is central to the configuration of your Ivanti Neurons for Zero Trust Access (nZTA) services.
A nZTA application definition can be created to refer to on-premise applications, web pages, or network locations served from your datacenter and cloud infrastructure. nZTA can also publish resources based on Software-as-a-Service (SaaS) applications such as Microsoft O365 and Salesforce.
You publish your application definitions to the Gateways that reside at the corresponding locations, and your Gateways ensure that access requests are authenticated and authorized according to the rules defined in your Secure Access Policies (see Creating a Secure Access Policy).
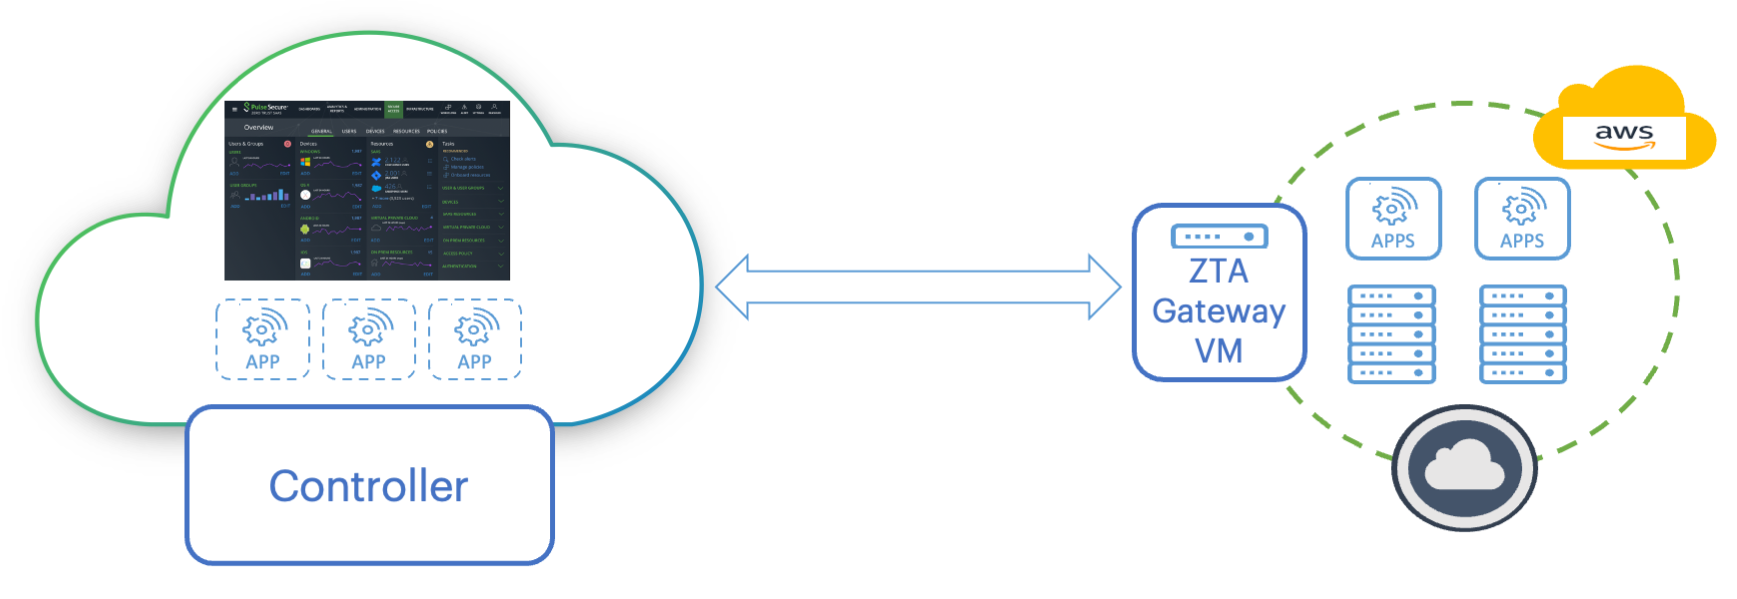
FIGURE 83 Creating definitions for deployed apps you want to make available to your users
The Controller enables you to:
Create definitions of applications to which your end users require access, see Adding Applications to the Controller.
Group together multiple applications for which a single secure access policy is required, see Adding Application Groups to the Controller.
Note
An application, or application group, can be associated with only one secure access policy.
Adding Applications to the Controller
Before you begin, make sure you have the following information:
The name of your application
A suitable description for your application
The URL, FQDN, or IPv4 address you use to access the application.
To create an application definition:
Log into the Controller as a Tenant Admin.
From the nZTA menu, click the Secure Access icon, then select Applications > Applications.
The Applications page appears. This page lists all applications defined on the Controller.
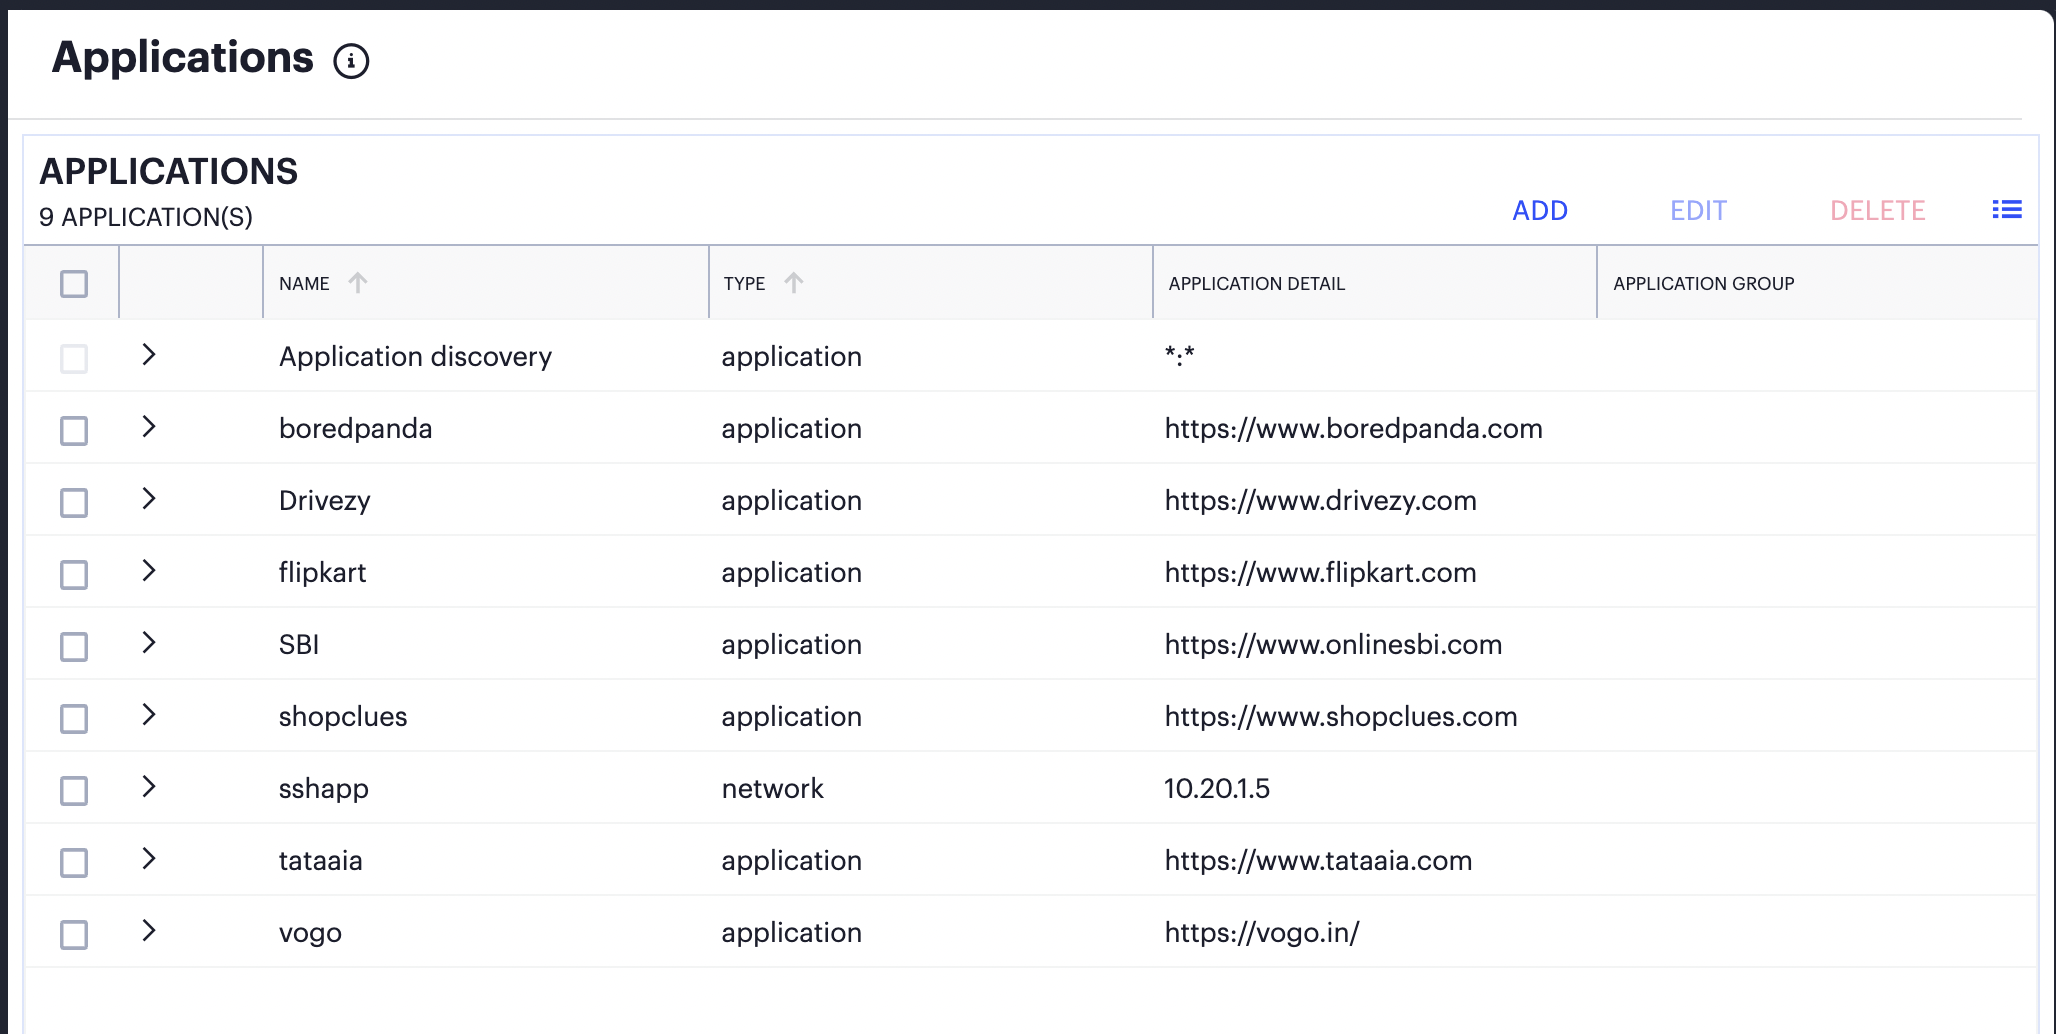
FIGURE 84 Applications Page
Note
The list includes a built-in application called Application discovery. The Application Detail for this application is “:”, indicating that all applications that it applies to all unlisted applications. This application is used by the nZTA application discovery feature, and cannot be deleted.
Click Add.
The Add Application form appears.
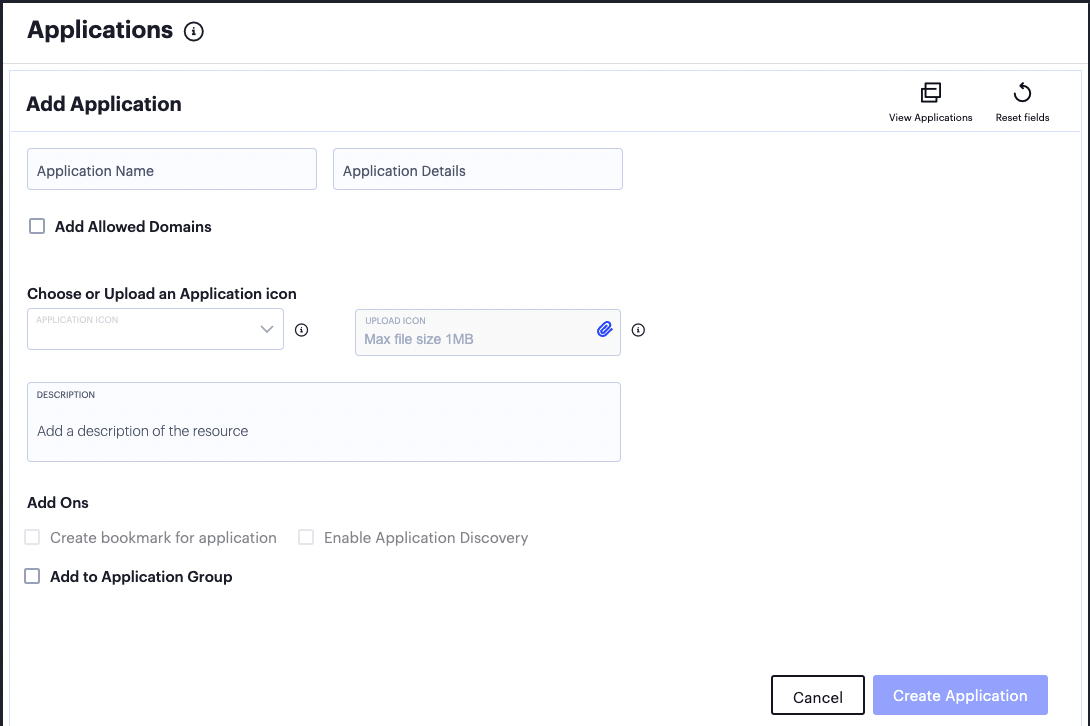
FIGURE 85 Add an Application
Note
At any point during this process, you can reset the form data by clicking Reset. You can also view existing application definitions in a pop-up dialog by clicking View Applications.
Enter the Application Name.
Enter the Application Details. That is, the URL, FQDN or IPv4 address of the application you want to add.
Note
You can only access each application using the addressing method specified when registering it. That is, if you registered the app using an IP address, you cannot access it using its FQDN, even via DNS that resolves to the correct IP. Similarly, if you registered the app using an FQDN, you cannot access it using its IP address.
For scenarios that require one or more additional domains to be associated with an application, select Add Allowed Domains.
Then, add your domains through one of the following methods:
Individually, by entering valid domains in the Add Domain text box, then selecting Add to add the domains to the list. You can add several domains at the same time by using a comma (,) separator. Repeat this step for each domain, or group of domains, you want to add.
In bulk, by uploading a Comma-Separated Value (CSV) text file containing the full list of your domains.
Domains added to this list must conform to the same scheme rules as the URI used in the Application Details field. To view a complete list of valid domain schemes, see the Tenant Admin Guide.
In the list of added domains, remove individual entries by selecting the X indicator adjacent to the domain name. To remove all domains, select Clear All.
For HTTP/HTTPS applications, the SAML Access option appears:
Disable this setting if you are using an application-level login for the application.
Enable this setting if you are using SAML single sign-on for the application. Then:
Under Download IdP Metadata, click Download and save the IdP metadata file.
Log into the application and upload the IdP metadata file. Refer to the product documentation for the third-party application for details of this process.
In the application, download its SAML metadata as a file. Refer to the product documentation for the third-party application for details of this process.
Under Upload SAML Metadata, upload the SAML metadata file from the application.
(Optional) If you want to add custom SAML attributes, use Attribute and Value to add key-value pairs. Select Add to add an attribute pair, then repeat as required.
Added attributes are displayed beneath the input fields. Click the corresponding X indicator to remove an attribute.
To associate an icon with this application, either:
Select a Application Icon from the list of supported icons. This field auto-populates based on the scheme you use in Application Details.
Use Upload Icon to upload a bespoke image file as the icon for this application. Make sure your icon is in JPEG format using the maximum dimensions 48 x 48 pixels (maximum file size 1 MB). Ivanti recommends you use only square images for your application icons.
Enter a Description for the application.
(Optional) If you want a bookmark for this application, select the Create bookmark for application check box.
(Optional) If you want to enable application discovery, select the Enable Application Discovery check box.
(Optional) If you want to add the new application to an application group, select the Add to Application Group check box, and then select the required application group.
Note
When using SAML authentication, make sure you add to a single application group only those applications that use the same SAML authentication source.
Click Create Application.
The new application appears in the list of applications.
After you have defined your applications in the Controller, you can publish the definitions to your ZTA Gateway, see Workflow: Creating a Secure Access Policy.
Adding Application Groups to the Controller
Multiple applications can be referenced from an application group.
When you select an application group during any subsequent process, all applications in the group are included automatically.
Note
For SAML authentication, make sure you add to a single application group only those applications that use the same SAML authentication source. A secure access policy can associate an application group with only one authentication method. Therefore, all applications added to the group must use the same SAML metadata for authentication.
To create an application group:
Log into the Controller as a Tenant Admin.
From the nZTA menu, click the Secure Access icon, then select Applications > Application Groups.
The Applications Groups page appears. This page lists all application groups defined on the Controller.
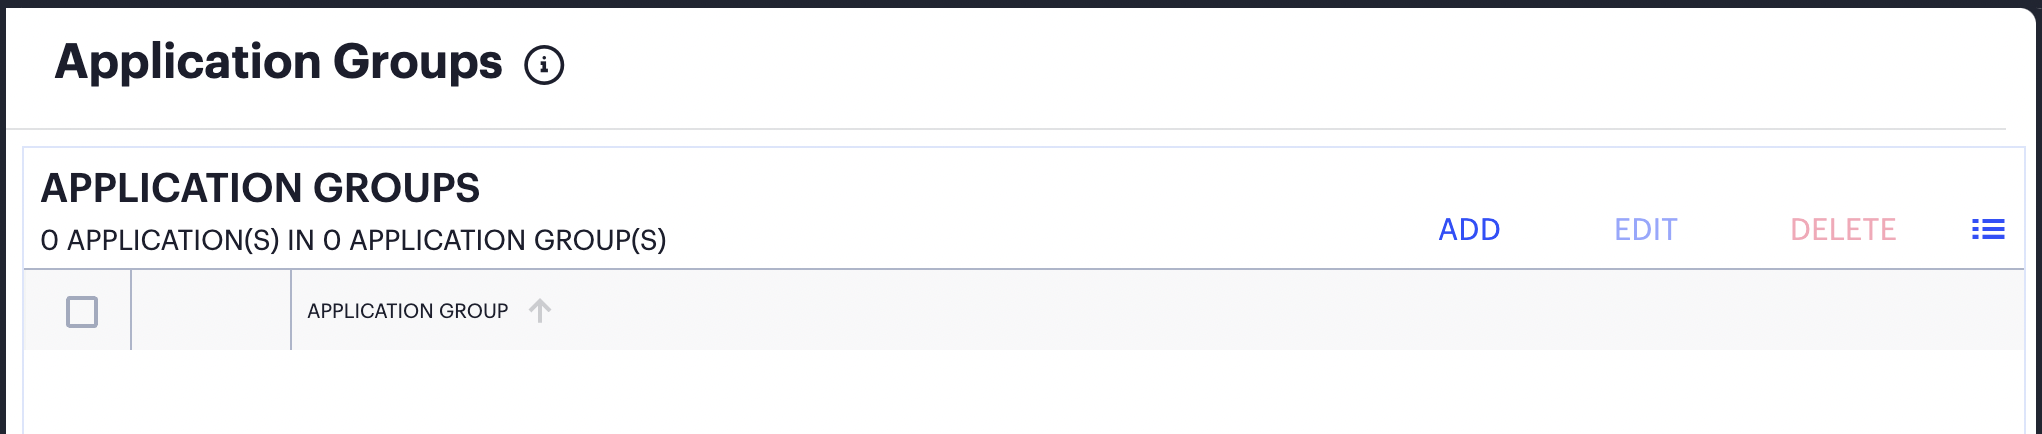
FIGURE 86 Application Groups Page
Click Add.
The Add Application Group form appears.
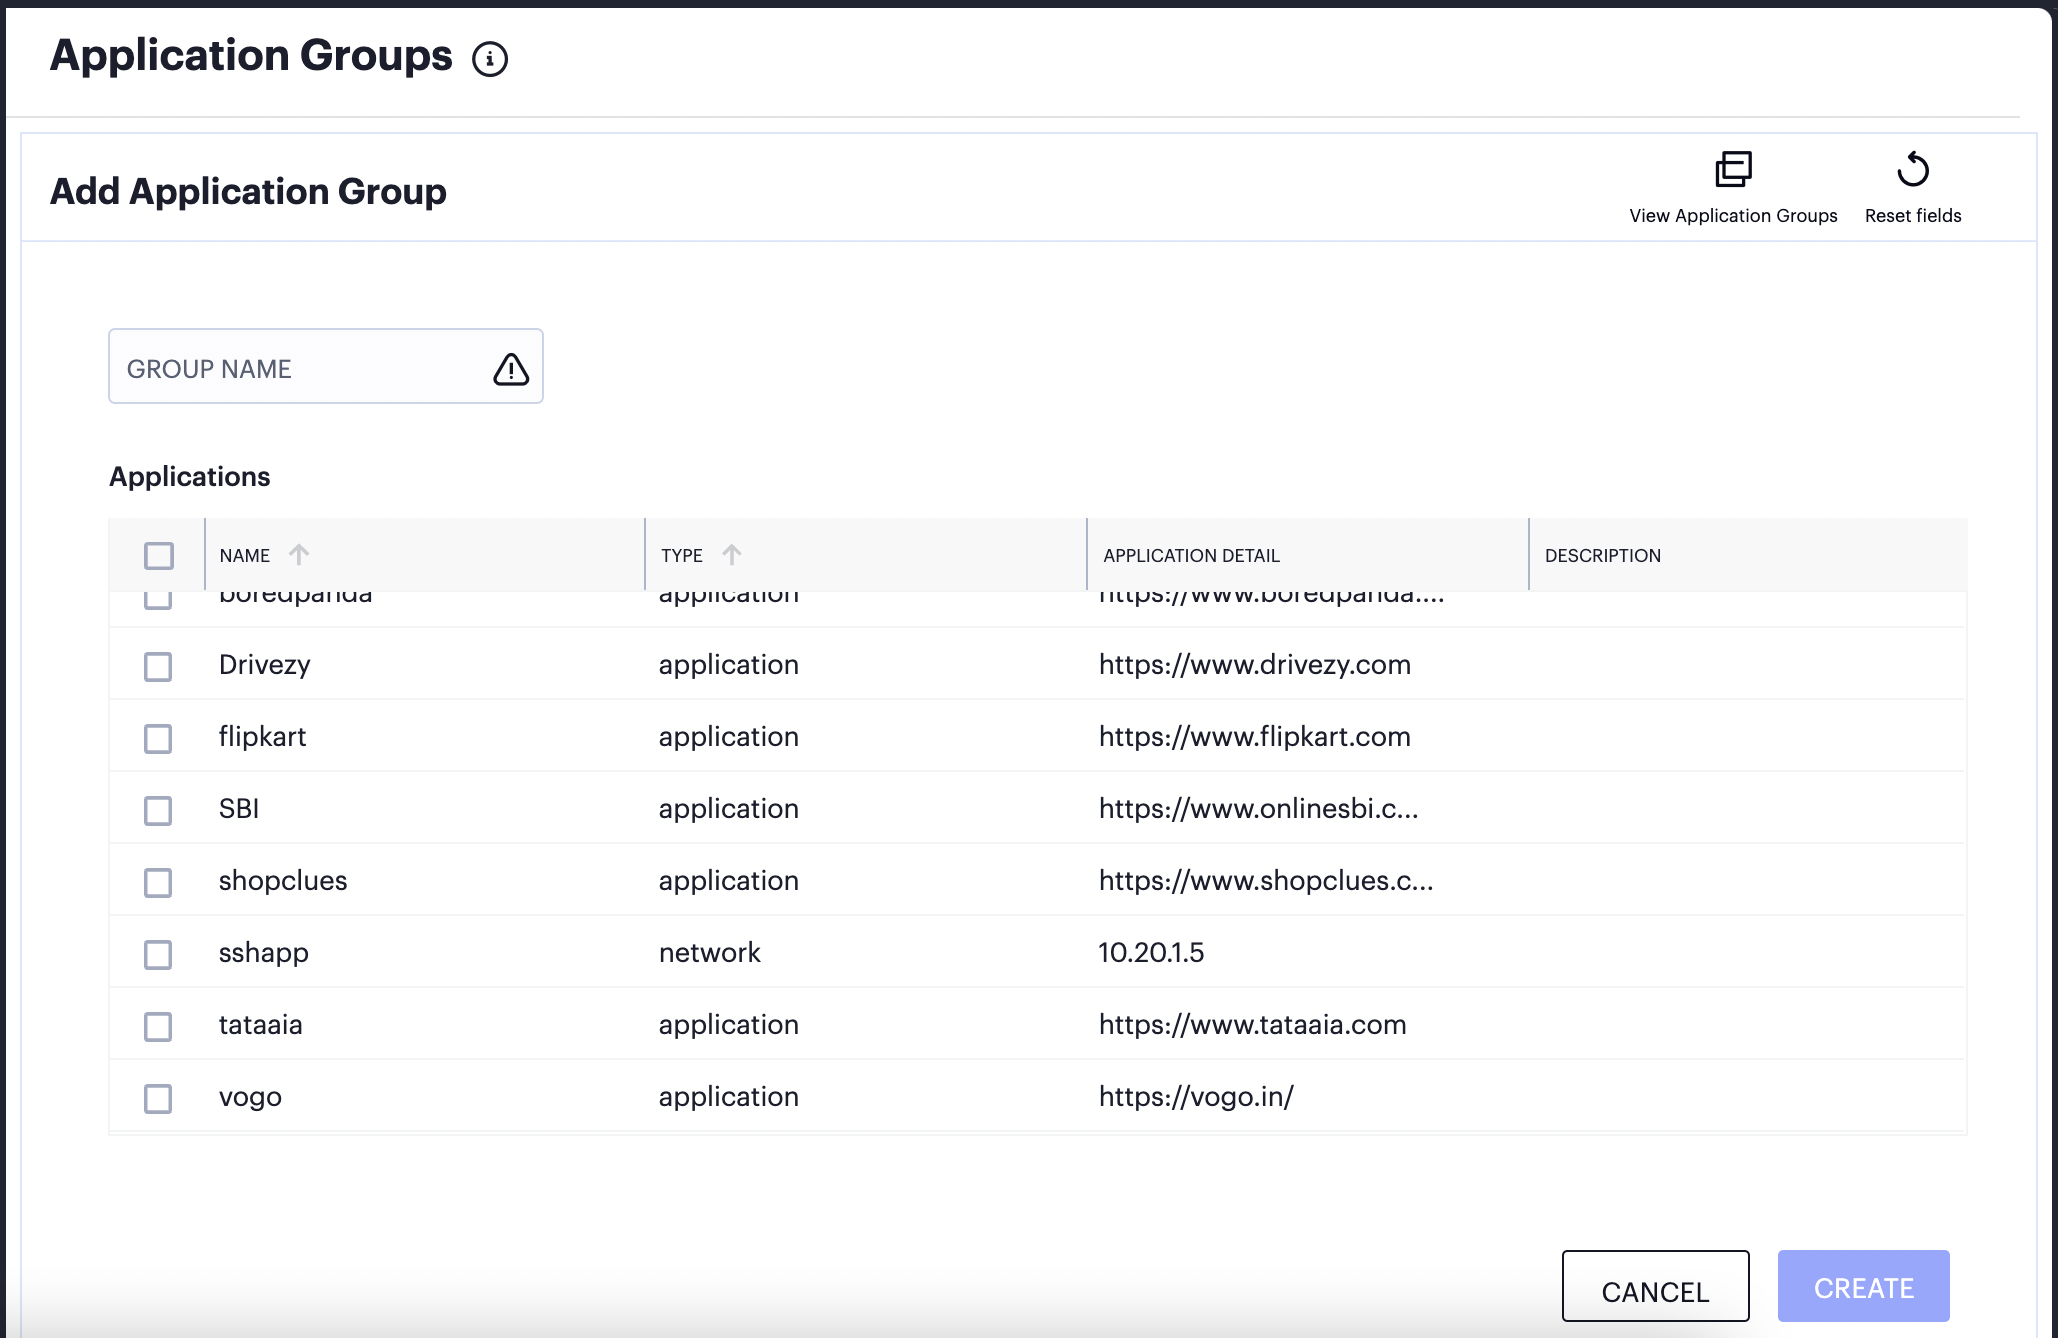
FIGURE 87 Add an Application Group
Note
At any point during this process, you can reset the form data by clicking Reset. You can also view existing application groups in a pop-up dialog by clicking View Application Groups.
Enter the Group Name.
Select the applications you want to include in the group.
Note
You cannot add the Application discovery application to a group.
Click Create to create the group.
The application group is added to the list.
Next Steps
After you have created your application definitions on the Controller and deployed them to your cloud or datacenter locations, move on to create your Secure Access Policies. See Creating a Secure Access Policy.
Note
Before you create a Secure Access Policy, make sure you have created all required definitions for Gateways, Users, Devices, and Applications.