Using the MSP Portal
After you log in to the MSP Portal, nSA displays the All Tenants page. This serves as the home page, or dashboard, for your portal.
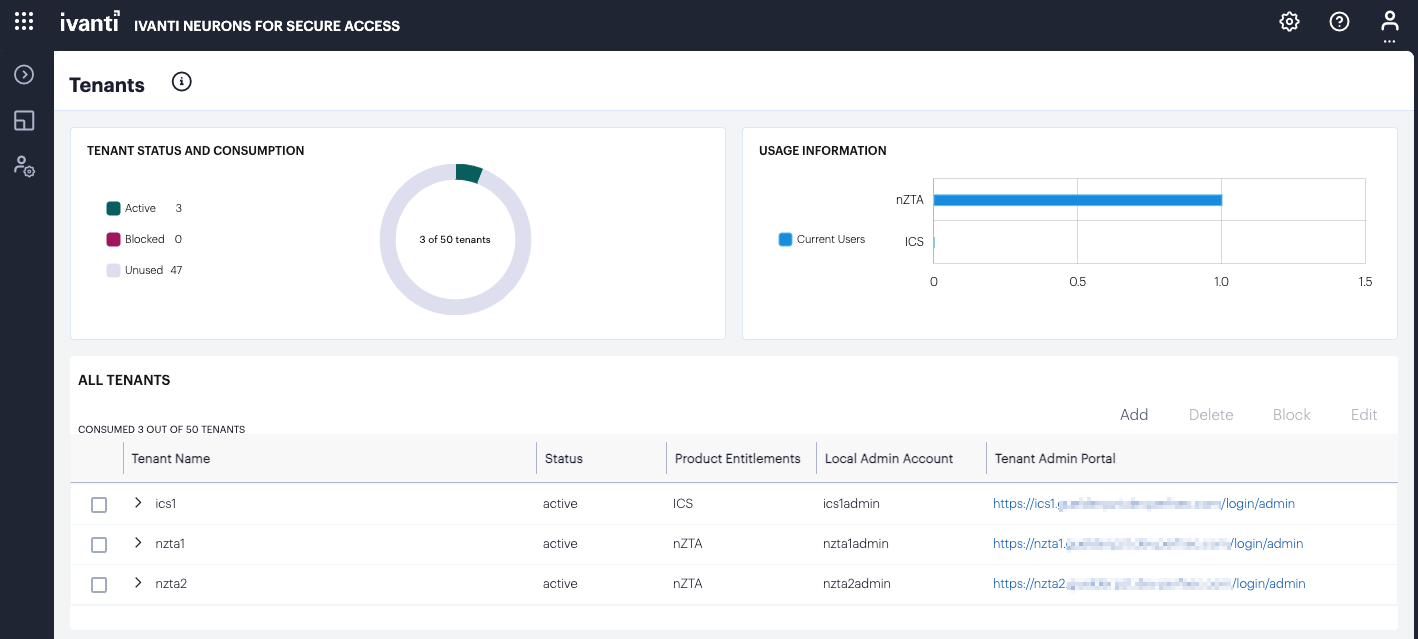
FIGURE 3 The MSP Portal
Note
To return to this page any time, click the menu icon in the left-hand menu bar and select Tenants > All Tenants. Alternatively, click the banner at the top.
From this page, you can view and configure all functions and capabilities allowed through your subscription.
To learn more about the portal interface, see Using the Portal Interface.
To learn more about the graphs and data shown in this page, see Using the All Tenants Dashboard.
Using the Portal Interface
When you log in to the MSP portal for the first time, or at any point where you have no tenants defined in your deployment, nSA presents a banner recommending you create a new tenant:
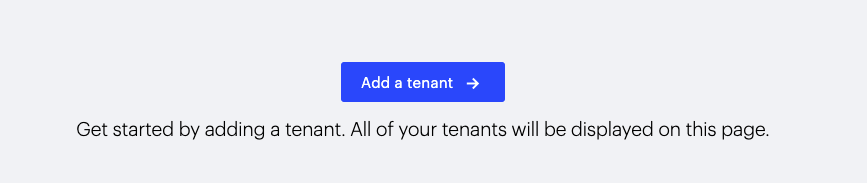
FIGURE 4 Getting started in the MSP portal
To add a new tenant, select Add a tenant. Then, to learn more about the process of creating tenants, refer to Creating Tenants in the MSP Portal.
For all subsequent login sessions, nSA displays the Tenant Dashboard. This serves as the home page for your portal, and provides an overview of tenant activity across your deployment.
FIGURE 5 The Tenant Dashboard
Note
To return to this page any time, click the menu icon in the nSA menu and select Tenants > All Tenants. Alternatively, click the banner at the top.
From this page, you can view and configure all functions and capabilities allowed through your subscription and role. Using the nSA menu at the left-hand side, choose from:
The Show/Hide menu icon, providing the ability to show or collapse the nSA menu tree:

FIGURE 6 Showing or hiding the nSA menu system
The Tenants menu icon, providing access to the main configuration screens of the MSP portal:

FIGURE 7 Accessing the Tenants menu
Through this menu, you can select:
Tenants > All Tenants: See Using the MSP Portal.
Tenants > Usage Summary: See Generating Usage Data for Billing.
The Administrator menu icon, providing options to configure administrator access to the MSP portal:

FIGURE 8 Accessing the Administrator menu
To learn more, see Configuring Administrator Access.
In addition to the nSA menu, the following controls can be used to configure the appearance and functionality of the portal:
Portal settings:

FIGURE 9 Accessing the portal settings menu
The Settings dialog appears:
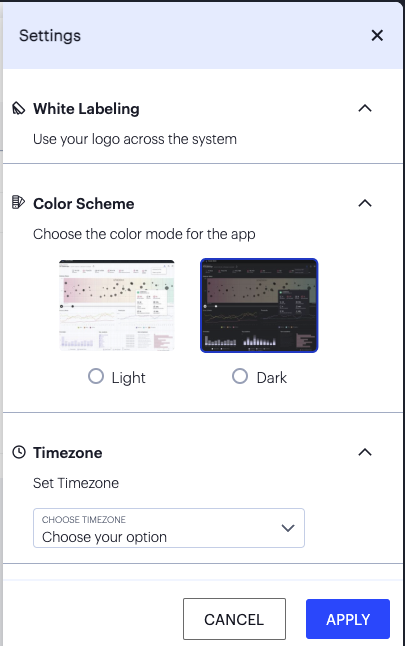
FIGURE 10 Configuring portal settings
Use this dialog to configure your portal interface. Select from:
White Labeling:
Use this feature to configure a common branding across all of your deployed tenants. Select the text White Labeling to view the White Labeling dialog:
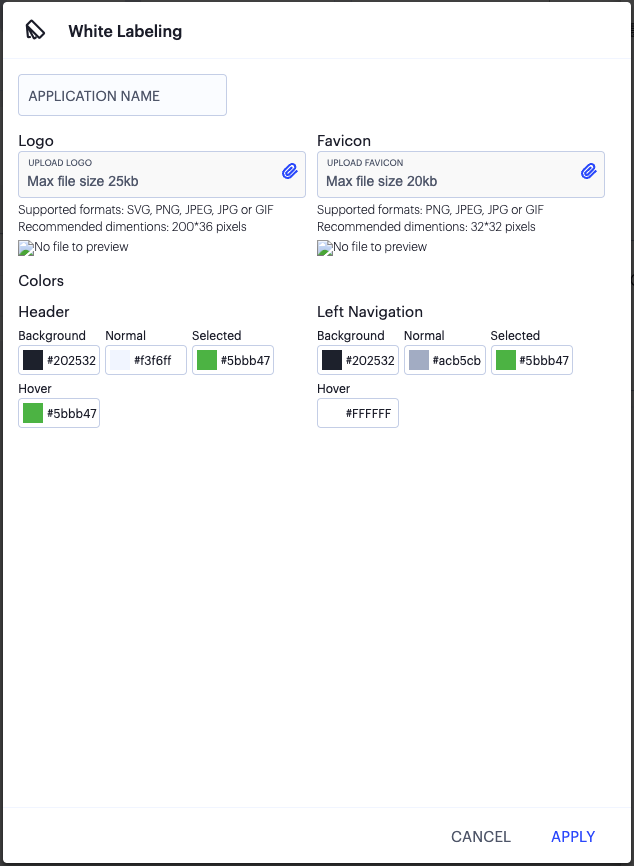
FIGURE 11 The White Labeling dialog
In this dialog you can configure:
The Application Name applied to your tenants.
The Logo that appears on the tenant’s nSA portal.
The Favicon used in the browser.
The Colors used to brand the tenant’s nSA portal.
Color Scheme:
Select Light or Dark to switch between themes:
Timezone:
Configure the default timezone for this admin login account. The configured timezone affects the display of data across all pages. Changes to the timezone persist across login sessions, and the default setting is UTC (Coordinated Universal Time).
Note
Changing the timezone can affect the analytics and usage data displayed in the portal.
Help and Documentation:
nSA documentation for administrators is available from the MSP portal. If you are a MSP admin, login to the portal using the URL provided in your welcome email. To access product help and documentation links, click the help icon in the navigation bar:

FIGURE 12 Getting help and documentation
MSP Admin account options:

FIGURE 13 Admin account options
From this option, you can reset the account password or log out of the portal (see also Logging out of the MSP Portal).
Using the All Tenants Dashboard
The All Tenants page contains the following components:
Tenant Status and Consumption:
MSPs are typically provided with a default initial allowance of 50 tenants. This dashboard contains a chart showing deployed tenants as a proportion of the total allowance.
Defined tenants are indicated as either Active or Blocked, with the remainder of the allowance indicated as Unused.
Note
As you approach the limit of your allowance, nSA presents an Increase Operation Limit dialog. Confirming this dialog sends a message to Ivanti to indicate that you wish to increase your maximum tenant allowance.
Usage Information:
This dashboard contains a usage chart showing the total number of enrolled and licensed end-users, per nSA service, across all tenants.
All Tenants:
This section contains a table listing all of your tenant definitions. Each entry lists the following details:
Tenant Name: The designated name for this tenant.
Status: The status of this tenant deployment, “active” (for fully active tenants) or “pending” (for tenants in a mid-deployment state).
Product Entitlements: The nSA services this tenant is entitled to use.
Local Admin Account: The tenant admin account username specified during tenant creation.
Tenant Admin Portal: The FQDN of this tenant’s default Tenant Admin Portal endpoint, in the form
https://<yourMSPsubdomain>.pulsezta.net/login/admin.Note
The Tenant Admin Portal displayed here is the default endpoint for the tenant admin. The tenant admin might modify this endpoint later; however, this field is not updated to reflect such changes and only ever shows the default endpoint.
Select the arrow indicator adjacent to the tenant name to view a drop-down panel containing a summary of Current Users versus Maximum Users for each of this tenant’s product entitlements:

FIGURE 14 Viewing a summary of a tenant’s service usage
To add a new tenant, select Add. To edit an existing tenant, select the checkbox adjacent to the tenant name, then select Edit. To learn more about adding and editing tenants, see Creating Tenants in the MSP Portal.
To permanently remove a tenant and all their data, select the checkbox adjacent to the tenant name, then select Delete. Confirm the operation in the subsequent dialog.
Note
Deleting a tenant is a permanent operation and cannot be reversed.
To temporarily suspend the operation of a tenant without removing any configuration, select the checkbox adjacent to the tenant name, then select Block. Confirm the operation in the subsequent dialog.
Blocking a tenant does not deny access for the tenant admin to the Tenant Admin Portal. However, nSA does then disallow any further connection attempts by the end users in the tenant subscription.
A blocked tenant is indicated accordingly in the All Tenants MSP dashboard, and the Tenant Status and Consumption dashboard Blocked counter is incremented.