Creating a Linux Patch
The Patch Properties page allows you to create patches for non-Windows operating systems, including Linux and other Unix-based operating system.
Create a Linux patch using the Patch Properties page.
The Patch Creation Wizard is used create patches for Windows operating systems. Refer to Using the New Patch Wizard for additional information.
- Select File > New.
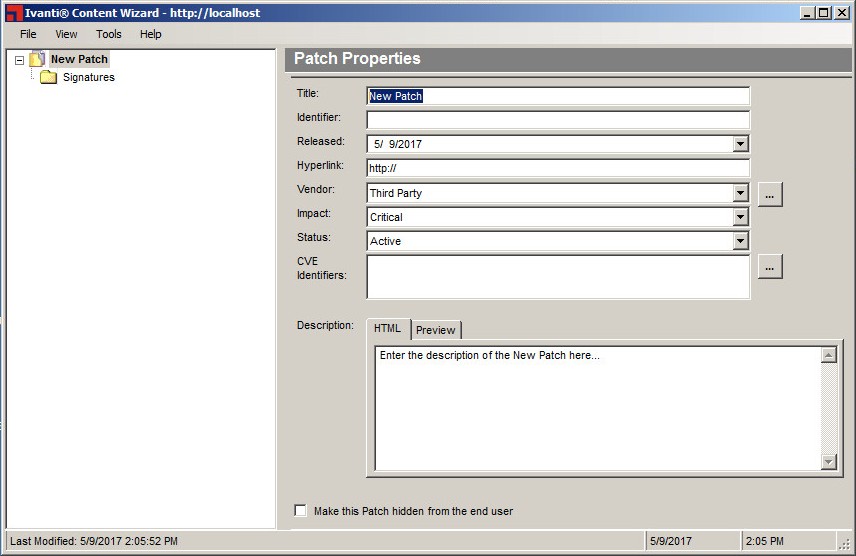
The Patch Properties page opens.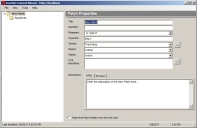
- Type a unique name for the patch in the Title field. The default title is New Patch.
- Type a unique identifier for the patch in the Identifier field.
You may determine the identifier or you may choose to use one supplied by the vendor. - Type the release date for the patch in the Released field.
By default, the current date is specified. You can use the vendor's date if necessary. - Type the vendor's URL in the Hyperlink field.
- Select a vendor from the Vendor drop-down list.
Vendors must be added before they can show up as an item in the Vendor drop-down list. For more information, see Adding a New Vendor. - Select an impact from the drop-down list in the Impact field.
To understand the various impact options available, refer to Understanding Patch Severity Levels. -
Select an applicable patch status from the drop-down list in the Status field:
- Active
- Beta
- Pending
To understand the various status options and their meaning, refer to The Patch Properties Page.
- [Optional] Select CVE Identifiers.
- Click the CVE Identifiers button.
The CVE Identifiers dialog opens. - Select File > Add.
The Add CVE Code dialog opens and lists the available CVE Identifiers. - Double-click on the CVE Identifier that is applicable to your needs.
The Add CVE Code dialog closes and the item is added to the CVE Identifiers dialog. - Click Save.
The CVE Identifiers dialog closes and the item is added to CVE Identifiers field. - [Optional] Repeat steps a, b, c and d to add additional CVE Identifiers.
- Type a description in the Description field.
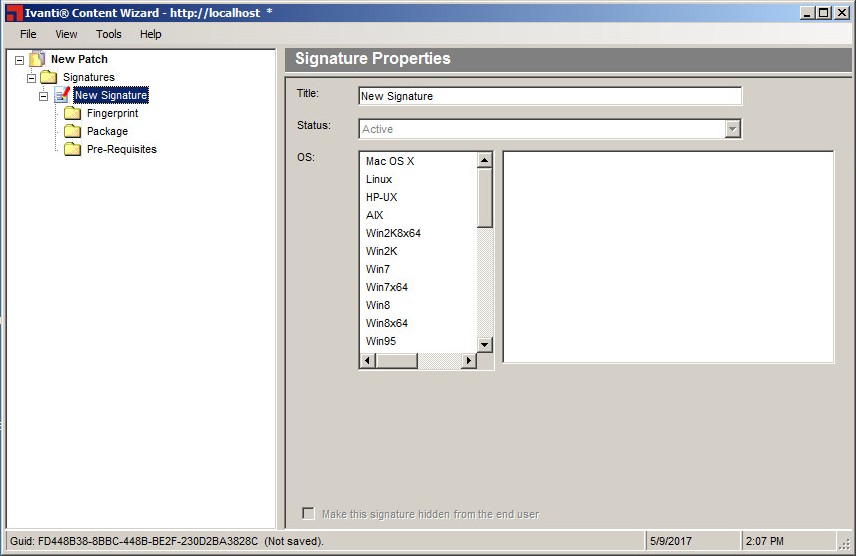
This description will be visible in the Patches page of the Ivanti Endpoint Security. - In menu tree located in the left pane, select Signatures.
The Signature Summary dialog appears in the right pane. - Click New.
The Signature Summary page opens.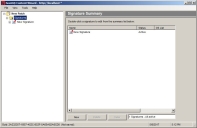
- Select New Signature in the right pane.
- Click View.
The Signature Properties page opens.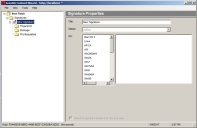
- [Optional] Type a new title in the Title field.
The signature title is added to the left pane. - Select the applicable patch status using the Status drop-down list.
The following list items are available:- Active
- Beta
- Pending
- Select Linux.
A list of available Linux distributions appears.
- Select the version of the operating system for the signature in the list details field.
- [Optional] Check or clear the Make this signature hidden from the end user check box to hide the signature from the end user.
- [Optional] Edit the Fingerprint.
- In the left pane, expand the Signatures directory and select Fingerprint.
- Click New.
The fingerprint is added to the pane. - Click View.
The Fingerprint Properties page opens. - Make your edits.
- [Optional] Add Package content.
- In the left pane, expand the Signatures directory and select Package.
The Package Summary page opens. - In the right pane select New.
A New Package is created, and the subsequent Content folder appears under the New Package folder in the left pane. - In the left pane, select Content.
- Right-click in the right pane and add applicable content. For details on adding package content, refer to Adding Content to a Package.
- [Optional] Add a Pre-Requisite.
You may add a pre-requisite signature to the patch. - In the left pane, expand the Signatures directory and select Pre-Requisites.
- In the right pane select Add.
The Add Pre-Requisite Signature dialog opens. -
Search for pre-requisites to add.
- Remove Detect from Search field.
- Click Search.
- Select a pre-requisite from the available list.
- Click OK and the pre-requisite is displayed in the Pre-Requisite Summary page.
- Repeat steps b and c to add additional pre-requisite signatures to the patch.
For details on creating a new pre-requisite signature patch, refer Creating a New Patch. - Select File > Save.
The Patch Properties are saved.
For additional information about the properties on the Patch Properties page, refer to The Patch Properties Page.

For additional information about the properties on the Signature Properties page, refer to The Signature Properties Page.

Tip: Double-clicking an operating system name in the OS field selects all the versions of that operating system within the details list.
This action is necessary only if you intend to add the fingerprint for the patch. For additional information refer, to The Fingerprint Summary Page.
The Linux patch with the attributes you have specified is created.