Configuring the Configuration Database
After you have installed Neurons for ITSM, the System Configuration Wizard starts automatically and displays the Configuration Application page.
On this page, you will do the following:
•Specify the name of the configuration database and the authentication method that is used by all supported web applications when connecting to the configuration database.
•Create or recreate the configuration database.
•If you use Windows Integrated Security for the configuration database, specify the Windows domain credentials for the service account.

1.Enter values into the fields:
| Parameter | Description |
|---|---|
| Target Environment | |
| Deployment |
Choose one of the following: •Single Server Deployment: If you are setting up the Minimum Production Deployment . •Multiple Server Deployment: If you are setting up the Enterprise Production Deployment. |
| Target Landscape |
(Only if you selected Multiple Server Deployment) Click the down arrow. The system displays the Target Landscapes dialog box. •On the first server that you configure, check Production and click OK. •On subsequent servers, check any combination of landscapes other than production and enter values in the subsequent fields. See below.
|
| Production Configuration Server |
(Only if you selected Multiple Server Deployment and selected anything other than Production in the Target Landscape field) The host or domain name of the configuration server for the production instance. Do not enter the information for any other instance; you must enter the information for the production instance. |
| Port |
(Only if you selected Multiple Server Deployment and selected anything other than Production in the Target Landscape field) The port number of the production server. The default is 80, or 443 if you check Use SSL. |
| Use SSL |
(Only if you selected Multiple Server Deployment and selected anything other than Production in the Target Landscape field) Check to enable SSL encryption to the server.
|
| CentralConfig API Key (Production) |
CentralConfig API key of the production environment. To retrieve the CentralConfig API Key,- navigate to the Configuration console > Configure > Security Controls > API Keys > CentralConfigApiKey (Key groups) > CentralConfigApiKey). |
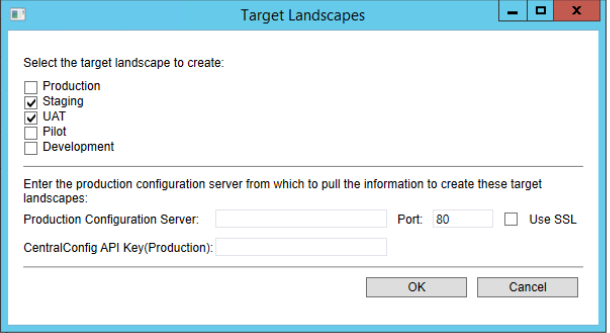
2.Click OK to close the Target Landscapes dialog box.
3.Enter values into the fields:
| Parameter | Description |
|---|---|
| Configuration Database Server Name |
The server where the configuration database is located.
Do one of the following: •Accept the default value. •Enter the name of the server of the configuration database. •Browse for a server name by clicking the down arrow and selecting <Browse for more...>. The system displays any Microsoft SQL Server instances in your network. Choose a server and click OK.
NOTE: Do not choose localhost unless you are setting up a Demonstration or Proof-of-Concept Deployment. |
| Configuration Database Name |
The name of the configuration database. The default name is ConfigDB and you cannot change the name. |
| Authentication Method |
Select one of the following: •Windows Authentication: Uses Microsoft Windows authentication. •SQL Authentication: Uses Microsoft SQL authentication. If you select this option, enter the user name and password below. |
| User Name |
(Only if you selected SQL Authentication) The user name associated with the Microsoft SQL authentication.
NOTE: If your deployment store FILESTREAM attachments, specify a configuration database user account that has a db_owner role on Microsoft SQL Server. See Task 2: Setting up Neurons for ITSM. |
| Password | (Only if you selected SQL Authentication) The password associated with the user name for the Microsoft SQL authentication. |
4.Click Test Connection to test the connection to the configuration database server. The system displays Connection successful! if the connection is good. You must have a working connection to create a database. You cannot continue with the configuration if this connection does not work.
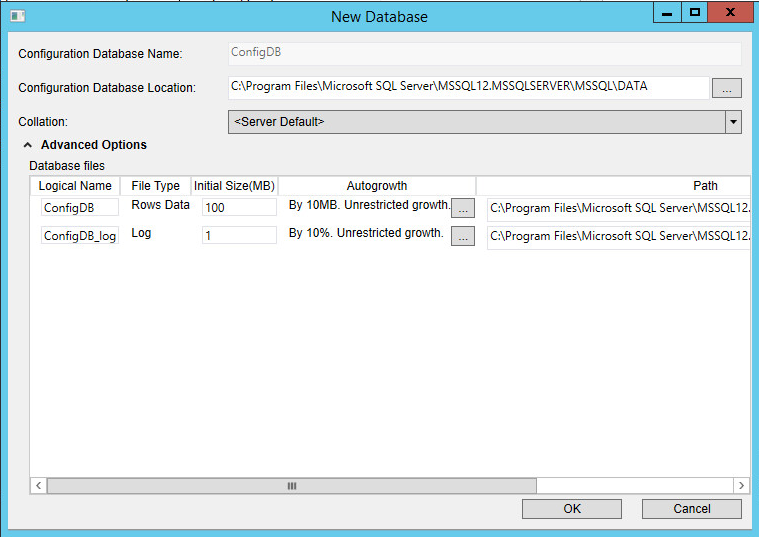
5.Depending if there is already a configuration database, click Load Configuration Database or Re-Create & Load Configuration DB. If the configuration database already exists, the system asks if you want to recreate the database. Click Yes. The system displays the New Database dialog box.
New Database Dialog Box
6.Enter values into the fields:
| Parameter | Description |
|---|---|
| Configuration Database Name | The name of the configuration database. The default name is ConfigDB and cannot be changed. |
| Configuration Database Location |
The location for the configuration database.
NOTE: If you have customized the existing configuration database, specify a different location; otherwise, the system overwrites your customization when you load the recreated database. |
| Collation |
The set of rules that describe how to compare and sort strings, such as the order in which letters are sorted and whether case matters. NOTE: ISM application does not support case sensitive SQL Collation. |
| Advanced Options | |
| Logical Name | The logical name of the configuration database. This name is stored as a file name, and is a separate entity from the read-only database name that is displayed in Microsoft SQL Server Management Studio. |
| File Type | The file type, either database records or database logs. These values are read-only. |
| Initial Size (MB) | The initial file size, in MB, when creating the configuration database. |
| Autogrowth | Specifies how the database will expand when it reaches its maximum file size. We recommend having at least 1 GB or 10% to start with. Click ... to update the values. |
| Path |
The location of the file. Click ... to update the location. |
| File Name | The name of the file. |
7.Click OK. The system creates the configuration database and installs it on the configuration database server that you specified. Several progress dialog boxes appear as various Microsoft SQL scripts execute to create and load the configuration database. After the system loads the configuration database, the Configuration Application page displays Configuration database loaded.
8.Click Next. The system refreshes the Configuration Application page. (If you end up on the next page of the System Configuration Wizard, click Previous to return to the Configuration Application page.)
9.Enter values into the fields:
| Parameter | Description |
|---|---|
| Configuration Server Domain Name | The fully-qualified domain name of the configuration server in this format: config.servername.com. |
| License Server | The name of the license server. We recommend using a fully-qualified domain name. |
| Port | The port number of the license server. The default is 80, or 443 if you check Use SSL. |
| Use SSL | Check if the license server uses SSL. |
| IvantiSM License File-Production |
The name of the license file for the Neurons for ITSM production instance. Click Browse..., navigate to the license file, and click Open. License files have a .lic suffix.
NOTE: The system displays either one or both of the license fields, depending on your landscape environment. At this point, you only need to enter one license, which allows the License Manager to start and run Neurons for ITSM. You can import additional licenses, if needed, at a later time from within the License Manager. See Using the License Manager. |
| IvantiSM License File-Non-Production |
The name of the license file for the Neurons for ITSM non- production instance. Click Browse..., navigate to the license file, and click Open. License files have a .lic suffix.
NOTE: The system displays either one or both of the license fields, depending on your landscape environment. At this point, you only need to enter one license, which allows the License Manager to start and run Neurons for ITSM. You can import additional licenses, if needed, at a later time from within the License Manager. See Using the License Manager. |
10.Create the administrator account for the configuration database. You only need to create this account once. If you return to this page in the System Configuration Wizard later, these fields are not displayed.
Enter values into the fields:
| Parameter | Description |
|---|---|
| Login ID | The system automatically displays the login ID of HSWAdmin. You cannot change this. |
| Password |
The password associated with the administrator.
Record this password for future reference. If you lose the password, you must recreate and load the configuration database. |
| Confirm Password | Re-enter the password associated with the administrator. |
| First Name | The first name of the administrator. |
| Last Name | The last name of the administrator. |
| Email Address | The email address of the administrator. |
11.Do one of the following:
•If you chose Single Server Deployment, click Next. The system displays the Neurons for ITSM Application page.
•If you chose Multiple Server Deployment, repeat all of the steps in this procedure to create a configuration database for each of your tenants. Then click Next. The system displays the Neurons for ITSM Application page.