Upgrading Neurons for ITSM from an Earlier Release
Landscapes
During an Neurons for ITSM upgrade, you can upgrade the development (staging) or testing (UAT) landscapes and test them without affecting the production landscape. After you have verified that the development (staging) or testing (UAT) landscape upgrade was successful, go ahead with production landscape upgrade.
Reporting Feature
You must upgrade both Neurons for ITSM and the reporting feature at the same time. The versions of the software for both Neurons for ITSM and the reporting feature must be the same.
Licenses
Versions of Ivanti Service Management before Release 2015.1 used a different licensing structure. When you upgrade to Neurons for ITSM Release version 2015.1, the system automatically uses the licenses that you used in the previous release.
In the System Configuration Wizard, on the Configuration Application page, there are fields to enter the license files. The system populates these fields automatically based on your previous license file. See Configuring the Configuration Database.
DSM Integration
If your Neurons for ITSM deployment includes a DSM integration, you must configure and verify your DSM integration for the new release.
Although there is a DSM integration service component in the Neurons for ITSM installer, it is only used for DSM integrations prior to Ivanti Service Management Release 2015.2.
For DSM integrations after Ivanti Service Management Release 2015.2, you must use the package from the Ivanti App Store.
After you have upgraded Neurons for ITSM, access the Ivanti Software App Store and the DSM integration by doing the following:
1.Log into https://support.heatsoftware.com/.
2.Go to the Ivanti Software App Store by selecting App Store from the top menu.
3.From within the Ivanti Software App Store, open the DSM integration package.
4.Download the DSM integration package for Release 2019.1 and the accompanying instructions.
5.Follow the instructions to configure and verify your DSM integration.
For more information about DSM, see Working with DSM in the online help.
About Upgrading from Earlier Releases
• The upgrade to the N version of Ivanti Service and Asset Manager should be always performed from N-1 version. For example, upgrade of on-premise version 2018.1.1 to 2019.1.0 should be done only after the upgrade path of 2018.3.1. Skipping of any of the released version of the application during an upgrade might fail the application upgrade or the application might stop working post the upgrade.
• 2019.2 is a cloud-only release and has no updates for on-premise customers.
•The system upgrade log file name under c:\Logs\ReleaseTool will be “ApplyPatchConfigDB2019.3.1.log” for config database which is expected for 2020.1 release.
To upgrade to Neurons for ITSM Release 2024, you must upgrade your system to every Service Management release between your currently installed release and Neurons for ITSM Release 2020.3 in sequential order. See the table below.
| Upgrade From Release | Details | Install Release |
|---|---|---|
| 2013.1.x | The current Ivanti Service Management version and the Inventory Management component, if present. See Uninstalling the Inventory Management Component. | 2013.2.2 |
| 2013.2.x | 2014.1.1 | |
| 2014.1.x | 2014.2.1 | |
| 2014.2.x | 2014.3.1 | |
| 2014.3.x | 2015.1 | |
| 2015.1.x | Nothing. | 2015.2 |
| 2015.2.x | 2016.1 | |
| 2016.1.x | 2016.2 | |
| 2016.2.x | 2017.2 | |
| 2017.2.x | 2017.3.x | |
| 2017.3.x | 2018.1.x | |
| 2018.1.x | 2018.3.x | |
| 2018.3.x | 2019.1.x | |
| 2019.1.x | 2019.3.x | |
| 2019.3.x | 2020.1.x | |
| 2020.1.x | Important steps to be performed. Click here to view the steps. | 2020.2.x |
| 2020.2.x | Nothing | 2020.3.x |
| 2020.3.x | 2020.4.x | |
| 2020.4.x | 2021.1.x | |
| 2021.1.x | 2021.2.x | |
| 2021.2.x | 2021.3.x | |
| 2021.3.x | 2021.4.x | |
| 2021.4.x | 2022.1.x | |
| 2022.1.x | 2022.2.x | |
| 2022.2.x | Install the patch - HotFix_BUG_997037_994439-OnPrem.zip (install this patch after upgrading to 2022.3 and on fresh installation). | 2022.3.x |
| 2022.3.x | 2022.4.x | |
| 2022.4.x | 2023.1.x | |
| 2023.1.x | 2023.2.x | |
| 2023.2.x | 2023.3.x | |
| 2023.3.x | Refer to Installing Neurons for ITSM | 2023.4.x |
For example, if you are currently on Ivanti Service Management Release 2014.1.x and you want to upgrade to Ivanti Service Management Release 2018.3, you must do the following:
1.Uninstall Ivanti Service Management Release 2014.1.x and the Inventory Management component, if present. See Uninstalling the Inventory Management Component.
2.Install Ivanti Service Management Release 2014.2.x.
3.Uninstall Ivanti Service Management Release 2014.2.x.
4.Install Ivanti Service Management Release 2014.3.x.
5.Uninstall Ivanti Service Management Release 2014.3.x.
6.Install Ivanti Service Management Release 2015.1.x.
7.Install Ivanti Service Management Release 2015.2.x.
8.Install Ivanti Service Management Release 2016.1.x.
9.Install Ivanti Service Management Release 2016.2.x.
10.Install Ivanti Service Manager Release 2017.3.1
11.Install Ivanti Service Manager Release 2018.1.x
12.Install Ivanti Service Manager Release 2018.3.x
13.Install Ivanti Service Manager Release 2019.1.x
14.Install Ivanti Service Manager Release 2019.3.x
15.Install Ivanti Service Manager Release 2020.1.x
16.Install Ivanti Service Manager Release 2020.2.x - Important steps to be performed. Click here to view the steps.
17.Install Ivanti Service Manager Release 2020.3.x
18.Install IvantiNeurons for ITSM 2020.4.x
19.Install IvantiNeurons for ITSM 2021.1.x
20.Install IvantiNeurons for ITSM 2021.2.x
21.Install IvantiNeurons for ITSM 2021.3.x
22.Install IvantiNeurons for ITSM 2021.4.x
23.Install IvantiNeurons for ITSM 2022.1.x
24.Install IvantiNeurons for ITSM 2022.2.x
25.Install IvantiNeurons for ITSM 2022.3.x - click here for details
26.Install IvantiNeurons for ITSM 2022.4.x
27.Install IvantiNeurons for ITSM 2023.1.x
28.Install IvantiNeurons for ITSM 2023.2.x
29.Install IvantiNeurons for ITSM 2023.3.x
30.Install IvantiNeurons for ITSM 2023.4.x
Upgrading from Ivanti Service Management Release 2017.3.x
If you are upgrading to Neurons for ITSM Version 2018.3, you must first upgrade to Neurons for ITSMVersion 2018.1.1. You do not have to uninstall Ivanti Service Management Release 2017.3.x.
If you have a multiple server environment, you must shut off the notifications to the web servers before you upgrade the system. This is because when you make metadata changes as part of the upgrade, the system tries to synchronize them, but because the versions are different, the system hangs or takes a lot of time. See step 2 below.
Perform these steps on the system that hosts the Neurons for ITSM components:
1.Back up the following items:
•Neurons for ITSM Configuration Database (ConfigDB)
•Neurons for ITSM Application Database
•Attachment folder (if used)
2.(Optional, if your system uses multiple servers) Deactivate the web servers by doing the following:
| a. | Log into the Configuration Database. See the Configuration Database Guide for Neurons for ITSM for information about using the configuration database. |
| b. | Open the Web Servers workspace. The system displays a list of web servers. |
| c. | Open a web server record. |
| d. | Clear the Server is Active check box. |
| e. | Click Save. |
| f. | Repeat for all of the web servers. |
3.Access the installation folder on the Ivanti product CD or zip file and run IvantiServiceManager.exe. Right-click and select Run as Administrator to ensure proper installation.
The installer checks for the prerequisite software components. If any of those components is not installed, the system prompts you to install them now.
4.Click Install at the prompt. Installation of the prerequisite software can take several minutes. If you are prompted to restart the system, click Yes.
5.In the Upgrade Confirmation dialog box, click Yes. The system displays the Welcome dialog box. The installer checks for space and other requirements before displaying the Next button.
6.In the Welcome dialog box, click Next. The system displays the License Agreement dialog box.
7. Choose I accept the terms in the license agreement and click Next. The system displays the Destination Folder dialog box.
8.Click Next to accept the default installation folder, or click Change and select a different folder. The system displays the Setup Type dialog box.
9.Your selection of features from the Setup Type dialog box depends on the role of the individual host in your deployment plan.
•For the Demonstration or Proof-of-Concept Deployment, choose Complete, click Next, and install all components.
•For the Minimum Production Deployment , choose Complete, click Next, and install all components.
•For the Enterprise Production Deployment, your choice depends on the role of the host:
•Production processing server: Choose Custom, click Next, and install all components except for the Operations Console.
•Staging or UAT processing servers: Choose Complete, click Next, and install all components.
•Web servers: Choose Custom, click Next, and only install the Ivanti Service Manager application server.
For the Enterprise Production Deployment, note the following:
•If your deployment includes different processing servers for production, staging, and UAT, you must install the License Manager in every one of those landscapes.
•You can choose Complete and install all Neurons for ITSM features on all of your servers, but doing that takes up more disk space than necessary.
When installing components, note the following:
•To not install a component, click the down arrow next to the server icon next to the category name, highlight the component, right click, and select This feature will not be available.
•If your deployment includes DSM, you do not need to install the DSM integration service because that component has been incorporated into Ivanti Service Management since Release 2015.2.
10.Click Next. The system displays the Ready to Install the Program dialog box.
11.Click Install. The system begins installing Neurons for ITSM and displays a status dialog box, showing the installation progress of each module over the next few minutes.
12.Click OK if the system displays a dialog box saying that reboot is required after installation.
13.If the system displays a dialog box saying that some of the files that need to be updated are currently in use, choose Automatically close and attempt to restart applications and click OK.
When the installation is completed, the system displays the System Configuration Wizard.
14.Go through the pages in the wizard making any changes that might be necessary.
If you already have an existing administrator account, you do not need to create a new account. Just enter the information for your existing administrator account.
15.On the Upgrade System page, do not check Do not create backup prior to upgrade unless you already made a backup. Hidden for 2017.1 and 2017.2 Needs to show in 2017.3
16.Notice that the system table version and metadata package version for the configuration database are not the latest versions.
Upgrade System Page Needs to show in 2017.3
17.Click the top Upgrade System button.
18.When prompted, enter the administrator role credentials for the configuration database and click OK.
19.If your deployment has additional databases to upgrade, repeat steps 15 and 16 until:
| a. | All of your databases have been upgraded: |
•Configuration database
•Application database (IvantiSM)
| b. | All of your environments have been upgraded: |
•Production
•Staging
•UAT
•Development (optional combination of staging and UAT)
20.Click Finish.
21.Restart the host server.
22.(Optional) If you also installed the Neurons for ITSM reporting feature, you must upgrade it to the match the release number of your Neurons for ITSM system. Access the installation folder on the Ivanti Software product CD or download folder and run ReportingService.exe to upgrade Neurons for ITSM reporting feature.
23.Log in to the configuration database and activate the web servers that you deactivated in step 2.
Upgrading from Ivanti Service Management Release 2014.3 or Earlier
•About Upgrading From Ivanti Service Management Release 2014.3 or Earlier
•Uninstalling the Inventory Management Component
About Upgrading From Ivanti Service Management Release 2014.3 or Earlier
Beginning with Ivanti Service Management Release 2015.1, the Inventory Management component is known as Ivanti HEAT Discovery. As a result, before you can upgrade to the current version of Neurons for ITSM, if you are upgrading from Release 2014.3 or earlier, you must first uninstall the Inventory Management component.
Uninstalling the Inventory Management Component
Perform these steps on the system that hosts Neurons for ITSM:
1.Click the arrow at the bottom of the Start menu to view the Apps menu.
2.Mouse-over the Uninstall Ivanti Service Management icons to find the one for the Inventory Management component.
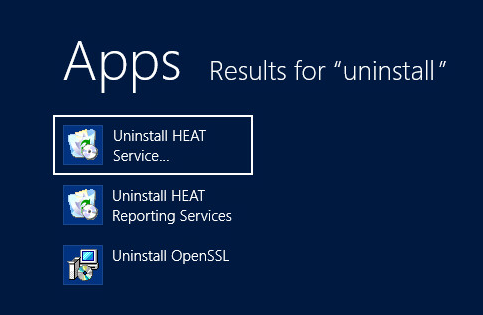
3.Click Uninstall Ivanti Service Management.
4.In the confirmation dialog box, click Yes.
Upgrading from Ivanti Tryvium 2020.1 Release to 2020.2 Release
The following steps should be performed before installing 2020.2 from 2020.1 release.
1.Log in to Neurons for ITSM with the Administrator role.
2.Open the Configuration console.
3.Under Security Controls, select Security and Sessions.
4.Under Concurrent Session, change the value of Named User, Privileged User, and Non Privileged User to 0.
5.Save the changes and refresh the page and re-validate the values are changed.
6.Now you can install 2020.2 Neurons for ITSM.
7.After installation is complete, you can change the concurrent users values as it was earlier.