Understanding the Information in the Grid
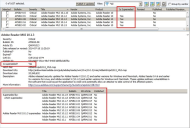
The Updates and the Published Third-Party Updates grids each consist of two panes. Each pane displays unique information and provides unique functionality.
- The top pane displays all of the updates for the selected workspace. This pane contains a large number of columns that provide high level information about each update. You can also select the updates that you want to perform an action on.
- The bottom pane displays detailed information about the update that is selected in the top pane. This pane is not available if more than one update is selected in the top pane.
- Apply filters to search for specific updates.
- Use the Search tool to display only those updates that match your search criteria
- Reorder the columns by clicking and dragging the column headers to new locations. Only the Included column cannot be moved.
- Click within a column header to sort the column in ascending or descending order.
- Apply filters to one or more column headers.
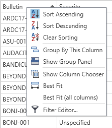
- Right-click within a column header and perform a number of additional actions.
- Sort Ascending: Sorts the selected column in ascending order.
- Sort Descending: Sorts the selected column in descending order.
- Clear Sorting: Clears the ascending or descending sorting criteria currently set for a column
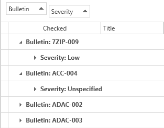
- Group By This Column: Groups the table using the data in the selected column. It does this by moving the data into expandable lists that are located in the body of the grid. One expandable list will be created for each possible column value.
- Show Group Panel / Hide Group Panel: Displays or hides an area immediately above the column headers that contains "Group By" boxes. One "Group By" box will be displayed for each column header for which Group By This Column is currently enabled. You can also drag column headers to and from this area.
- Show Column Chooser: Enables you to add and hide information within the grid. When you select Show Column Chooser, the Column Chooser dialog is displayed. This dialog is used to specify which of the available columns you want displayed within the grid. If you click and drag an entry in the list to a new position in the dialog, the columns in the grid will be reordered to match.
- Best Fit: Resizes the width of the selected column so that the header text is displayed in the optimal amount of space.
- Best Fit (all columns): Resized the width of all columns in the table so that the header text is displayed in the optimal amount of space.
- Filter Editor: The Filter Editor dialog will show any filters that are currently active in the column headers. You can use the editor to modify the existing filter criteria and to build new criteria using the available filter conditions and logical operators.
Hover over a column header and then click the filter icon located in the upper-right corner.
![]()
Use the filter menu to select which of the values currently contained in the column should be displayed. When you apply a column filter, the filter definition will be displayed beneath the grid. You can use this to confirm which column filters have been applied to the current display and you can edit the filter.

If you perform this action on any subsequent columns, that data will be presented as nested groups at increasingly lower levels within the expandable lists.
For example:
If Show Group Panel is enabled, this will show the "Group By" boxes in the area immediately above the column headers.
Tip: To turn off the Group By This Column feature and revert to the original view: Enable Show Group Panel, right-click each Group By box and select Ungroup, and then right-click in the column header and select Hide Group Panel.
The table will be grouped according to the data in the box. If there are two or more boxes then the grouping will be nested, with the left-most box presented at the highest level, the second box presented at the second level, etc.
Most of the columns in the two grids are self-explanatory and need no description. A few columns may not be so obvious, however, and their descriptions are provided here.
- Associated Template: Indicates if the updates in a supersedence chain are associated with an Update Template.
- Bundled count: Applies only to bundles and indicates the number of updates contained within the bundle. The value will be 0 for any update that is not a bundle.
- Catalog: Indicates which catalog the update is contained in.
- Category: Available with v3 catalogs, which support the use of categories within a catalog.
- CVE ID: Displays the CVE IDs that are associated with the update. The column entry is blank if there is no associated CVE ID.
- CVSS: Displays the Common Vulnerability Scoring System value for an update. If an update includes multiple CVEs, the highest CVSS is shown.
- Detectoid: Indicates if the selected item is a detectoid. A detectoid is a piece of logic that determines if an update is installable.
- Download method: Indicates if the update can be downloaded by the program (Automatic), if it must be manually downloaded (Acquire from vendor) or if it is Unavailable.
- IAVA ID: Displays the Information assurance vulnerability alerts (IAVA) IDs that are associated with the update. The column entry is blank if there is no associated IAVA ID.
- In Bundles: Indicates the number of bundles that contain this update.
- Is Downloaded: Indicates if the update has been downloaded to the file system, but not published to WSUS. This is particularly useful if you have set up your environment for offline downloads.
- Is Superseded: Indicates if the update has been superseded by another update. An update that has been superseded is not the most current update available. To view the supersedence chain for an update, select the update and the superseded information is displayed in the bottom pane. The default filter, *Latest not-published, will not display any superseded updates that have not already been published. To view all updates, including superseded updates, select the filter named *All.
- Languages: Identifies the different language versions that are available for each update. You can limit which languages are displayed by using the Languages tab of the Patch for Configuration Manager Settings dialog. If the Languages column entry is blank it means that the update applies to all languages that the product supports.
- Metadata Only: Indicates if detection logic has been published for the update but not the actual software binaries used to install the update.
- Notes: Shows any notes that are associated with the update.
- Published: Indicates if the update has been published to WSUS.
- Published Revision: This number is incremented each time a revision to that update is published. All published updates will have a number greater than zero.
- Revised: Indicates if the update is a revision to an update that was previously published. If so, the check box in the Selected column will be enabled. Publishing such an update will create a new revision and will increment the Published Revision number.
- The detection logic that determines if a patch applies to a system and if it is already installed
- Any text related to the update
- Status: Displays real-time status for active operations and error status for failed operations. If an operation completes successfully, the status is stored for one minute and then cleared on the next refresh. For failures, the status column continues to display the error status until you clear it using Clear status.
For IAVA IDs to be available, you need to purchase a separate SKU: U.S. Federal for Ivanti Patch for Configuration Manager subscription. Please contact your Ivanti Sales representative to acquire a Federal Edition license for Patch for Configuration Manager. After acquiring the license, activate it under Settings > License Tab.
For example:
A revision update alters only the metadata and not the update package. A revision is posted to the Patch for Configuration Manager catalog whenever any of the following need updating:


