Previous Reconciliations
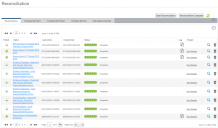
Click Reconciliations under Reporting on the menu bar to see a list of previous reconciliations.
Products, Metrics and Roles
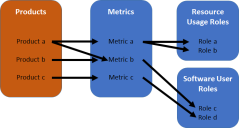
The following definitions apply within License Optimizer:
•Product – the software application
•Metric – the unit in which the liability for products are measured
•Software User Roles – if a product’s metric is user-based, there may be more than one type of user associated with it, for example Full Access User, Authorized User
•Resource Usage Roles – if a product’s metric is based on resource usage, there may be one or more resource usage roles associated with it
Note that:
•a product has at least one metric
•metrics may have one or more software user roles
•metrics may have one or more resource usage roles
•metrics may have neither resource usage roles, nor software user roles
The Reconciliation page contains five tabs:
The Reconciliations tab of the Reconciliation page lists previous reconciliations in date order. The data grid includes the following columns:
•Partial – indicates whether the reconciliation was a full reconciliation ![]() or a partial reconciliation
or a partial reconciliation ![]() . For more information on partial reconciliations, see Start Reconciliation.
. For more information on partial reconciliations, see Start Reconciliation.
•Name – the name of the reconciliation as a link. Clicking this link displays the reconciliation data for the selected reconciliation in the Data Summary page. For more information, see Data Summary.
•Last Action – the date and time that the last action of the reconciliation was completed.
•Created Date – the date and time that the reconciliation was initiated.
•Status – indicates the current status of the reconciliation, alongside a comment:
•gray progress bar – the reconciliation is initiating
•amber progress bar – the reconciliation is in progress
•green progress bar – the reconciliation has completed successfully
•red progress bar – the reconciliation has failed to complete
•Log – displays an icon for reconciliations where you may download a reconciliation log. Click the icon to download a text file containing the reconciliation log that lists the actions from the reconciliation.
•Stream – displays a link that opens the Maintenance Streams page from where you can view maintenance streams for a specific product version and see what was calculated in the chosen reconciliation. For more information about Maintenance Streams, see Maintenance Streams.
•
 – click the magnifying glass icon to display the Past Reconcile Result dialog that gives an overview of the reconciliation results, shows the configuration settings used, and shows the filters used for partial reconciliations.
•
![]() – click to delete the reconciliation record. You are prompted for confirmation.
– click to delete the reconciliation record. You are prompted for confirmation.
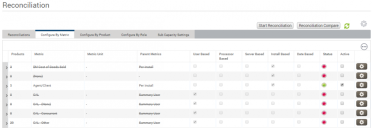
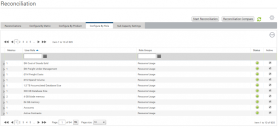
The Configure by Metric tab on the Reconciliations page displays all metrics in License Optimizer in a data grid, which you can sort as required.
The columns in the Metrics data grid are:
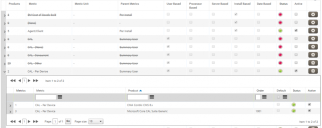
•Products – a count of the number of products linked to the associated metric.
Click  to the left of the data grid entry to expand the list and see the products associated with the metric.
From this pane, you can see information relating to each product associated with the selected metric. Click  within this pane to display metrics associated with each product entry.
•Metric – the name of the metric.
•Metric Unit – the unit specified for the metric.
•Parent Metric – the parent metric of the associated metric.
•User Based, Processor Based, Server Based, Install Based, Date Based – these columns display the type of data that the metric is based on.
•Status, Active – these columns indicate whether the associated metric is active (green circle icon in the Status column and Active column checked) or inactive (red circle icon in the Status column and Active column unchecked).
•Gears menu – enables you to add a product or role to the associated metric, or edit the associated metric.
•Edit metric – displays the Edit Metric Configuration dialog so that you can edit the metric.
•Add Product to Metric – displays the Edit Product Metric Configuration dialog so that you can add a product to a metric.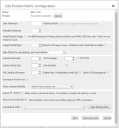
Click Search on this dialog to search for the product that you want to add to the metric.
IMPORTANT: The Edit Product Metric Configuration dialog also contains a number of advanced settings that you may wish to apply to the Product Metric Configuration. Take great care in using these advanced settings. We recommend that you seek guidance from the License Optimizer Support Team before using these advanced settings.
•Add Role to Metric – displays the Add Role to Metric dialog, enabling you to select a role to add to the metric.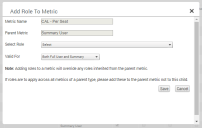
Adding roles to a metric overrides any roles inherited from the parent metric.
If roles are to apply across all metrics of a parent type, add these to the parent metric not to this child.
Reconciliation page gears menu
You can create a new metric from the Reconciliation page gears menu at the top right of the screen.
To create a new metric:
1.On the Reconciliation page gears menu, click Create Metric.
The Create Metric Configuration dialog appears.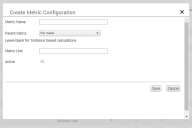
2.Configure the new metric by completing the following fields:
•Metric Name – the name of the new metric.
•Parent Metric – the parent metric for the new metric.
You may choose not to associate a Parent Metric with your new metric by selecting Select Parent Metric in the Parent Metric drop-down list (this is the blank option). In this instance, License Optimizer calculates liability on the number of software instances of the product found in software data alone.
The License Optimizer parent metrics contain rules for calculating liability and any metrics you create user that use a parent metric will use the License Optimizer rules for the specified parent metric to calculate the liability for that metric at reconciliation.
•Metric Unit – a unit of measure for the new metric.
This value is for information only and is not used in a reconciliation.
•Active – the status of the new metric (active or inactive).
3.When you have completed the fields on this dialog, click Save.
A metric is used in a reconciliation only if products are assigned to the metric and the metric is set to active.
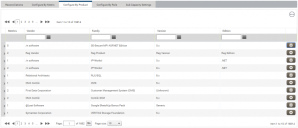
The Configure by Product tab on the Reconciliations page shows all products in License Optimizer that have a metric assigned to them other than the default install metric.
The columns in the Products data grid are:
•Metrics – a count of the number of metrics linked to the associated product.
Click the Expand Entry arrow to the left of the data grid entry to expand the list and see the metrics associated with the product.
From the expansion pane, you can see information relating to each metric associated with the selected product and set the priority order for metrics associated with the selected product by clicking Move Up and Move Down in the in-line gears menu for the entries in the expansion pane.
When a product has more than one metric assigned to it, License Optimizer needs to know which metric to use first in reconciliation.
EXAMPLE: Product A has both metric 1 and metric 2 assigned to it and metric 1 has a higher priority than metric 2.
During reconciliation, License Optimizer looks for licenses for product A with metric 1 first and uses those licenses as required. License Optimizer then looks for licenses for product A with metric 2 and uses those licenses.
•Vendor – the product vendor.
•Family – the product name.
•Version – the version of the product.
•Edition – the edition of the product.
•Gears menu – enables you to add a role to the product or view roles already associated with the product:
•Product Roles – displays the View Product Configuration dialog that enables you to view roles associated with the selected product.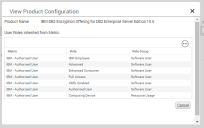
•Add Role to Product – displays the Add Role to Product dialog, which enables you to add a role to the selected product.
The Configure by Role tab on the Reconciliations page displays all roles in License Optimizer in a data grid, which you can sort and filter as required.
The columns in the Roles data grid are:
•Metrics – displays a count of the number of metrics linked to the associated role.
Click the Expand Entry arrow to the left of the data grid entry to expand the list and see the metrics associated with the role.
From this pane, you can see information relating to each metric associated with the selected role. Click the Expand Entry arrows within this pane to display products associated with each metric.
•User Role – the name of the role.
•Role Groups – states whether the role is a Software User role or a Resource Usage role.
•Status, Active – state whether the associated metric is active (green circle icon in the Status column and Active column checked) or inactive (red circle icon in the Status column and Active column cleared). You can change the status of a role by checking or clearing the Active check box of the associated role data grid entry.
Editing and creating roles
You can edit a role by clicking the associated data grid entry to display the Edit Role Configuration dialog, or create a new role from the Reconciliation page gears menu at the top right of the screen.
To create a new role:
1.On the Reconciliation page gears menu, click Create Role
The Create Role Configuration dialog appears.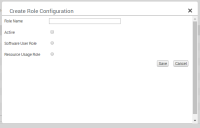
2.Completing the fields as follows:
•Role Name – the name of the new role.
•Active – he status of the new role.
•Software User Role, Resource Usage Role – the type of the new role.
3.Click Save.
When you have created a role, it is available:
- In the Software Users page or the Resource Usage page (depending on the role type of the new role)
- In the Configure by Role tab on the Reconciliation page.
A role is used in reconciliation only when it is assigned to a metric and products are assigned to that metric.
The Sub Capacity Settings tab enables you to configure the sub capacity settings for specific vendors. Sub Capacity licensing enables products to be licensed according to the resources available to software installed on the partition rather than having to license the entire server.
Records for sub capacity settings are shown in a data grid. You switch settings on or off using the check box alongside the associated sub capacity settings record entry.
We recommend that you check these settings before running any reconciliation, to ensure the settings are configured as required.
Click Start Reconciliation to run a new reconciliation. For more information, see Start Reconciliation.
Click Reconciliation Compare to compare two snapshot dates (full reconciliations only). For more information, see Comparing reconciliations.
Click the Refresh Data icon to refresh the reconciliation records data in the data grid.
Click the Reconciliation page gears menu to create new metrics or roles. For more information, see the Configure by Metric and Configure by Role tabs above.
