Configure Merge Actions for Individual Fields
Use the mApp Action context menu in the Business Object Editor within a mApp Solution to configure merge actions for individual Business Object fields. You can also use the Field Properties window to configure merge actions for individual fields, as well as for field properties.
Good to know:
- You can only configure separate merge actions for individual Business Object fields and field properties if the Business Object is set to Merge in the Business Object Properties window (mApp page). If the Business Object is set to any other option, or if Include in mApp is cleared, then you cannot configure separate merge actions for individual field properties.
-
If you are configuring merge actions for Business Object fields that were previously applied as part of a Protected mApp™ Solution, the main differences are:
- You see a shield icon
 next to
each content-protected field.
next to
each content-protected field.
- If a Business Object field is content-protected, it cannot be deleted. This includes menu, context menu, toolbar, and related buttons.
- Default fields in a content-protected Business Object cannot be edited in any way but you can add new fields and then edit or delete them.
- When a Business Object is content-protected, you can increase its field length from the default and decrease it back to the original default length.
- You can use a content-protected Business Object property field in a Full Text Search by selecting the check box on the Search Results page.
- See Protected mApp™ Solutions.
- You see a shield icon
To configure merge actions for individual Business Object fields:
- Add a Business Object to a mApp Solution using the Add Business Object to mApp Wizard.
- In the
Object
Manager within the
mApp Editor,
select the
Business Object from the Object tree, and then
select the
Edit Business Object task in the
Structure area.
Note: You can also select Business Object
 on the
mApp Editor
toolbar to open the Business Object Editor.
on the
mApp Editor
toolbar to open the Business Object Editor.
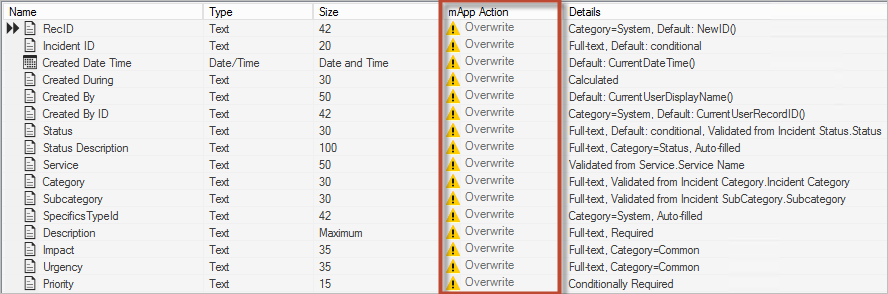
The Business Object Editor opens, displaying the list of fields with a mApp Action column to show which fields you selected to overwrite and which ones you selected not to overwrite (blank in the mApp Action column) in the Add Business Object to mApp Wizard. If you set the Business Object to Merge in the Business Object Properties window, then the selections made in the Defaults section (Default Behavior for Fields drop-down list) are also reflected in the mApp Action column.
- Configure separate merge actions for individual fields (using the
mApp Action context menu):
- Select a field, right-click in the
mApp Action column, and then hover over
mApp Action to open a context menu.
Note: The mApp Action context menu is only available if the Business Object was set to Merge.
- Select a merge action for the field from the context menu:
- Make no changes to field: Select this option to leave the existing definition in the target system unchanged (the mApp Solution definition is not imported into the target system when the mApp Solution is applied).
- Import field if not already there: Select this option to import the field if it does not already exist in the target system. If it already exists, the field is not imported when the mApp Solution is applied.
- Overwrite field: Select this option to have the mApp Solution definition overwrite the existing definition in the target system.
- Conditionally merge field properties: This option is grayed out on the context menu because merging a field requires selecting separate merge actions for individual field property merge areas. This is done using the Field Properties window (see step 5).
- Remove field from target system: Select this option to have the field removed from the target system.
- Field is reference-only: Select this option to include the field in the mApp Solution for informational purposes only (the definition is not imported into the target system when the mApp Solution is applied). You should rarely (if ever) need to do this manually, as the system automatically adds definitions as necessary for reference only.
The selected action shows in the mApp Solution status column (blank if you selected Make no changes to Field).
- Select a field, right-click in the
mApp Action column, and then hover over
mApp Action to open a context menu.
- Configure separate merge actions for individual fields (using the
Field Properties
window):
- Select a field in the Business Object Editor, and then select Field Properties.
- Select the
mApps page.
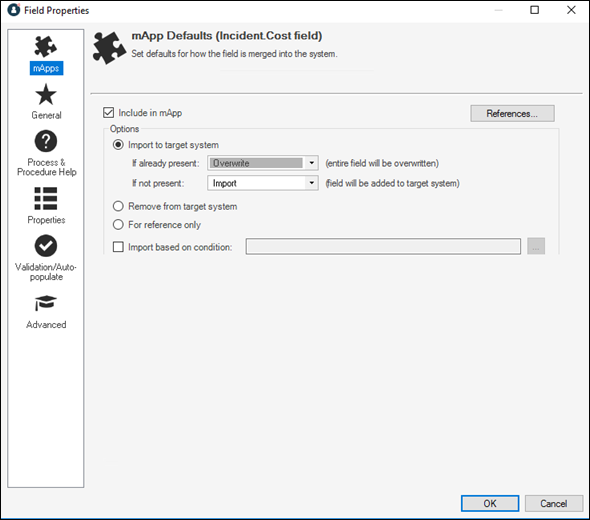
- Define general
mApp Solution properties for the field:
- Include in mApp: Select this check box
to include the field in the
mApp Solution. Clear this check box to leave the existing definition in the target
system unchanged (the field is not imported into the target system when the
mApp Solution is applied).
Note: This check box is automatically selected if some or all of the fields were set to overwrite when the Business Object was added to the mApp Solution (using the Add Business Object to mApp Wizard), or if you selected anything besides Make no changes to field in the mApp Action context menu.
- References: Select this button to open the References window and view all of the other definitions being used by the field.
- Include in mApp: Select this check box
to include the field in the
mApp Solution. Clear this check box to leave the existing definition in the target
system unchanged (the field is not imported into the target system when the
mApp Solution is applied).
- Define options (merge actions) for how the definition will be
merged into a target system:
Note: These options are only available if Include in mApp is selected.
- Import to target system: Select this
option to import the definition into a target system. Then, select a merge
action based on whether or not the definition is already present in the target
system:
If already present: In the drop-down list, select a merge action to define how the definition is imported if it already exists in a target system:
- Overwrite: Select this option to have the mApp Solution definition overwrite the existing definition in the target system.
- Don't Import: Select this option to leave the existing definition in the target system unchanged (the mApp Solution definition is not imported into the target system when the mApp Solution is applied).
- Merge: Select this option to define separate merge actions for each individual area of a definition.
If not present: In the drop-down list, select a merge action to define whether the definition is imported if it does not currently exist in the target system:
- Import: Select this option to import the mApp Solution definition into the target system if does not already exist.
- Don't Import: Select this option to skip importing the mApp Solution definition into the target system if it does not already exist (the mApp Solution definition will not be added to the target system).
- Remove from Target System: Select this option to remove the definition from a target system.
- For Reference Only: Select this option to include the definition in the mApp Solution for informational purposes only (the definition is not imported into the target system when the mApp Solution is applied).
- Import/Remove Based on Condition:
Select this check box to import or remove the definition based on a condition.
Then, select the ellipsis
 to open the
mApp Conditions window and
define
mApp Solution conditions.
to open the
mApp Conditions window and
define
mApp Solution conditions.
Note: The action you selected from the mApp Action context menu is automatically selected.
- Import to target system: Select this
option to import the definition into a target system. Then, select a merge
action based on whether or not the definition is already present in the target
system:
- Configure separate merge actions for individual field property merge
areas:
- In the Options area of the Field Properties window, select Import to Target System .
- Select
Merge as the merge action for the field from
the
If Already Present drop-down list.
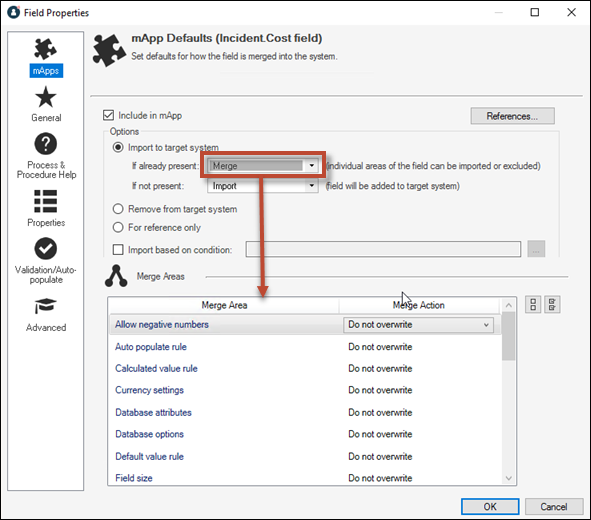
- Define individual merge actions for each merge area:
In the Merge Areas Grid: For each merge area, select a merge action in the Merge Action column drop-down lists:
- Overwrite: Select this option to have the merge area overwritten in the target system when the mApp Solution is applied.
- Do Not Overwrite:
Select this option to leave the merge area
unchanged in the target system when the
mApp Solution is applied.
Tip: Select Uncheck All
 to set all merge areas to
Do Not Overwrite. Select
Select All
to set all merge areas to
Do Not Overwrite. Select
Select All to set all merge areas to
Overwrite.
to set all merge areas to
Overwrite.
On the remaining pages of the properties window: Select mApp
 next to each of the merge areas to define merge
actions for individual properties:
next to each of the merge areas to define merge
actions for individual properties:
Select OK.
The selections you made in the Options area are reflected in the Business Object Editor Grid.
- Prepare the mApp Solution for Distribution (), or save the mApp Solution () to continue making other changes.