Getting Started with Spend Intelligence
This section helps you to become familiar with Ivanti Neurons for Spend Intelligence, introducing you to some of the concepts and features while guiding you through to getting some initial results. It is not exhaustive - more detail is provided in the other sections of the help - but aims to provide an overview so that you feel more comfortable exploring and experimenting for yourself.
If your organization has not implemented Spend Intelligence previously, you may find it helpful to work through all of this section; if your organization has already implemented Spend Intelligence, you may still find it helpful to work through this section but maybe without needing to action each stage.
Remember that Ivanti Neurons for Spend Intelligence is not a finance package and does not always give exact financial values. The purpose of the system is not to balance your accounts but to help you sift through the mass of software asset data you have to find where you are spending money and to identify opportunities for spending less.
Connectors: get some data
First of all, we need a connector to a source of inventory data. It is unlikely that Spend Intelligence is the first thing in the Ivanti Neurons platform that your organization will try, so there is a good chance you already have a suitable connector set up.
For information about setting up a connector server and creating a connector, see Connectors.
It is also worth ensuring you have a connector to a Single Sign-On (SSO) connector (Okta or Microsoft Entra ID) set up. SaaS Management uses these along with connectors to certain SaaS applications to determine usage and liability for Cloud subscriptions.
What software is installed?
There are two dashboards in Ivanti Neurons for Spend Intelligence that tell us about the software we have: Software Insights for on-premise software, and SaaS Management for cloud software.
When you start one of the Spend Intelligence components (Software Insights, License Manager, or SaaS Management), a Spend Intelligence navigation pane appears that enables you to open each of the pages of Spend Intelligence directly. For the rest of this section, we will use this navigation pane to move around the application.
Under Overview in the Spend Intelligence navigation pane, click Software Insights to view the Software Insights dashboard. This dashboard contains a number of tiles that display information about your IT estate. You can click the tiles to see more information, and then drill down further to investigate anything that looks interesting. Give it a go now to see if you can identify some end-of-life or upgradeable software, or maybe first watch a short video:
Watch a video about Software Insights (4:07)
For more detailed information, see Software Insights.
When you have finished exploring the Software Insights dashboard, click SaaS Management under Overview in the Spend Intelligence navigation pane to view the SaaS Management dashboard. This dashboard shows you information about your cloud subscriptions. As with the Software Insights dashboard, you can click the tiles to see more information, and then drill down further to investigate anything that looks interesting. Give it a go now to see if you can identify which users rarely use applications they have and which applications are costing you the most. You can also watch a short video that introduces SaaS Management:
For more information, see SaaS Management.
What software have we bought?
Whereas Software Insights and SaaS Management help you to understand what software is being used, License Manager helps you to understand what software you have paid for and whether you have the correct number of licenses. If you are using a piece of licensable software, you must have a license for it or you may face serious penalties. However, software can be expensive, so you don't want to buy more licenses than you need. Later we will see how License Manager can help you to get the balance right between your liabilities and your entitlements.
Before we start using License Manager, let's look at some concepts and terminology.
Liabilities, metrics, and entitlements
Whenever you install a piece of licensable software, you incur a liability that needs to be matched with a corresponding entitlement in the form of a license. The size of a liability varies depending on the software title: different software titles may measure their liability in different ways called metrics. Be aware that different vendors may use different names for the same metric.
The most basic metric is Per Device (also known as Per Computer, Per Install, and so on). Each time you install software using this metric, you need another license. Some software uses a Per User metric: you can install it many times, but only one user may use it for each license. Client/server software, such as Microsoft SQL Server, often uses a Per Server, Per Core, or Per Processor metric where the size of the liability depends on the hardware of the server it is installed on. There are also unlimited licenses, often known as site licenses, which entitle all users associated with a specific site or region to use a piece of software.
You need to confirm the type of metric the software you are installing uses so that you can calculate the number of licenses you require to provide a matching entitlement.
Product types: different ways of buying licenses
As well as liabilities being calculated using different metrics, you can also buy licenses to cover these liabilities using different product types. Again, be aware that different vendors may use different names to mean the same thing. There are four basic types:
- Base license (perpetual license): a license that entitles you to use a specific version of a specific software title for ever. You can usually upgrade to minor releases and apply patches, but you cannot upgrade to the next major release.
- Maintenance license: when combined with a base license, this entitles you to use a specific software title for ever and also upgrade to the latest version for the duration of the maintenance agreement. These licenses often provide other benefits and must be renewed so that there is no gap in the maintenance agreement.
- Upgrade license: enables you to upgrade to the latest version of a software title from an earlier version.
- Subscription: enables you to use an application delivered on the cloud for a set duration.
Watch a video about product types (5:30)
Each time you buy one of these types of license is called a transaction. License Manager helps you to determine your license availability by matching maintenance and upgrade licenses with base licenses to show the corresponding entitlement.
For more detailed information, see License Manager.
Creating entitlement data and the SKU Library
So far we have looked at liabilities – the software that is being used and requires a license. Now we are going to consider entitlements – the contracts and licenses that give you the right to use that software.
Typically, you will import your contracts and license transactions from spreadsheets. Vendors often provide this information in spreadsheets, and they are a convenient method of managing this information. However, you can also create contracts and transactions directly in Ivanti Neurons for Spend Intelligence, so let's do that now to get an understanding of what these records look like.
Before we create a contract, it helps to know about another component of the system: the SKU Library. The Ivanti SKU Library contains prices for many software SKUs (Stock Keeping Units), which are the specific items you can buy from a vendor. These prices are used in the system if you haven't entered a cost along with a transaction, or imported a price list. We use the term cost for the amount of money you paid for a license, and price for the amount of money a vendor advertises the license at. The combination of a vendor and a SKU code uniquely identifies a software title, so it is important to enter the vendor name accurately to ensure it matches vendors in the SKU Library.
To create a contract:
- Under Entitlement on the Spend Intelligence sidebar, click Contracts.
The Contracts data grid appears. - On the Actions menu, click Create.
The Create Contract panel appears. - Start typing the vendor name in the Vendor field.
As you start to type a vendor name, matching vendors from the SKU Library appear in a drop-down.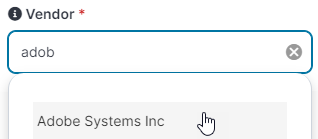
- Select the required vendor.
- Enter the Contract Number.
The combination of the Contract Number and Vendor must be unique. - Complete the remaining fields as required.
Hover over the i icon in front of a field label for information about how to complete the field. - Click Create.
The contract is created.
For more detail, see Contracts.
The contract is the framework that you buy software with and that sets the terms of use of the software. The license is the right to use a piece of software with certain conditions. You enter licenses into the system as transactions, which are the records of a purchase. Let's add one manually to help us to understand what is happening later when we import license transactions.
To create a transaction:
- Under Entitlement on the Spend Intelligence sidebar, click Transactions.
The Transactions page appears. - On the Actions menu, click Create.
The Create Transaction panel appears. - Enter the Vendor, like you did for the contract.
- Enter the SKU Code if you know it.
If a match for both the Vendor and SKU Code is found in the SKU library, the panel automatically updates with any fields for the matching SKU. - Complete the remaining fields as required.
If the Product Type has not been completed automatically based on the values in Vendor and SKU Code, it is important to select the appropriate value, as this affects the results you see in License Manager. See Selecting the Product Type for more information.
If you select a Cost Recurrence other than One Off, you must set a Coverage Start and Coverage End.
If you select the Unlimited check box, the Quantity is set to 1 and cannot be changed. - Click Create.
The transaction is created and the data in the system is updated. You are notified when the data processing completes.
If you specified a Contract Number that already exists, the transaction is linked to that contract. If you specified a Contract Number that does not exist, a new contract with no expiration date is created with that Contract Number. If you did not specify a Contract Number, the transaction is not linked to a contract.
Getting ready to import your licenses
Before importing your license records, decide what you want to achieve and gather the required information. The best advice is to start small: choose a small set of records for an install-based, desktop product from a single vendor. By choosing something straightforward you will gain familiarity with the system and the concepts while using a manageable set of data. Importantly, you will get a result more quickly this way, and then you can move on to bigger, more complex datasets. License data is often a little messy, so it is good practice to import it a little at a time, gaining experience as you proceed, and fixing a small number of issues each time. In this way, the data in your system will be clean and accurate, it will be easier to identify and fix new issues, and you will start to learn more and more about your license position after each import. If you import all of your license data at once, there is a possibility you will have a lot of errors to fix and it will be difficult to know where to begin. Start small and take one step at a time.
When you are comfortable using the system, then you can decide in which order to work through your vendors. To decide the order, consider:
- the number and complexity of the licenses
- the annual spend
- the likelihood of an audit
- the importance of the software to your organization
Target the vendors where you can get the best results for the least effort.
Gathering the proof of entitlement
Each vendor may have different requirements for what they consider a proof of entitlement in an audit, so you need to confirm for each vendor what is needed. Usually, a Purchase Order alone is insufficient, and you may need to provide items such as: a Contract, Publisher Notification, License Certificate, Novation Agreement, Full Boxed Product or Physical Media, Reseller Invoice, Publisher Online Portal, or Publisher Entitlement Reports.
When you have gathered your proof of entitlement documents, make sure it is complete and accurate. Are entitlement reports from vendors missing child organizations or agreements? Do the calculations provided by the vendors match your purchase history? If possible, compare multiple sources such as invoices and vendor license reports to validate your proof of entitlement.
Importing your license data
You have collected and checked a set of license transaction records, so now is the time to enter them into the system. You can enter them manually, one at a time from the Transactions page as we did earlier (and also see Transactions and Product Types) but this method is intended only for creating single transactions. It is much simpler, quicker, and less error-prone to import your transactions.
For Microsoft products, you can import your Microsoft License Statement (MLS) directly, whereas for other vendors there is a template spreadsheet you can download that includes the required columns with help text included to guide you.
Completing the template spreadsheet
It is best practice to download the latest version of the generic template spreadsheet before starting, as this will have the correct columns and include the latest advice. For more detailed information, see Import sources.
To download the template spreadsheet:
- On the Spend Intelligence sidebar, under Configuration, click Import Sources.
The Import Sources page appears. - Click Add.
The Add import source panel appears. - Under Generic License Transaction Import, click Download Template File.
The template spreadsheet is downloaded.
Before you can complete the template spreadsheet, you need to click the Enable Editing button that appears beneath the menu bar. We also recommend copying it somewhere that gets backed up - you don't want to lose it.
The first few rows of the spreadsheet contain instructions, then there is a row containing the column headers. Do not delete these rows, and do not change the text in the column headers. The Spend Intelligence importer uses these cells in the spreadsheet to map the data you are importing to the correct values in Spend Intelligence. The row beneath the column headers contains example data, which you do need to overwrite.
For each row, complete as many columns in the spreadsheet as you can. In particular, try to complete all of the columns with a red header. Hold your mouse pointer over a column header to see a pop up with additional information about what is required.
Remember, particularly when you are just starting out, don't add too many rows. Create a small import file first so that you can more easily understand how the data you have imported appears in the system.
Importing the spreadsheet
You can add many import sources, each of which you can import multiple times to add new records or update existing ones. If you delete an import source, all of the associated records are deleted. Take some time to consider what import sources you want to create, and how you want to name them. The names and contents of the import sources can help you to visualize your software estate and also plan the management of the corresponding data in Spend Intelligence. For details of how to import the data, see Import sources.
Validating the import
If everything goes well, when the import completes you will see the status Completed. However, you may see a warning message saying Completed with errors. Don't panic. Click the title of the import source, then on the import instances page, click the link in the Import date and time column to see the details of the import. If the Summary page reports there are errors or warnings, click the Messages tab to see more detail.
Error messages indicate a problem in the import file that needs resolving before you can start analyzing your licenses, whereas warning messages are less important and may not immediately affect your analysis.
Carefully interpret the messages, fix the issues in your spreadsheet, then re-import the updated file.
Learning from your data
Now that you have some transaction data in your system, you can start analyzing it. Remember: Ivanti Neurons for Spend Intelligence is not a finance package and is not intended to give exact figures – we are just trying to get a feel for where money is being spent so we can focus our efforts in the correct place.
Costs and prices
Spend information can come from three different places, and are determined in the following order:
- costs imported alongside license transactions or contracts; these are likely to be the amount actually paid with any reductions you have negotiated, and so are considered first
- price lists you have imported; these are likely to be the price you usually expect to pay
- prices found for matching software titles in the Ivanti SKU Library, which contains prices for many software SKUs; these are the standard prices and won't include any offers or reductions
On the Spend Intelligence sidebar, under Summary, click License Manager. The License Manager dashboard appears, showing you a range of charts and data grids that enable you to explore your license position. You can click the charts and data grids to see more details about areas of interest. For more information, see License Manager.
Comparing liabilities and entitlements
When you have investigated the dashboards of License Manager, consider comparing your liabilities with your entitlements. There are two stages to this:
- Determine your license availability - after appropriately combining all of the base, maintenance, and upgrade transactions what entitlements do I have?
- Match these available licenses with the installations that have been discovered.
More information is available at Comparing your liabilities and entitlements, or there are two videos that give an overview below.
How to interpret the dynamic summary of your license and install data and so gain an understanding of the current state of your license position:
How to use the license alignment feature to help you to determine if you have enough licenses for your IT estate:
What next?
Now that you have had a quick tour of Spend Intelligence, there are many ways to extend your usage to get more value from it. The obvious first thing to do is to import more licenses to build a more complete picture of your entitlements and liabilities. When doing this, remember to do it stepwise, choosing how to progress using the factors suggested earlier.
Other suggestions include:
- Integrate with Ivanti Neurons for ITAM to share data between your asset lifecycle management system and your software license spend system. See Integration with Ivanti Neurons for ITAM.
- Integrate with Ivanti Neurons for ITSM to log reclamation tickets directly from Ivanti Neurons for Spend Intelligence. See Connecting Software Insights to Ivanti Neurons for ITSM.