Adding a new license
In addition to importing licenses, you can add a new license manually. To add a new license, click Add New license from the Licenses page gears menu.
The Add New License page appears.
When you buy licenses, you usually know the vendor SKU (stock keeping unit) that you used. This SKU identifies exactly what it is you have bought. You can use SKUs to help you to enter license records more easily.
To add a license using a SKU:
1.Alongside SKU Number, click Look up.
The SKU Search dialog appears.
2.Enter the SKU in the SKU Number box, then click Search.
The data grid updates with details of the selected SKU.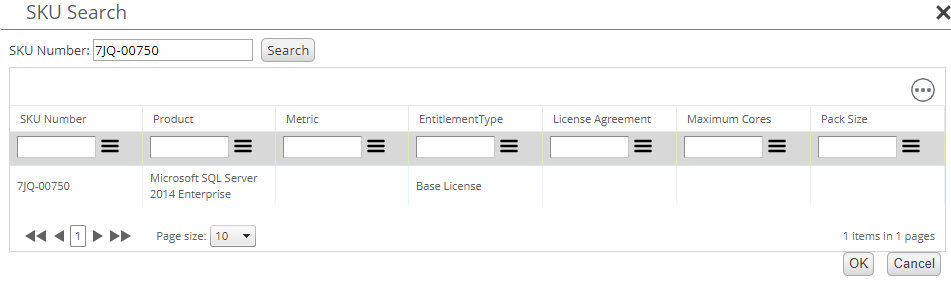
If you complete the Product field on the License page before you click Look up, the data grid shows all SKUs for the selected product:
3.Select the required SKU in the data grid, then click OK.
The SKU Search dialog closes, and the Add New License page updates with all of the information available from the SKU.
4.Complete the remaining fields on the Add New License page as described in the sections below, then click Save to save the new license.
1 – License Details
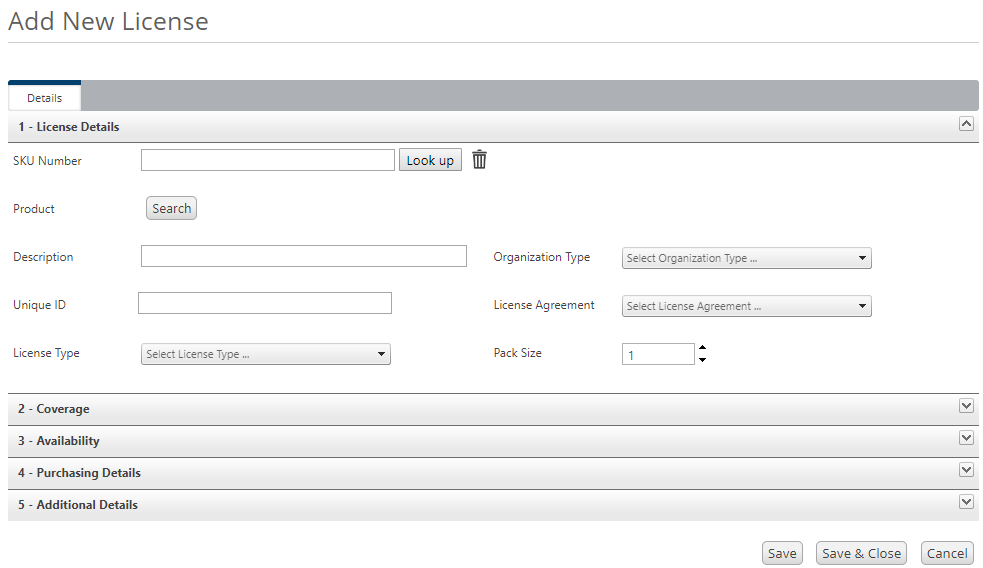
If you didn't use the SKU as described above, click Search to display the Select Product dialog to search for and select the product for the license. When you have selected the product, the Description field updates with the details of the selected product. If required, you can change this.
Set the following values:
•License Type.
If you choose Maintenance, an additional Maintenance Type drop-down list appears. For more information on Maintenance Licenses, see Maintenance licenses.
•License Agreement
•Organization Type – None, Education, Non-profit, Government, or Corporate.
•Level (Microsoft only)
•Pack Size
•Cores (Microsoft only)
When you have completed the License Details section, the following sections become available:
2 – Coverage
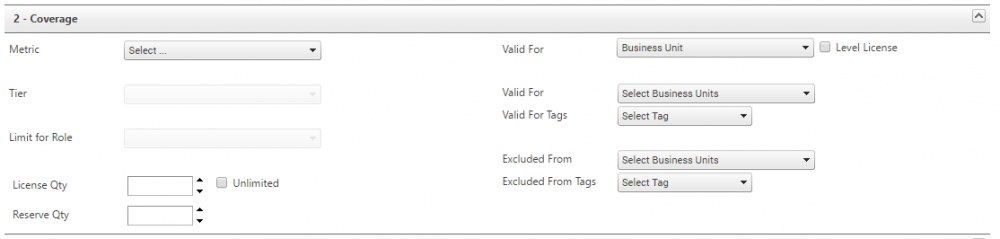
The Coverage section of the License page enables you to specify:
•Metric – the license metric(s) available to the product selected
License metrics can be based on a number of different measurements, for example the number of installations, details of the processors on the server where the software is installed, or the number of users of the software. In the case where license metrics are based on the number of users of the software, you need to set the appropriate usage values on the Software Users page for License Optimizer to use during reconciliation.
If you select a metric on the License page that requires usage configuration, a link appears that opens the Software Users page in a new browser tab so that you can set the number of users of the software. For more information, see Software Users.
•Tier – for certain metrics, you can set the tier for the license
•License Qty and Reserve Qty – select the Unlimited check box if you have an unlimited license
•The scope of the license.
You set the scope of the license using the Valid For and Excluded From drop-down lists. In the first Valid For drop-down list, specify how you want to restrict the license. You can choose to restrict the license by Business Unit, User, or OSI.
If you choose Business Unit, the following fields appear:
•Level License check box – select this if you want the license to include any child business units of a selected business unit.
•Valid For Business Units and Valid For Tags – select the business units and/or tags that the license will be restricted to.
•Excluded From Business Units and Excluded From Tags – select the business units or tags that the license will not be available to.
If you choose User or OSI, a Search button appears so that you can search for the users or OSIs that the license will be restricted to.
•The OSI option enables you to specify which OSIs the license can be applied to. The license is not applied to any other OSI even if the license is not used or not fully used against liability for the OSIs specified in the license. This means that any surplus licensing is not available to be used on OSIs that have not been specified.
•The User option enables the license to cover only the named users selected. Where the license is a user metric, the reconciliation is straightforward: for example, Oracle Database License is applied to user John Smith (where John Smith is a named user in the Software Users page).
If the metric is not a user metric, the OSIs that the named user is associated with are analyzed and any installed software found to match the licenses on those OSIs become valid for reconciliation.
3 – Availability

The Available check box is selected by default, meaning that the license is available for use in reconciliation. If you clear the check box, the license becomes unavailable for use in reconciliation, and you need to enter an explanation in the Unavailable reason field to explain why the license has been made unavailable.
Use the Available From and Available To fields to specify dates when subscription or term licenses are available. If you run a reconciliation outside of these dates, the license is not used in the reconciliation process.
If you specify Available From and Available To dates, you can select the Task and Event Reminder – License Renewal check box to create a task.
The right side of the Availability section changes depending on the License Type selected:
•The Downgradable check box appears for Base Licenses only – clear the check box to prevent the license from downgrading using Downgrade paths in the Software Library to cover liability at previous versions.
•Select the Perpetual License check box for perpetual licenses. With this check box selected, the license will never expire even if it is associated with a contract that has expired, and will continue to be used in reconciliations.
•The Upgrade Path drop-down list appears for Upgrade license types only and enables you to specify the upgrade path for the license.
•The Maintenance From and Maintenance To fields appear for Maintenance licenses only. If you complete these fields, you can set a task and event reminder for maintenance renewal.
For more information on Maintenance Licenses, see Maintenance licenses.
For more information about task and event reminders, see Tasks.
4 – Purchasing Details
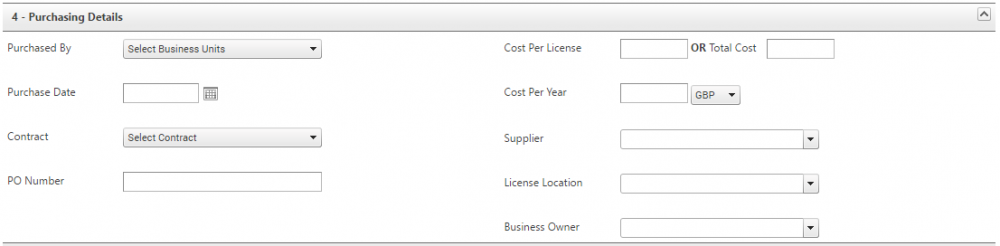
Use the Contract field to link the new license to a contract. This field uses both the Contract Number and the Contract Description combined to help you to identify the correct contract. If the selected contract has start and end dates specified, they are passed down to licenses linked to it.
You can enter new or select previous values for the Supplier, License Location, and Business Owner fields.
5 – Additional Details
You can add custom fields or constraints to the new license record in the Additional Details section.

You can add values to existing custom fields or create new custom fields. For more information, see Custom fields.
Use the Constraints field to add any relevant constraints to the new license record, such as an academic license.
When you have finished entering license details, click Save.
Additional functionality
When you have saved the License record, you can add more information:
•Notes – click Notes at the top of the page to show or hide the Notes pane. The Notes button displays the number of notes that have been created for the selected license.
To add a new note, click  on the Notes pane to display the note fields. Select a Type for the note, enter the note, then click OK.
•Purchase History – use this tab to link existing purchase history records to the license record, or to create new purchase history records. If you create new purchase history records, they are automatically linked to the selected license record. For more information on purchase history records, see Purchase History.
•Transfers
•Attachments – you can add attachments and links to a license record for storing scans of documents related to the license.
To add an attachment to a license, click the Attachments tab, then click Add New Attachment.
The Add New Attachment pane appears. Click Browse to upload a file, or enter a URL, then click Insert to save the attachment.
•Audit Log – this tab shows the changes made to the License page, providing transparency of all changes made to license records. The audit log also stores old values or previous values, where appropriate. You cannot edit the audit log records.