Define Search Results Properties for a Business Object
Use the Search Results page in the Business Object Properties window to define the following:
- Full-Text and Quick Search: Whether to enable Full-Text and/or Quick Search for a Business Object.
Both Quick Search and Knowledge Search use Full-Text Search. If you enable Full-Text Search, the list of Fields is indexed for fast lookup.
- Card view: Search results appear in a more web-like interface, as a list or as large or medium cards.
- Link text: The text that appears as links in a search results list of records (using either an Expression or Field values).
- Body text: The text that appears underneath the link text in a search results list of records (using Field values).
- Image: An image to accompany the search results.
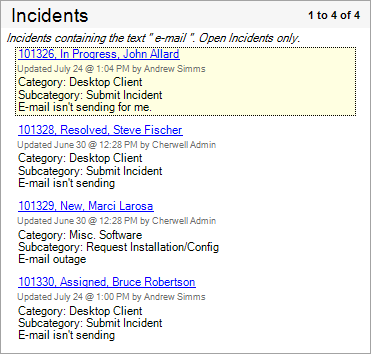
The options defined on the Search Results page determine how a Search Results list of records appears in CSM. The following figure shows an example of a Search Results list of records with link text and body text, as well as labels and subtitles included.
The Business Object Properties window is available in the Business Object Editor (accessed from within the Object Manager in a Blueprint).
To define search results properties for a Business Object:
- Open the Business Object Properties window:
- In the CSM Administrator main window, click the Blueprints category, and then click the Create a New Blueprint task.
If working on a saved Blueprint, open the existing Blueprint.
The Blueprint Editor opens, showing the Object Manager in its Main Pane. The Object Manager lists the existing Business Objects.
- In the Object Manager, click a Business Object in the Object tree, and then click the Edit Business Object task in the Structure area.
The Business Object Editor opens.
You can also click the Edit Business Object button
 on the Blueprint Editor Toolbar to open the Business Object Editor.
 - Click the Bus Ob Properties button.
- In the CSM Administrator main window, click the Blueprints category, and then click the Create a New Blueprint task.
- Click the Search Results page.
- Define general search results properties:
- Include in Full-Text Search: Select this check box to enable Full-Text searching for the Business Object.
- Show in Quick Search: Select this check box to make the Business Object available in Quick Search.
You can only select Show in Quick Search if Include in Full-Text Search is also selected.
- Enable card view: Select this check box to display search results in a card view format. Then, select a default view (how the results list is displayed when it first opens; Users can change the view):
- Results list: Select this radio button to display search results in a web-like search results list.
- Large: Select this radio button to display search results as large cards (ideally, 310x155).
- Medium: Select this radio button to display search results as medium cards (ideally, 150x150).
- Define link text options. This is what will be displayed as a link in a search results list:
- Expression: Select this radio button to use an Expression to determine the link text. Then, select a most recently used (MRU) Expression in the drop-down, or define one using either:
- Stored Expression: Click the Ellipses button
 to open the Expression Manager, and then select an existing stored Expression or create a new stored Expression. Stored Expressions can be reused in numerous places in CSM.
 - Custom Expression: Click the Custom Expression button
 to open the Custom Expression Builder, and then create a custom Expression specifically for this scenario.
- Stored Expression: Click the Ellipses button
- List of Fields: Select this radio button to use the values from a list of Fields as the link text in a search results list.
- Add: Click this button to add Fields to the list (you can add multiple Fields at the same time).
- Delete: Click this button to delete a selected Field from the list (you can only delete one Field at a time).
Use the Up/Down arrows

 to change the order of the selected Fields. The Field values will be displayed in this order in the search results list.
 - Includes Label: Click a Field, and then select this check box to include the Field name in the search results list along with the Field's value. Fields that include labels are indicated by an icon
 .
.
- Show Last Modified Subtitle: Select this check box to display a subtitle underneath the link with information regarding when and by whom the Business Object record was last modified.
- Expression: Select this radio button to use an Expression to determine the link text. Then, select a most recently used (MRU) Expression in the drop-down, or define one using either:
- Define body text options. This is what will be displayed under the link text in a search results list.
- List of Fields: Select which Fields contain the values to be displayed under the link text in a search results list.
- Add: Click this button to add Fields to the list (you can add multiple Fields at the same time).
- Delete: Click this button to delete a selected Field from the list (you can only delete one Field at a time).
Use the Up/Down arrows
to change the order of the selected Fields. The Field values will be displayed in this order in the search results list.
- Includes Label: Click a Field, and then select this check box to include the Field name in the search results list along with the Field's value. Fields that include labels are indicated by an icon .
- List of Fields: Select which Fields contain the values to be displayed under the link text in a search results list.
- Define conditions for displaying an image in a search results list of records:
- Show Result Image: Select this check box to define an Expression that determines when a search results image is displayed. Then, select a most recently used (MRU) Expression in the drop-down, or define one using either:
- Stored Expression: Click the Ellipses button to open the Expression Manager, and then select an existing stored Expression or create a new stored Expression. Stored Expressions can be reused in numerous places in CSM.
- Custom Expression: Click the Custom Expression button to open the Custom Expression Builder, and then create a custom Expression specifically for this scenario.
- Stored Expression: Click the Ellipses button
- Results List Image Size: In the drop-down, select a size for the image to show in the results list view (48x48, 32x32, or 16x16).
- Card View Image Size: Select a size for the image to show in card view, either:
- Zoom to fill: Select this radio button to have the image zoom to fill the width of the picture area, and crop as necessary.
- Best Fit: Select this radio button to have the image centered or resized to best fit the available image space. If the image is smaller than the available image space, it is centered in the picture area. If it is larger than the available image space, it shrinks to fit the picture area.
Example: Images can be used for a Group Object (example: Journal), with a specific image for each Group Member in the search results list (example: An envelope icon for Journal - Mail History, a notepad icon for Journal - Note, etc.). You can use Expressions to show different images for each Group Member based on status or other conditions (example: A closed envelope if a Journal - Mail History record is flagged as Unread, and an open envelope if it is flagged Read). Images are also useful for Search Results List Widgets (example: Customer's picture next to their posted announcement topics in the Portal). If card view is enabled and no image is used, a gray area will show where the image would be.
- Show Result Image: Select this check box to define an Expression that determines when a search results image is displayed. Then, select a most recently used (MRU) Expression in the drop-down, or define one using either:
-
Select OK.
- Publish the Blueprint (File > Publish Blueprint) to commit the changes, or save the Blueprint (File > Save Blueprint) to continue making other changes.
Before publishing a Blueprint that contains Business Objects, ensure that each Business Object has at least one Form and one Grid defined and that all of the appropriate Fields have been created.