Ivanti Connect Secure Cluster Management
Clusters define a collection of servers that operate as if they were a single machine. A cluster pair is used to refer to a cluster of two units and a multiunit cluster refers to a cluster of more than two units. Once two or more units are joined in a cluster, they act as one unit.
Creating ICS Cluster
Log into the nSA as a Tenant Admin.
From the ICS menu, click Gateways > Gateways List.
In the Gateways List page, click Create and then select ICS Cluster.
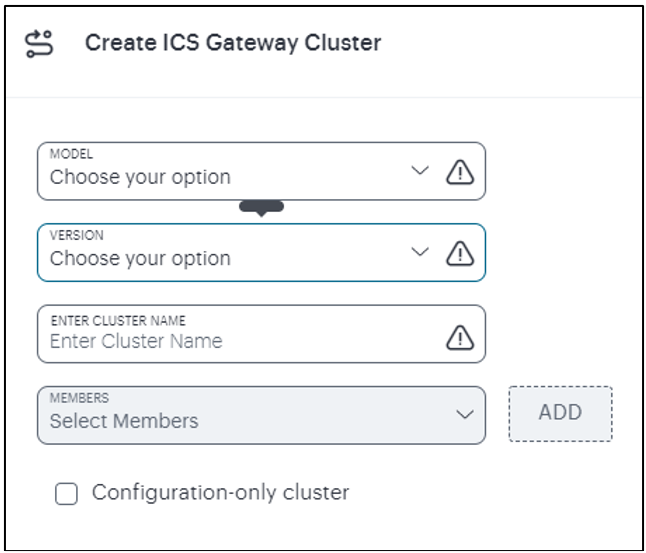
FIGURE 156 Create cluster
Select the ISA Model.
Select the Gateway Version.
Enter a unique Cluster Name.
Note
The name should be maximum 15 characters, only alphanumeric and hyphens are allowed between characters, and must start with a letter.
Select a member node and click Add to add the nodes.
Enable Configuration Only Cluster to limit data transfer between cluster nodes. User and session specific limits are only enforced on the node and not across the cluster.
Click Create Cluster.
An Active/Active cluster is created by default.
Editing a Cluster
To edit a cluster:
In the Gateways List page, click the cluster name that you want to edit.
In the Cluster details page, click the context menu icon present at the top-right of the page to access the options applicable to the selected Cluster.
Click Edit Cluster.
Add additional Gateways to the cluster and then click Update Cluster.
Removing a Cluster
To remove a cluster:
In the Gateways List page, click the cluster name that you want to delete.
In the Cluster details page, click the context menu icon present at the top-right of the page to access the options applicable to the selected Cluster.
Click Delete Cluster only to remove only the cluster and retain the Gateways, or click Delete Cluster and Gateways to remove the Cluster along with the Gateways.
Click Confirm in the confirmation box.
Deploying an Active/Active Cluster
An active/active clustering provides high availability and load balancing when deployed with an external load balancer. An active/active cluster deployment requires an external device to distribute the load among the members because the cluster does not have a VIP address. The load balancing devices are equipped with algorithms that balance the load, as well as detect whether a device is down.
Active/active configuration allows increased aggregate system Clustering Property Settings throughput as well as seamless failover, which is achieved by state synchronization between the two devices for all the configurations so that the devices are virtually identical.
Configuring an Active/Active Cluster
When you add members, you are prompted for settings unique to the member, such as the name and IP address configuration for the internal and external interfaces. A few additional settings are also unique, namely the management port and VLAN port settings, so you add these manually after the add node procedure that follows, but before the join cluster operation.
To configure Active/Active cluster:
Log into the nSA as a Tenant Admin.
From the ICS menu, click Gateways > Gateways List.
In the Gateways List page, select the cluster that you want to configure.
The cluster status page appears.
From the ICS menu, select Gateways List > Properties.
The cluster configuration page appears.
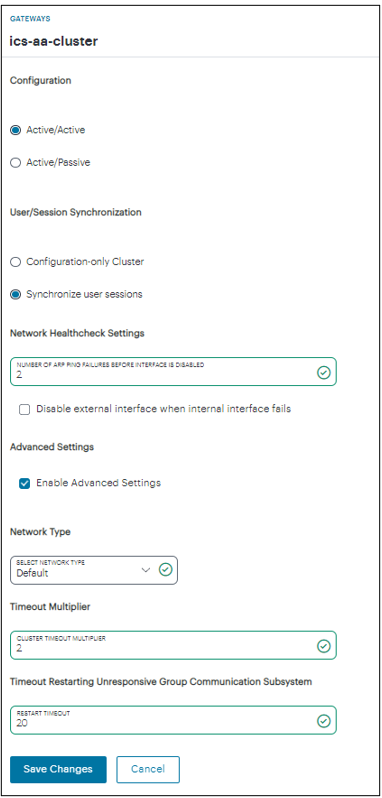
FIGURE 157 Configure Active/Active cluster
Select Active/Active option to run a cluster pair in active/active mode.
Select Configuration only cluster option to disable synchronization of session data and to replicate only configuration data and user records (for example, web bookmarks, NFS and windows shared files, terminal servers, telnet sessions, SAM, preferences, and passwords).
Enabling this option limits data transfers between the cluster nodes. User and Session specific limits are only enforced on the node and not across the cluster.
Select Synchronize user sessions option to synchronize all user session information (for example, instances of access to intranet services) among all the devices in the cluster.
Specify the number of ARP ping failures allowed before the internal interface is disabled.
Select Disable external interface when internal interface fails to disable the external interface of the device if the internal interface fails.
Select the Advanced Settings check box to specify the timeouts for the underlying cluster system. Do not change any values under this setting unless instructed to do so by Ivanti Technical Support.
Select the appropriate Network Type. Network type selection controls the timeouts used by the underlying cluster system. Change this value only when you observe repeated cluster partitions that may be related to long network delays or significant load in any of the cluster nodes.
Default cluster timeouts have been picked to be optimal for typical cluster installations. Administrators have the ability to adjust the cluster timeouts over a linear scale of 1-20. Smaller timeouts result in faster failure detection. Larger timeouts minimize the risk of cluster splits during transient network glitches. The system can be instructed to pick a reasonable default for the current cluster configuration by specifying a value of 0.
Click Save Changes.
Deploying an Active/Passive Cluster
Active/passive clustering is supported only if the members of the cluster pair are in the same subnet because the VIP address must be shared by both the members. An active/passive cluster configuration provides high availability. Active/passive configurations allows seamless failover without the need to set up any external equipment, which is achieved by state synchronization between the two devices for all the configurations so that the devices are virtually identical.
The Ivanti access control service uses a virtual IP (VIP) address to address the cluster pair in addition to addressing each device. The IP address takeover (IPAT) approach is used for the VIP address. If the active node fails, the passive node takes over the VIP address and sends a gratuitous Address Resolution Protocol (ARP) message notifying other networking devices that it now owns the VIP address. You should check that other devices in your network, especially the next-hop gateways, will honor the gratuitous ARP messages.
Configuring an Active/Passive Cluster
Active/passive clustering is supported only if the members of the cluster pair are in the same subnet because the VIP address must be shared by both the members. An active/passive cluster configuration provides high availability. Active/passive configurations allows seamless failover without the need to set up any external equipment, which is achieved by state synchronization between the two devices for all the configurations so that the devices are virtually identical.
The Ivanti access control service uses a virtual IP (VIP) address to address the cluster pair in addition to addressing each device. The IP address takeover (IPAT) approach is used for the VIP address. If the active node fails, the passive node takes over the VIP address and sends a gratuitous Address Resolution Protocol (ARP) message notifying other networking devices that it now owns the VIP address. You should check that other devices in your network, especially the next-hop gateways, will honor the gratuitous ARP messages.
To configure Active/Passive cluster:
Log into the nSA as a Tenant Admin.
From the ICS menu, click Gateways > Gateways List.
In the Gateways List page, select the cluster that you want to configure.
The cluster status page appears.
From the ICS menu, select Gateways List > Properties.
The cluster configuration page appears.
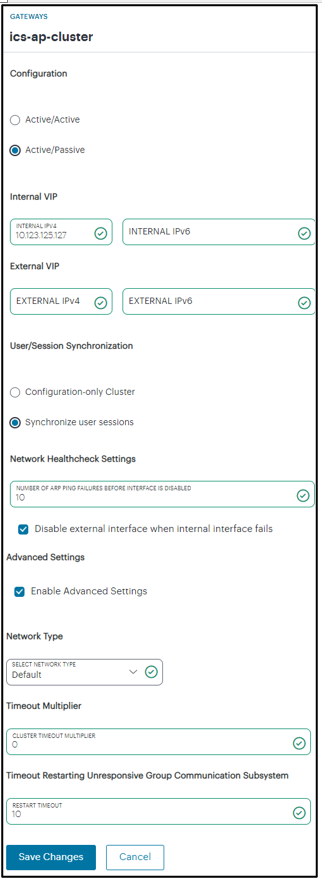
FIGURE 158 Configure Active/Passive cluster
Select Active/Passive option to run a cluster pair in active/passive mode.
Then, specify an internal VIP (virtual IP address) and an external VIP if the external port is enabled.
Select Configuration only cluster option to disable synchronization of session data and to replicate only configuration data and user records (for example, web bookmarks, NFS and windows shared files, terminal servers, telnet sessions, SAM, preferences, and passwords).
Enabling this option limits data transfers between the cluster nodes. User and Session specific limits are only enforced on the node and not across the cluster.
Select Synchronize user sessions option to synchronize all user session information (for example, instances of access to intranet services) among all the devices in the cluster.
Specify the number of ARP ping failures allowed before the internal interface is disabled.
Select Disable external interface when internal interface fails to disable the external interface of the device if the internal interface fails.
Select the Advanced Settings check box to specify the timeouts for the underlying cluster system. Do not change any values under this setting unless instructed to do so by Ivanti Technical Support.
Select the appropriate Network Type. Network type selection controls the timeouts used by the underlying cluster system. Change this value only when you observe repeated cluster partitions that may be related to long network delays or significant load in any of the cluster nodes.
Default cluster timeouts have been picked to be optimal for typical cluster installations. Administrators have the ability to adjust the cluster timeouts over a linear scale of 1-20. Smaller timeouts result in faster failure detection. Larger timeouts minimize the risk of cluster splits during transient network glitches. The system can be instructed to pick a reasonable default for the current cluster configuration by specifying a value of 0.
Click Save Changes.