Using Endpoint Security
Managing ESAP Versions
The Endpoint Security Assessment Plug-in (ESAP) on Ivanti Connect Secure checks third-party applications on endpoints for compliance with the predefined rules you configure in a Host Checker policy. This plug-in is included in the system software package.
Ivanti frequently adds enhancements, bug fixes, and support for new third-party applications to the plug-in. New plug-in releases are available independently and more frequently than new releases of the system software package. If necessary, you can upgrade the plug-in independently of upgrading the system software package.
You can upload up to four versions of the plug-in to your system, but it uses only one version at a time (called the active version). If necessary, you can roll back to a previously active version of the plug-in.
The default SDK version used is v3, but it can be reconfigured based on your requirement. The product/vendor names used by v3 and v4 SDK might differ. Due to the product/vendor names mismatch, there is a possibility that the rules become empty while creating Host Checker rule with v3 SDK activated and upon enabling v4 SDK. To avoid this, a migration page is added to help the administrators in migrating the policies from v3 to v4 SDK.
To migrate from v3 to v4 version:
Navigate to Manage Endpoint Security Assessment PlugIn Versions section on the Authentication > Endpoint Security > Host Checker page.
Select the Enable migration of Opswat SDK from old to new version (V3 to V4) option.
Click Save Changes.
On enabling this option, the clients start downloading the V4 SDK and migrate to newer SDK.
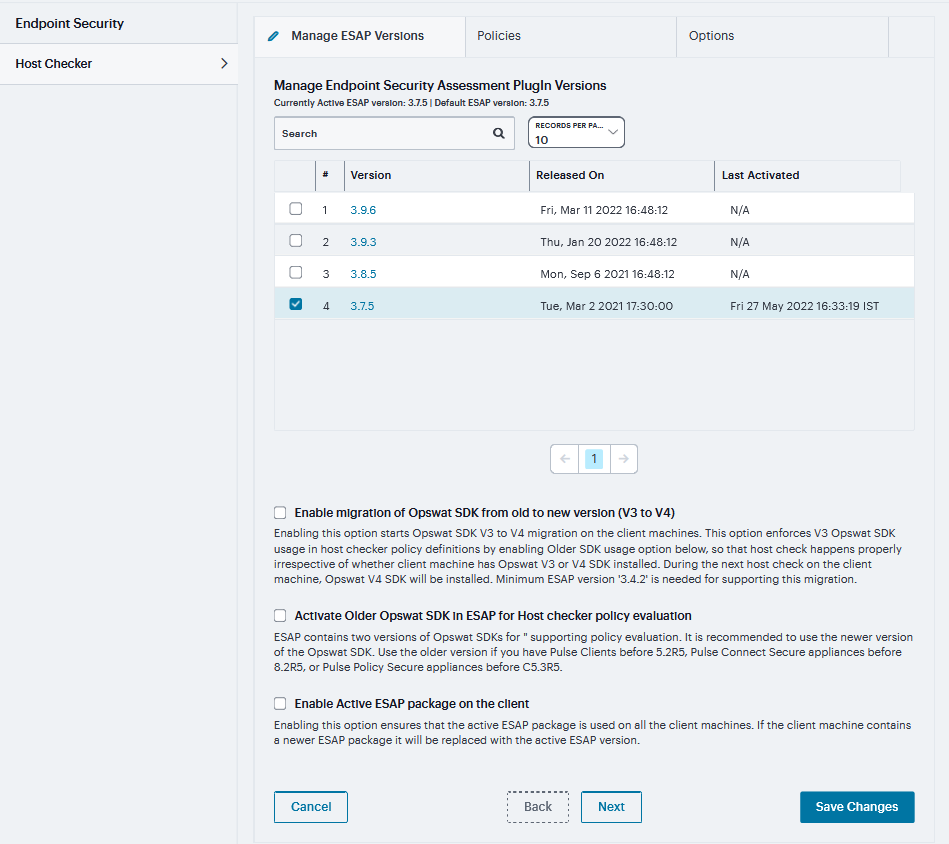
FIGURE 327 Endpoint Security Assessment PlugIn Versions
Clear the Enable migration of Opswat SDK from old to new version (V3 to V4) option once the migration is complete.
Verify the migration status. In the confirmation message box, click Confirm.
To roll back to previous version of OPSWAT SDK:
Navigate to Manage Endpoint Security Assessment PlugIn Versions section on Authentication > Endpoint Security > Host Checker page.
Clear the Enable migration of Opswat SDK from old to new version (V3 to V4) check box.
Enable Activate Older Opswat SDK in ESAP for Host Checker policy evaluation.
Click Save Changes.
Enabling the Active ESAP Package
Administrator can enable “Enable Active ESAP package on the client” check box to ensure that client machine always uses the active ESAP package, even if the active ESAP package is older than the version installed on the client system. In case client machine has newer ESAP package installed, it will be replaced with the older Active ESAP version with this option enabled.
To enable the active ESAP package:
Select Authentication > Endpoint Security > Host Checker.
Under Manage Endpoint Security Assessment Plugin Versions, select the Enable Active ESAP package on the client check box.
Click Save Changes.
Configuring Host Checker Policy
Host Checker is a software component that performs endpoint compliance checks on hosts that connect to Ivanti Connect Secure. It supports two types of rules within a policy; predefined and custom. The pre-defined inspection capabilities consist of health and security checks including antivirus versions, antispyware, OS versions, hard disk encryption status and patch checks. The pre-defined rules are provided by OPSWAT and it uses the ESAP plug-in for pre-defined checks.
To configure a Host Checker policy, perform these tasks:
Log into the nSA as a Tenant Admin.
From the ICS menu, click Gateways > Gateways List. In the Gateways list page, select the standalone ICS Gateway or Cluster node that you want to configure.
From the ICS menu, select Authentication > Endpoint Security > Host Checker.
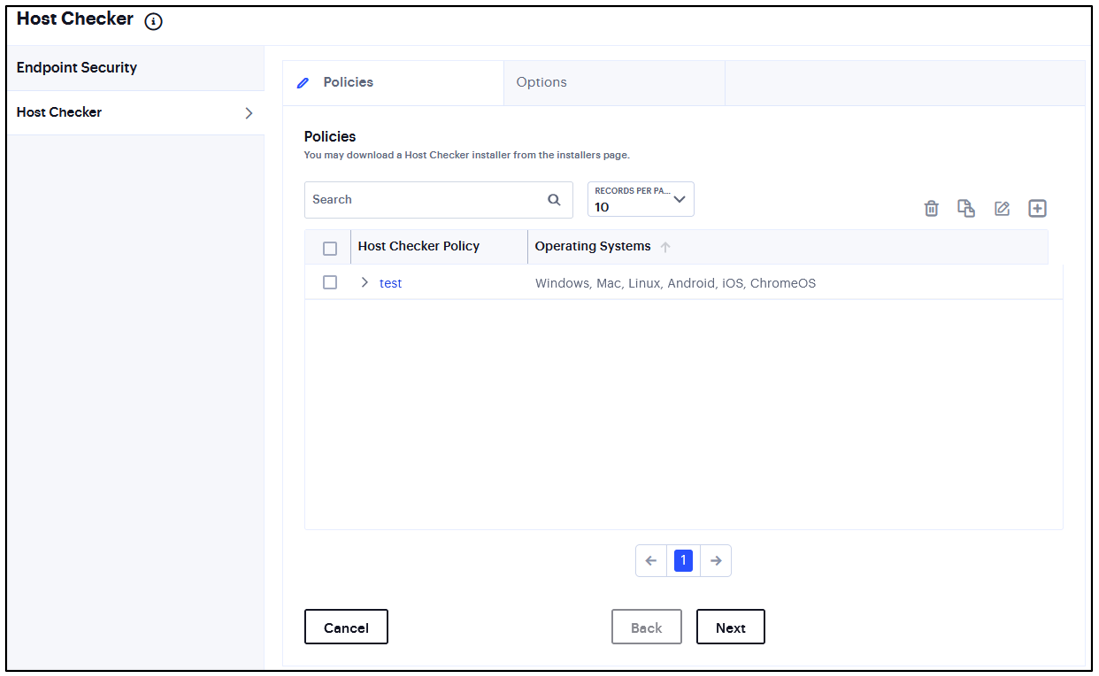
FIGURE 328 Host Checker
Under Policies, click the ‘+’ icon.
Enter a name for the policy and then click Save Changes.
A list of all the added policies is displayed.
Create one or more rules to associate with the policy.
In the Options tab, enter time limit for performance check and logout time if the device is inactive.
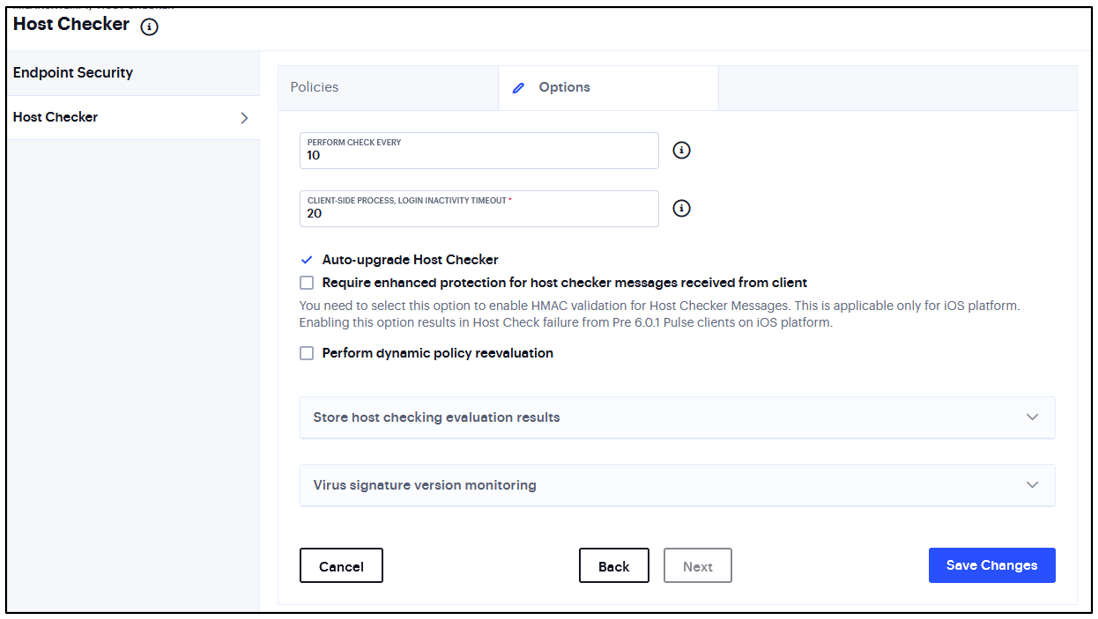
FIGURE 329 Host Checker Options
You can select Auto-upgrade Host Checker, Require enhanced protection for host checker messages received from client, and Perform dynamic policy reevaluation.
Note
You need to select this option to enable HMAC validation for Host Checker messages. This is applicable only for iOS platform. Enabling this option results in Host Check failure from Pre 6.0.1 Ivanti Secure Access clients on iOS platform.
Select Store Host Checking evaluation results to cache the result for the certain number of days.
Select Cache results if any of the roles is assigned or Cache results only if any of the selected roles are assigned and select the roles from Available Roles.
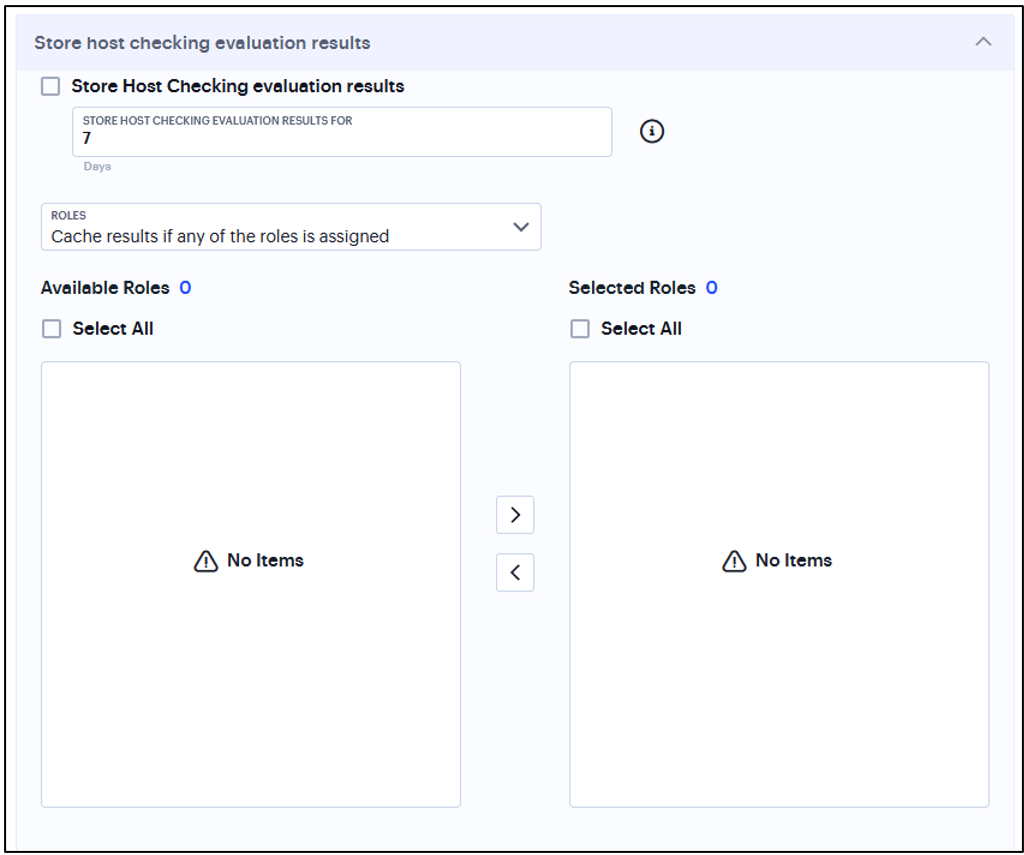
FIGURE 330 Store Host Checking Evaluation Results
In Virus signature version monitoring, select Auto-update virus signatures list.
For Download path, leave the existing URL(s) of the staging site(s) where the current list(s) are stored.
For Download interval, specify how often you want the system to automatically import the current list(s).
For Username and Password, enter your Connect Secure credentials.
To use a proxy server as the auto-update server, select Use Proxy Server and provide the proxy server details.
Note
You can also import the virus signatures manually by importing signature list.
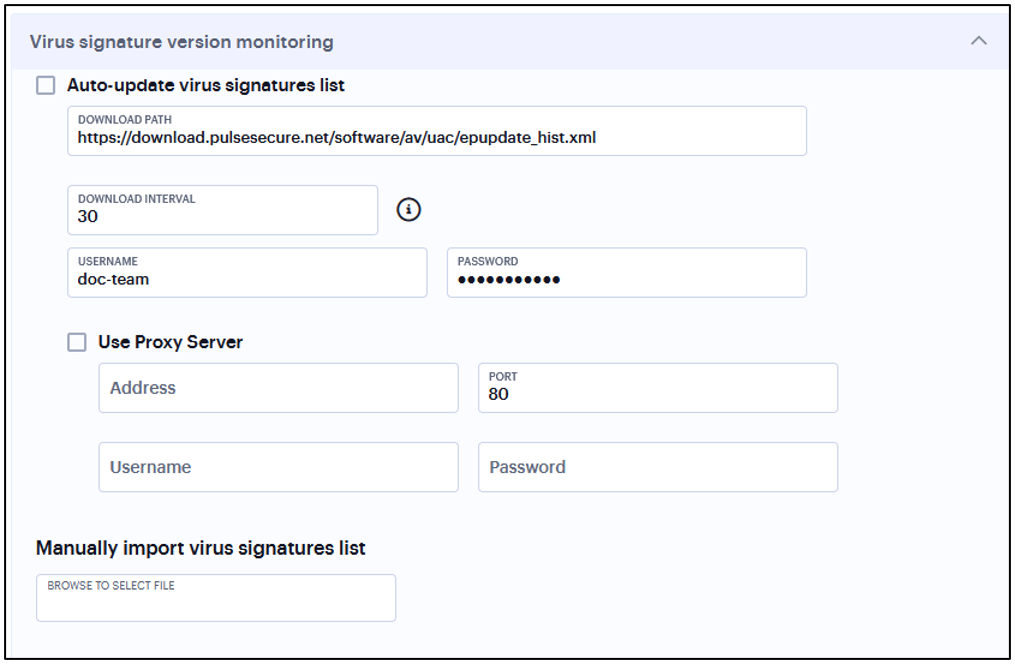
FIGURE 331 Virus Signature Version Monitoring
To edit an existing policy, select the corresponding check box and click the Edit icon.
To delete one or more policies, select the corresponding check boxes and click the Delete icon.
Checking for Third-Party Applications Using Predefined Rules
Host Checker comes pre-equipped with a vast array of predefined rules that check for antivirus software, firewalls, malware, spyware, and specific operating systems from a wide variety of industry leaders. You can enable one or more of these rules within a Host Checker client-side policy to ensure that the integrated third-party applications that you specify are running on your users’ computers in accordance with your specifications. For firewall and antivirus rules, you can specify remediation actions to automatically bring the endpoint into compliance.
Add Rule: Antivirus Rule with Remediation Options
To configure a Predefined Antivirus rule:
Select one of the following supported platforms:
Windows
Mac
Enter a Rule Name.
Under Criteria, click Require specific products/vendors. A new window will open with a list of all of the products that support the feature.
Select your vendor(s) and product(s) by using either the Require any supported product from a specific vendor or Require specific products check box.
If your product is supported, select the check box for any or all of the remediation actions that you want to apply.
(Optional) Select or clear the check box next to Successful System Scan must have been performed in the last, and enter the number of days in the field.
If you select this check box, a new option appears. If the remediation action to start an antivirus scan has been successfully begun, you can override the previous check.
(Optional) Select or clear the check box next to Check for the Virus Definition files. Enter a number between 1 and 20. If you enter 1, the client must have the latest update.
(Optional) Select Monitor this rule for change in result to continuously monitor the policy compliance of endpoints.
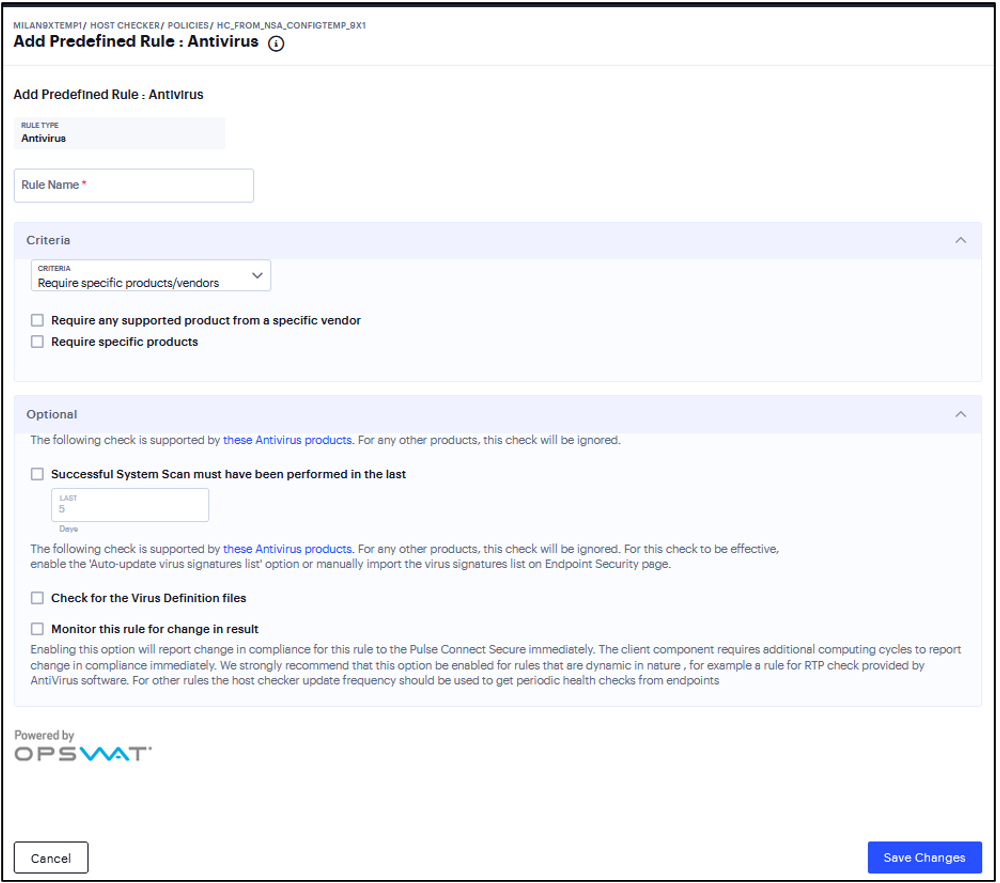
FIGURE 332 Antivirus Rule
Note
Use this option only for dynamic rules, such as checking whether Real Time Protection is enabled on the antivirus software. Use the host checker update frequency to monitor other rules periodically.
Monitor this rule for change in result for port check is applicable only for Windows and not for Linux or MAC machines.
Add Rule: Firewall Rule with Remediation Options
When you enforce the Host Checker rule with firewall remediation actions, if an endpoint attempts to log in without the required firewall running, Host Checker can attempt to enable the firewall on the client machine.
Select one of the following supported platforms:
Windows
Mac
Enter a Rule Name.
Under Criteria, click Require specific products/vendors. A new window will open with a list of all of the products that support the feature.
Select your vendor(s) and product(s) by using either the Require any supported product from a specific vendor or Require specific products check box.
(Optional) Select Monitor this rule for change in result to continuously monitor the policy compliance of endpoints. If this check box is selected, and a change in compliance status on an endpoint that has successfully logged in occurs, the system initiates a new handshake to re-evaluate realm or role assignments.
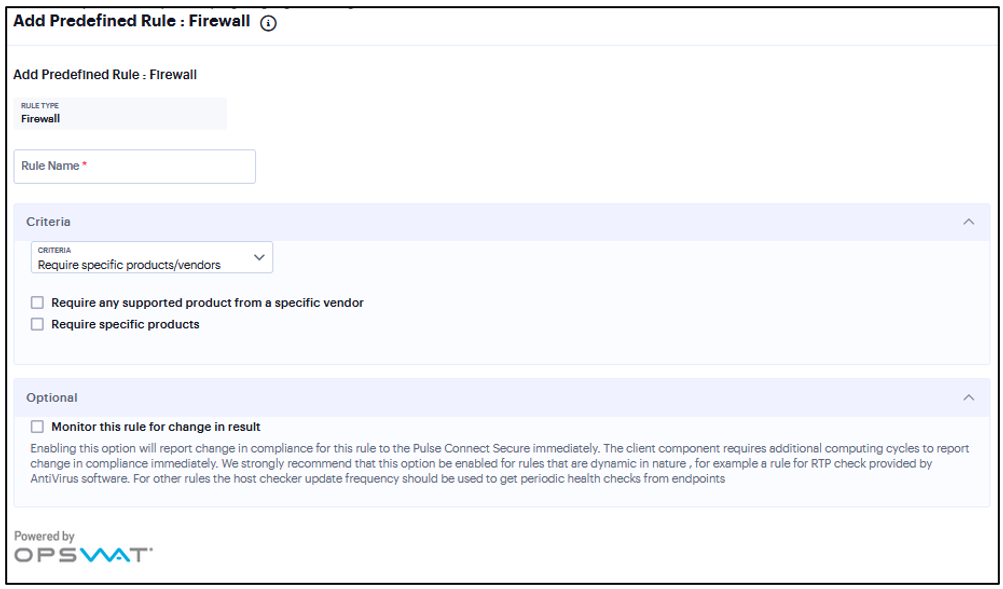
FIGURE 333 Firewall Rule
Note
Monitor this rule for change in result for port check is applicable only for Windows and not for Linux or MAC machines.
Add Rule: AntiSpyware
You can configure Host Checker to check for installed antispyware on endpoints.
To configure a Host Checker Predefined Spyware rule:
Select one of the following supported platforms:
Windows
Mac
Enter a Rule Name.
Under Criteria, click Require specific products/vendors. A new window will open with a list of all of the products that support the feature.
Select your vendor(s) and product(s) by using either the Require any supported product from a specific vendor or Require specific products check box.
(Optional) Select Monitor this rule for change in result to continuously monitor the policy compliance of endpoints. If this check box is selected, and a change in compliance status on an endpoint that has successfully logged in occurs, the system initiates a new handshake to re-evaluate realm or role assignments.
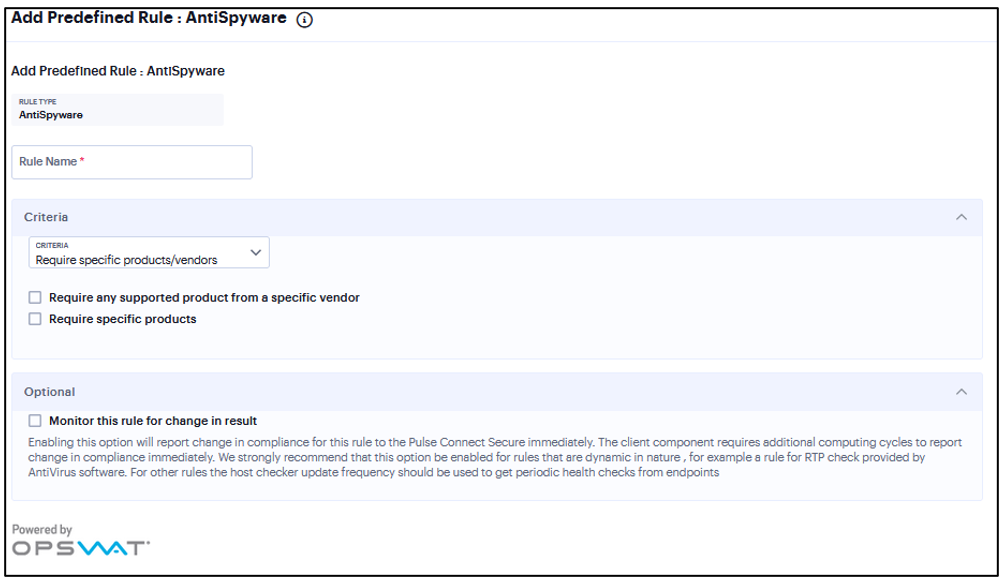
FIGURE 334 AntiSpyware
Note
Monitor this rule for change in result for port check is applicable only for Windows and not for Linux or Mac machines.
Add Rule: Hard Disk Encryption
You can configure Host Checker to check for installed Hard Disk Encryption on endpoints and specify the drives which needs to be encrypted using these software.
To configure a predefined hard disk encryption rule:
Select one of the following supported platforms:
Windows
Mac
Enter a Rule Name.
Under Criteria, click Require specific products/vendors. A new window will open with a list of all of the products that support the feature.
Select your vendor(s) and product(s) by using either the Require any supported product from a specific vendor or Require specific products check box.
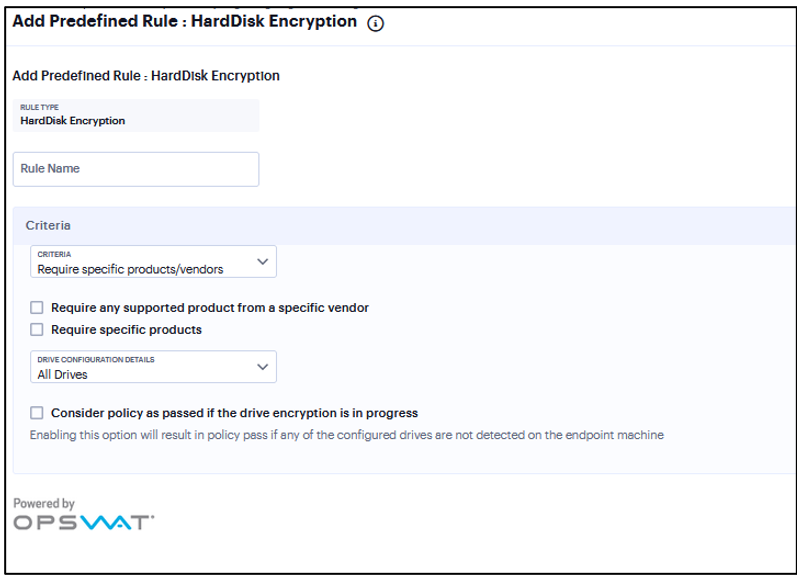
FIGURE 335 HardDisk Encryption
Under Drive Configuration Details, select the required option:
All Drives - (Default) Select this option to check if all the drives on the client machine are encrypted.
Specific Drives - Select this option to check if only specific drives on the client machine are encrypted.
Drive Letters - Enter the drive name. For example, C, D, E.
Select the Consider policy as passed if the drive Encryption is in progress option to allow the Host Checker policy to pass if the encryption process is in progress and the drive is not fully encrypted.
Note
The drive encryption process takes time to complete depending up on the drive size and contents.
For multiple drives, the Host Checker policy passes only if the encryption process is in progress in all the drives.
Add Rule: Patch Management
You can configure Host Checker to check for installed Patch management Software on endpoints.
To configure a predefined patch management rule:
Select one of the following supported platform options:
Windows
Mac
Enter a Rule Name.
Under Criteria, select the product name.
Default “Severity” options selected in policy are Critical, Important.
Default “Category” options selected in policy are Security Update, Critical Update, Regular Update, Driver Update.
To automatically enable patch deployment, select Enable Automatic Patch Deployment.
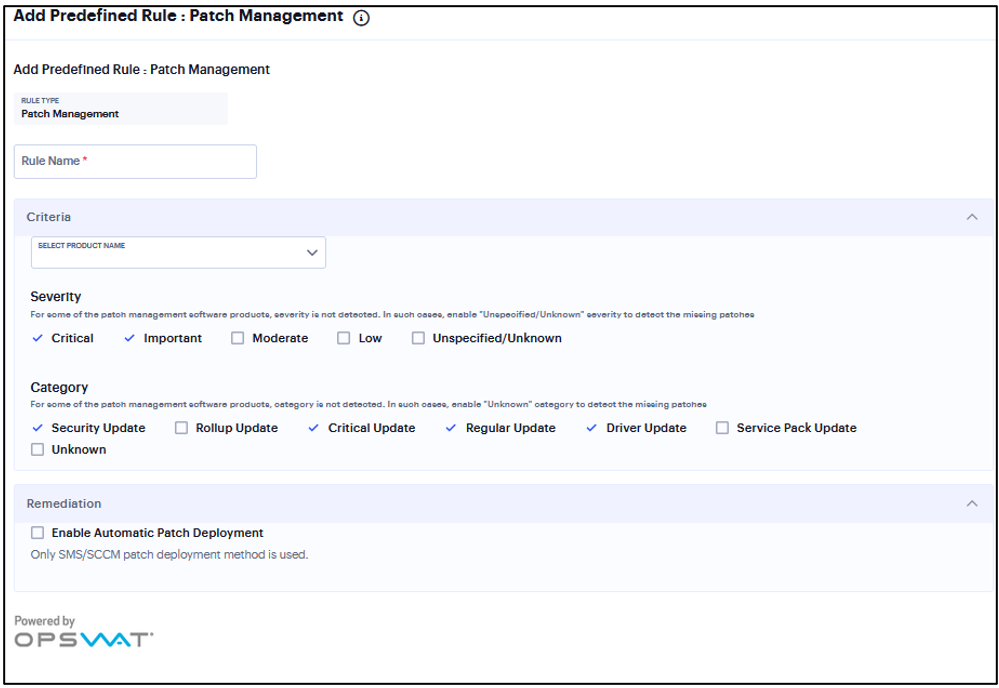
FIGURE 336 Patch Management
Add Rule: Common Vulnerability and Exposure (CVE)
The CVE check rule helps in identifying the endpoints which are vulnerable using the OPSWAT library.
This rule is applicable only to Windows platform.
To configure a predefined CVE check rule:
Enter a Rule Name.
From the Criteria, select if you require all the CVE checks from OPSWAT or choose the specific CVE checks from the available CVE checks list.
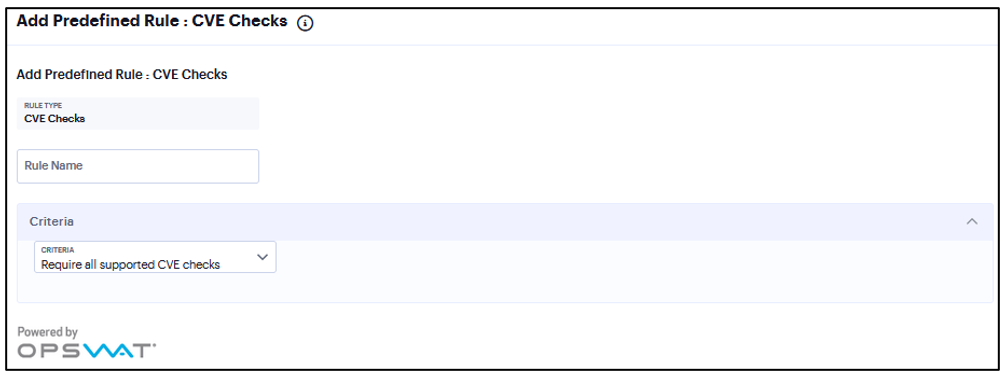
FIGURE 337 CVE Checks
Add Rule: OS Checks
You can configure Host Checker to check the version of the windows operating systems and minimum service packs.
This rule is applicable only to Windows platform.
To configure a Host Checker Predefined OS Checks rule:
Enter a rule name.
Under Criteria, select the service pack/version to ignore.
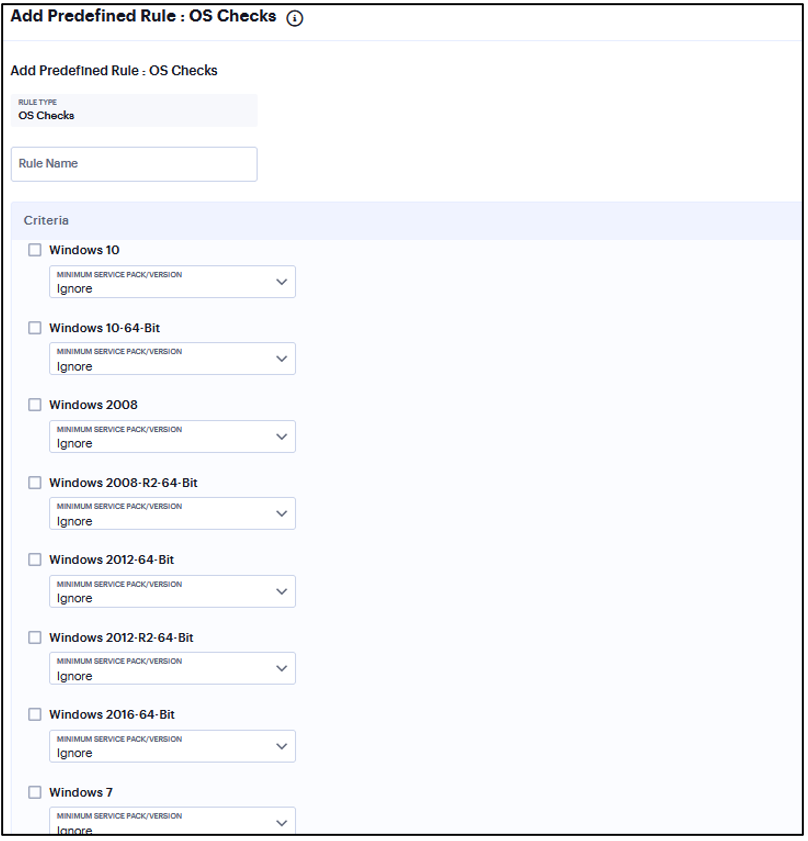
FIGURE 338 CVE Checks
Specifying Customized Requirements Using Custom Rules
In addition to the predefined policies and rules that come with the system, you can create custom rules within a Host Checker policy to define requirements that your users’ computers must meet.
Add Rule: Ports
Use this rule type to control the network connections that a client can generate during a session. This rule type ensures that certain ports are open or closed on the client machine before the user can access the device.
To configure the Ports rule:
Select one of the following supported platform options:
Windows
Mac
Linux
Enter the rule name.
Under Criteria, enter the Port list.
Click Status and select Required/Deny.
Required: Select this to enable access from a listed port.
Deny: Select this to disallow access from a listed port.
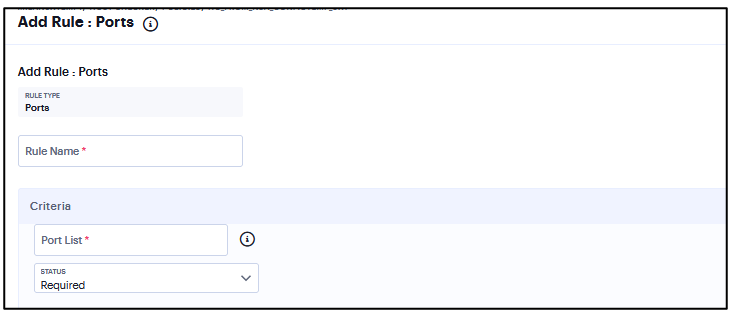
FIGURE 339 Ports
Add Rule: Process
To configure the Process rule:
Select one of the following supported platform options:
Windows
Mac
Linux
Enter the rule name.
Under Criteria, enter the Process name. For example, explorer.exe.
Click Status and select Required/Deny.
Required: Select this to allow access if the process exists.
Deny: Select this to deny access if the process does not exist.
(Optional) Enter the MD5 Checksums/SHA256 Checksums.
Select Monitor this rule for change in result to check if there is any change in compliance result.
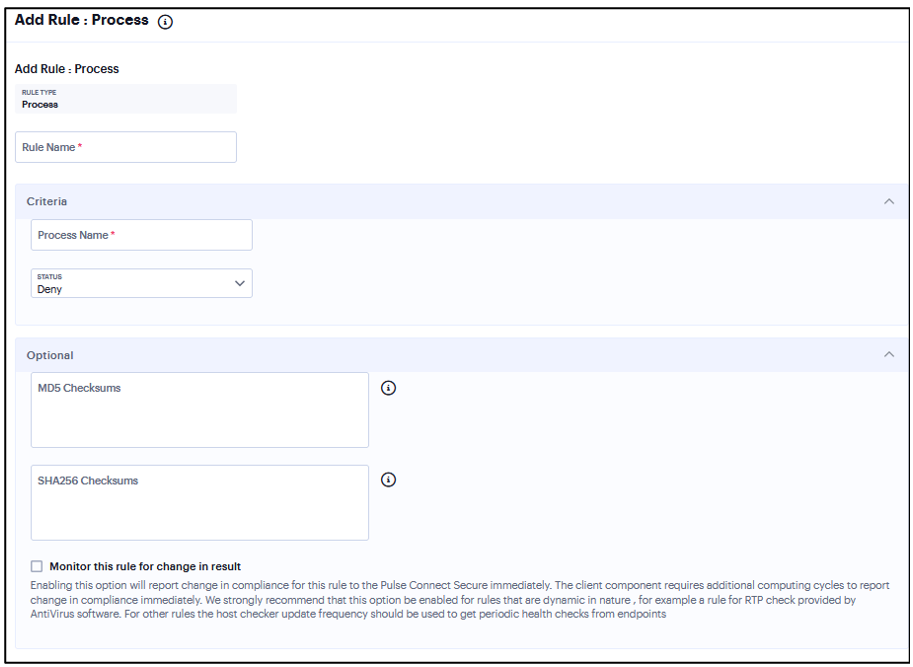
FIGURE 340 Process Rule
Add Rule: File
To configure the File rule:
Select one of the following supported platform options:
Windows
Mac
Linux
Enter the rule name.
Enter a full file name and path in File Name. For example, “c:test.txt” or “/Users/exampleuser/Downloads/test.txt”.
Under Criteria, click Status and select Required/Deny.
Required: Select this to allow access where the file exists and is valid.
Deny: Select this to deny access if the file does not exist or is invalid.
(Optional) Enter the MD5 Checksums/SHA256 Checksums value for the file.
Select Monitor this rule for change in result to check if there is any change in compliance result.
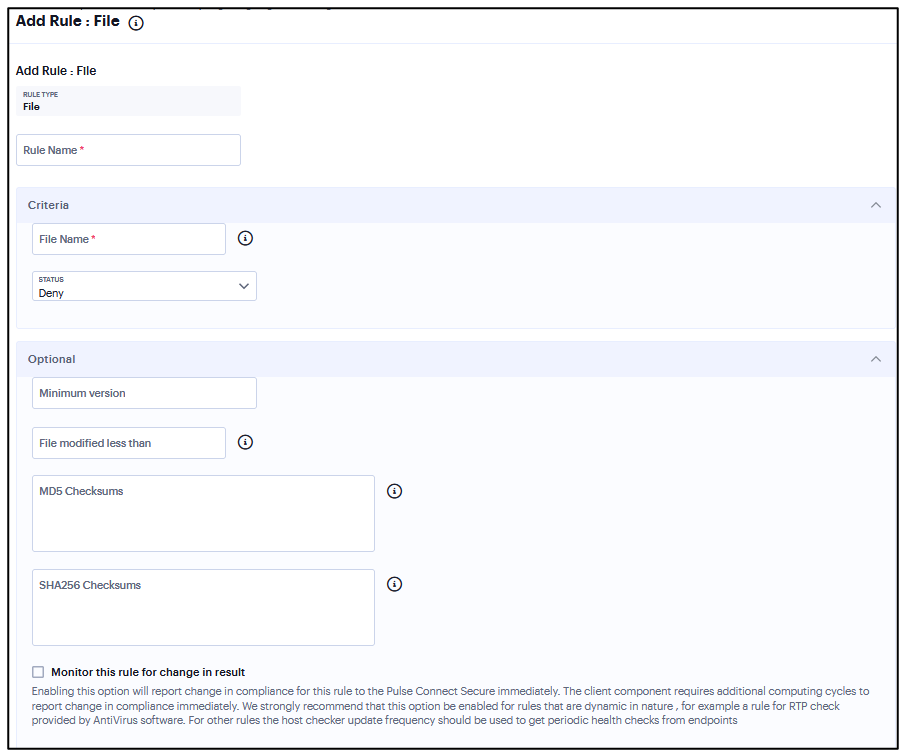
FIGURE 341 File Rule
Add Rule: NetBIOS
To configure the NetBios rule:
Select one of the following supported platform options:
Windows
Mac
Enter the rule name.
Enter the Netbios domain Names as a comma-separated list (without spaces) of domain names. Each name can be 15 characters. Duplicate names are not supported. For example, WINDOWS-PC,WIN*-PC,*-PC,WINDOWS*
Under Criteria, click Status and select Required/Deny.
Required: Select this to allow access from a listed Netbios domain name.
Deny: Select this to deny access from a listed Netbios domain name.
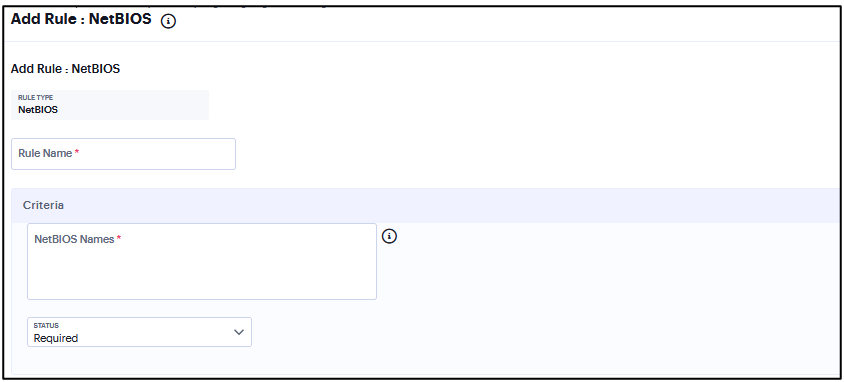
FIGURE 342 NetBIOS Rule
Add Rule: MAC Address
To configure the MAC Address rule:
Select one of the following supported platform options:
Windows
Mac
Enter the rule name.
Under Criteria, Enter the MAC address as a comma-separated list (without spaces) of MAC addresses in the form HH:HH:HH:HH:HH:HH where the HH is a two-digit hexadecimal number. Duplicate MAC addresses are not supported.
Click Status and select Required/Deny.
Required: Select this to enable access from a listed MAC address.
Deny: Select this to disallow access from a listed MAC address.
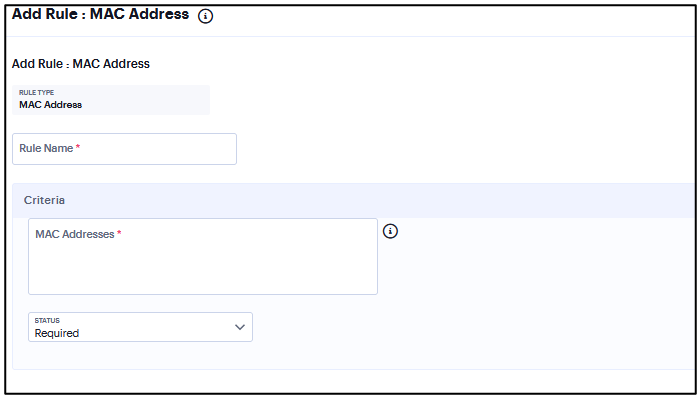
FIGURE 343 MAC Address Rule
Add Rule: Machine Certificate
To configure the Machine Certificate rule:
Select one of the following supported platform options:
Windows
Mac
Enter the rule name.
Under Criteria, select Any certificate to allow access with any certificate.
(Optional) Enter specific values in the machine certificate.
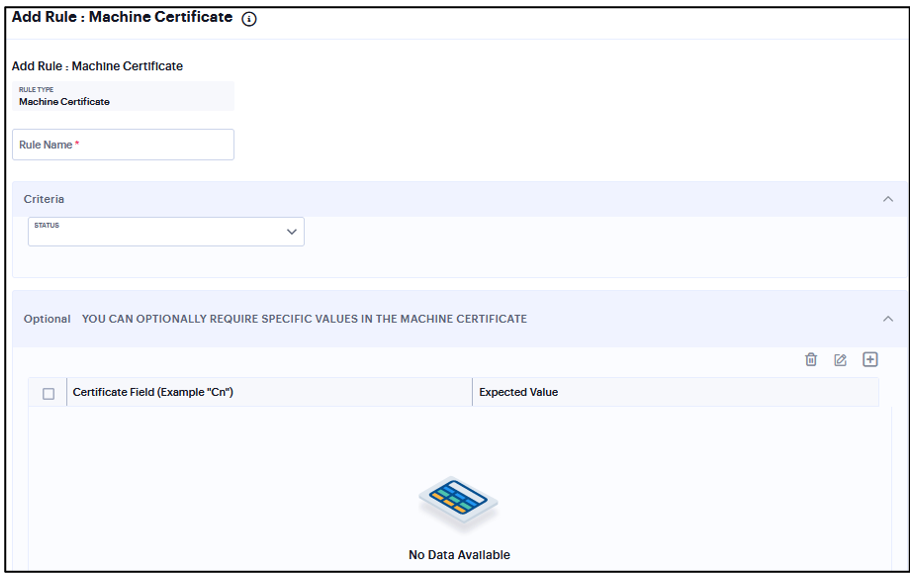
FIGURE 344 Machine Certificate
Add Rule: Registry Setting
Note that Registry Setting rule is applicable only to Windows platform.
To configure the Registry Setting rule:
Enter the rule name.
Under Criteria, select one of the following options:
HKEY_LOCAL_MACHINE
HKEY_USERS
HKEY_CURRENT_USER
HKEY_CURRENT_CONFIG
HKEY_CLASSES_ROOT
Enter a Subkey for the registry path.
Under Key Type, select one of the following key types:
string
dword
binary
Enter a Key name.
Enter a Value for the registry key.
Select the 64-bit check box to use the 64-bit registry store. Clear this check box to use the 32-bit registry store.
(Optional) Select Monitor this rule for change in result to check if there is any change in compliance result.
Under Optional, select Monitor this rule for change in result to continuously monitor the policy compliance of endpoints.
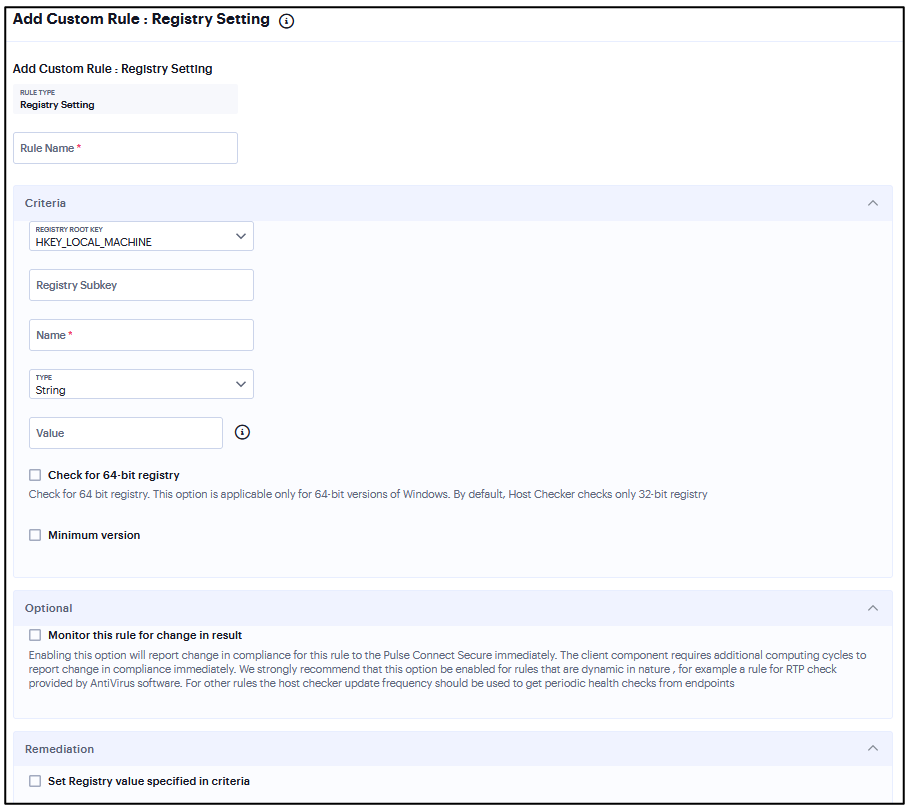
FIGURE 345 Registry Setting
Add Rule: Advanced Host Checking
Note that Advanced Host Checking rule is applicable only to Windows platform.
To configure the Advanced Host Checking rule:
Enter the rule name.
Under Criteria, select one of the following options:
ports
process
File
NETBIOS
MAC Address
Enable Required/Deny.
Select the registry root key- HKEY_LOCAL_MACHINE, HKEY_USERS, HKEY_CURRENT_USER, HKEY_CURRENT_CONFIG, or HKEY_CLASSES_ROOT.
Enter the registry subkey.
Enter the name of the registry.
Select the type of the registry- String, Binary, or DWORD.
Select “Check for 64-bit registry” to check the 64 bit registry on Windows. The default is 32 bit registry.
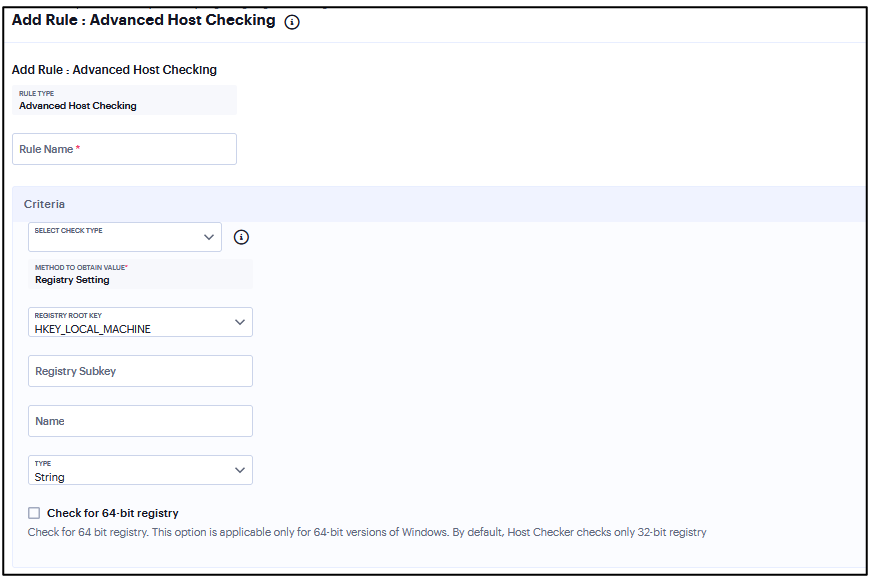
FIGURE 346 Advanced Host Checking
Add Rule: Jail Breaking Detection
Note that Jail Breaking Detection rule is applicable only to iOS platform.
To configure the Jail Breaking Detection rule:
Select one of the supported iOS platform options.
Enter the rule name.
Under Criteria, select Don’t allow Jail Broken devices
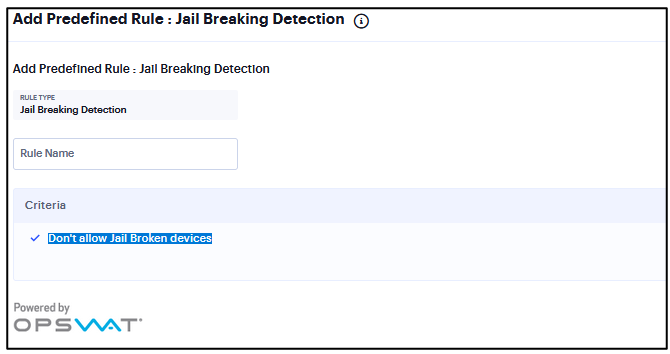
FIGURE 347 Jail Breaking Detection

