Multinode Configuration Management
Introduction
The configuration templates allow multiple ICS devices to be deployed following a single base configuration. With config templates, it makes admin users to easily roll out changes to all the gateways and maintain consistency across all the gateways.
It is most useful in cases where a large number of gateways exist that share a common configuration. With configuration templates, Admin’s can easily manage multiple nodes using the templates based on their requirement.
For example, for enterprise customers who maintain multiple gateways such as a retail deployment with many stores, or a global enterprise having branches in many locations across globe. In these scenarios, the features can be synchronized to all the gateways in various locations using the configuration template.
Note
Ensure that the sample policy name does not exist in the individual gateway while creating configurations using the configuration templates to avoid any configuration conflicts.
Adding Configuration Template
The Configuration page enables you to Create Config Template.
To add a Template:
Log into the nSA as a Tenant Admin. See Logging in to Ivanti Neurons for Secure Access.
From the ICS menu, click Gateways, then click Multinode Configuration, and then select Configuration Template.
The Configuration Template page appears, showing the full list of Templates currently configured on the nSA.
Click Create Config Template on top right corner of the screen.
The Create Configuration Template page appears, showing the settings to be filled for the Template:
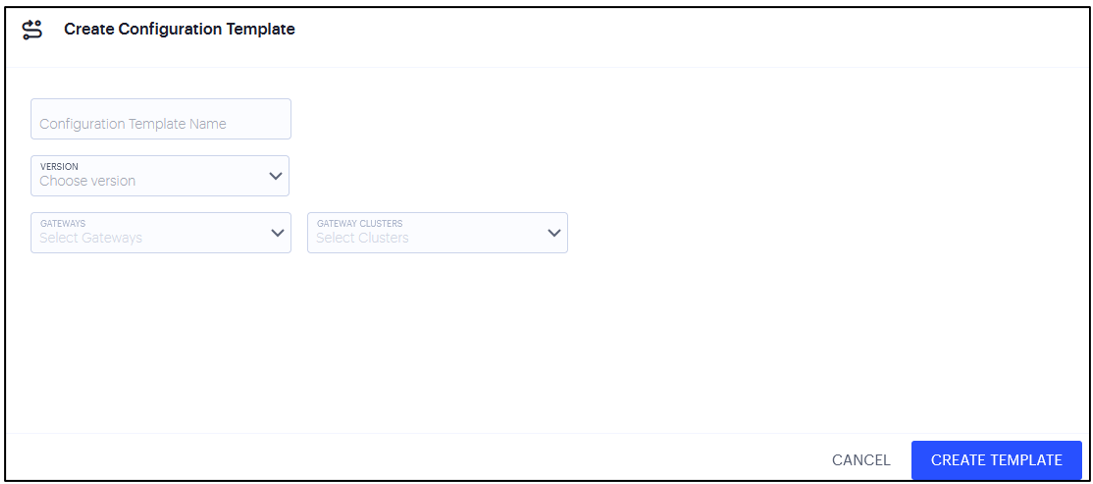
FIGURE 159 Creating a Template
On this page, enter the following settings:
TABLE 4 Template Settings¶ Setting
Description
Template Name
Enter a unique name for this Configuration Template.
Version
Select the Configuration Template version number.
Gateway
Select the Gateways that you want to be part of this template. A particular gateway can be part of any one Configuration Template, and not part of multiple Configuration Templates.
Gateway clusters
Select the Clusters that you want to be part of this template.
Enter any required Template details, then click Create Template.
The created Configuration Template gets listed under Config Templates List. To add more Gateways/Clusters to this Configuration Template, see Editing Configuration Template.
Viewing Configuration Templates
To view, configure and check the status of your configured Templates, use the Gateways > Configuration Templates section of the nSA Tenant Admin portal. The pages in this section remain inactive until you select a Config Template.
To view information for a Config Template:
Log into the nSA as a Tenant Admin.
From the ICS menu, click Gateways, then click Multinode Configuration, and then select Configuration Template.
The Config Templates List page appears with the following details: Configuration Template name, Configuration Template version and features managed by the Configuration Template
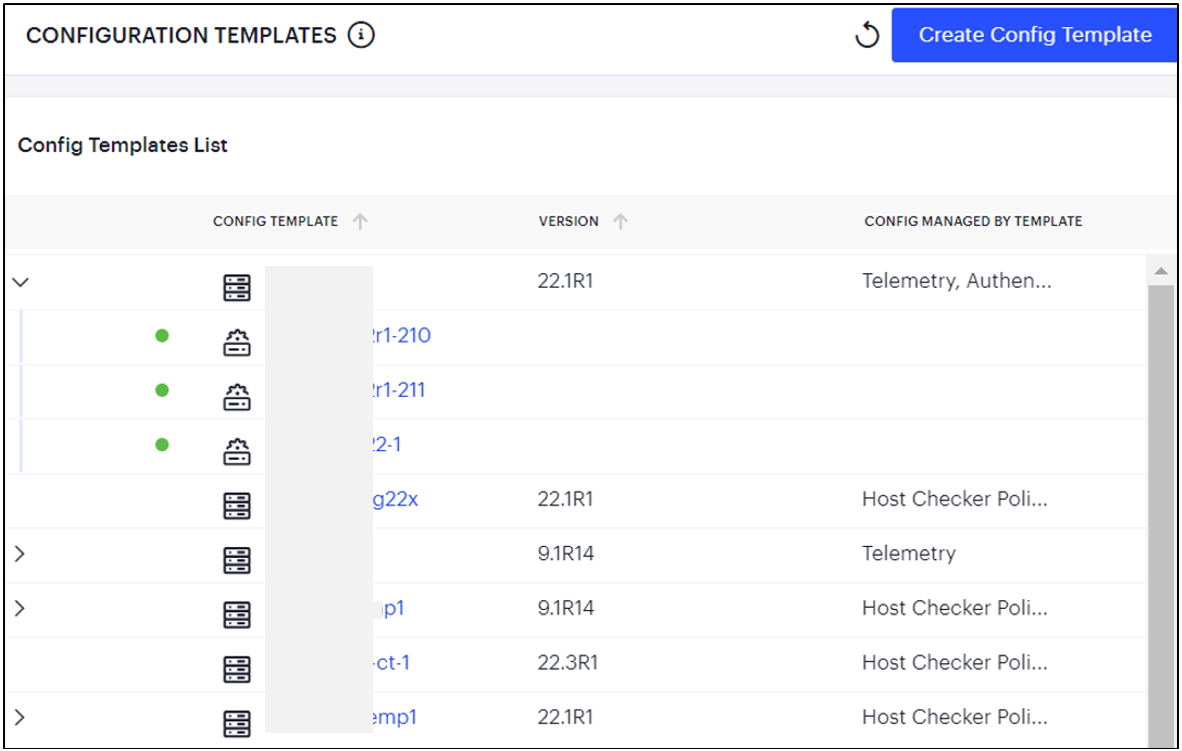
FIGURE 160 Viewing All Templates
Select a Template from the list to view the Template Overview page.
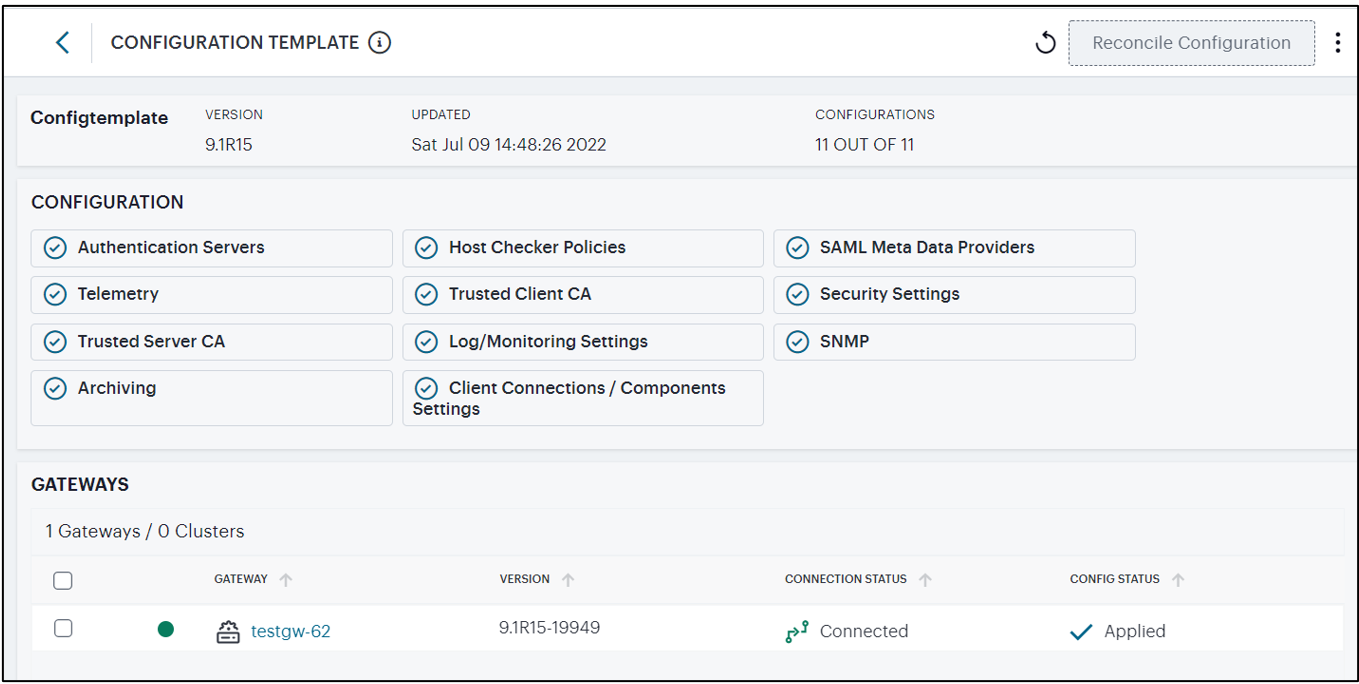
This page provides the following details:
Configuration Template name
Configuration Template version
Last updated date and time
Number of features managed by the Configuration Template
Configured features shown with blue check mark
Details of Gateways and Clusters managed by the Configuration Template:
Gateway/Cluster name
Configuration Template version
Connection status - Connected / Disconnected
Configuration status - “Pending” if a Gateway/Cluster is newly added and the configuration is not synchronized yet; “Applied” if configuration is successfully synchronized to a Gateway/Cluster; “Failure” if the configuration synchronization failed.
To view the details of different Templates, select Configuration Template and choose an alternative instance.
Use the context menu icon at the top-right to access the options applicable to the selected Template.
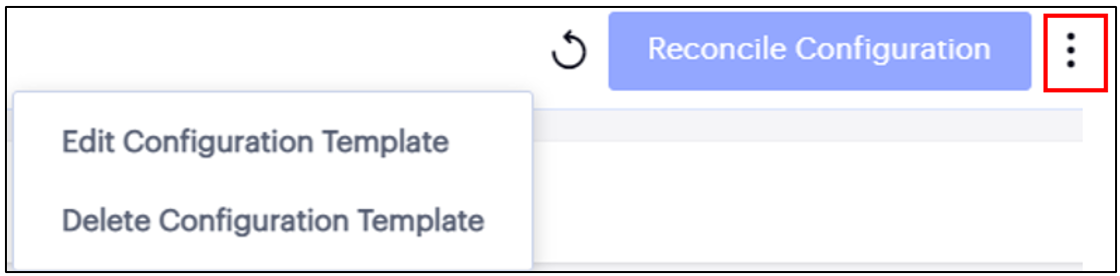
FIGURE 161 Edit a Template
Edit Configuration Template: Use this to add additional Gateways and Clusters, or remove existing Gateways and Clusters.
Delete Configuration Template: Use this to delete the Configuration Template. When you delete a Configuration Template, only the template is removed. The features synchronized by the Configuration Template to the Gateways/Clusters will not be removed from the Gateways/Clusters.
Viewing the Configuration Template Supported Features
The Configuration Template supports the following features:
Authentication Server, see Configuring Authentication Servers
Host Checker Policies, see Configuring Host Checker Policy
SAML Metadata Provider, see Configuring SAML
Telemetry, see Telemetry Settings
Trusted Client CA, see Configuring Certificates
Security Settings, see System Configuration.
Trusted Server CA, see System Configuration.
Log/Monitoring Settings, see System Configuration.
SNMP, see System Configuration.
Archiving, see Archiving Servers
Client Connections/Components Settings, see Users Configuration.
Select the Configuration Template from the list. The following are enabled on the ICS menu:
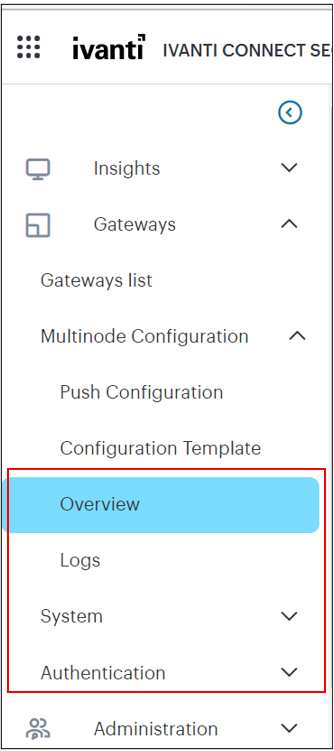
FIGURE 162 Configuration Template Features
Editing Configuration Template
The Configuration page enables you to edit the selected Template configuration. Using this page, you can add more Gateways/Clusters to the template or remove existing Gateways/Clusters from the template.
When you register a new Gateway and add it to the existing Configuration Template, the group configuration is synchronized to the newly registered Gateway. This is called as “Auto reconciliation”.
To edit a Template:
Log into the nSA as a Tenant Admin.
From the ICS menu, click Gateways, then click Multinode Configuration, and then select Configuration Template.
The Configuration Template page appears, showing the full list of Templates currently configured on the nSA.
Select the required Template.
The Template Overview page appears for the selected Template.
Click Edit Configuration Template from the context menu at the top-right.
The Edit Configuration Template page appears, showing the current settings for the selected Template:
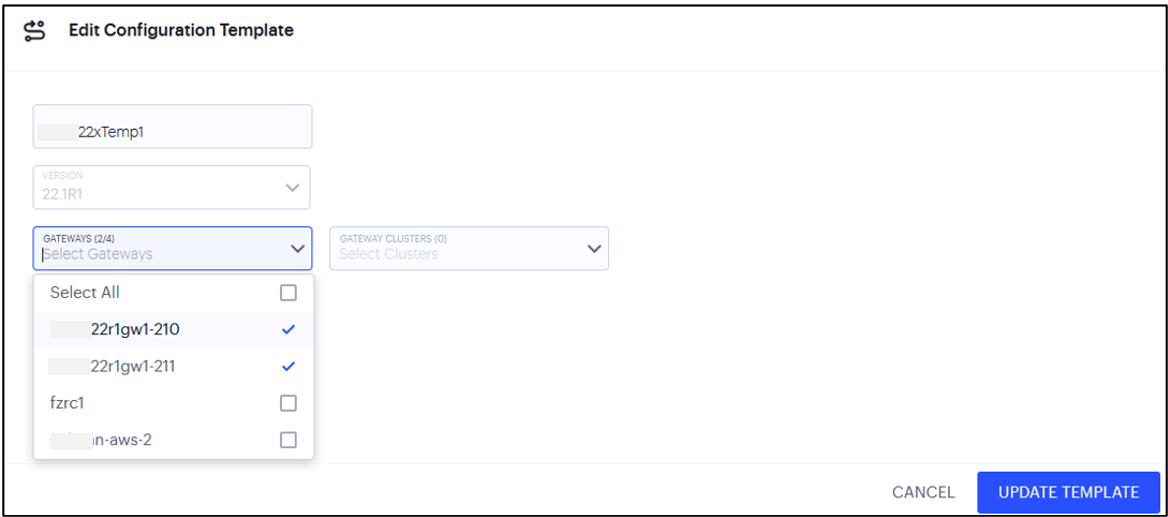
FIGURE 163 Editing a Template
On this page, you cannot modify the Configuration Template name and version. You can only add more Gateways/Clusters to the template.
Click Update Template.
Reconcile Configuration
If an admin makes changes to the features in a Gateway managed by the configuration template, then there will be a conflict. To resolve the conflict, use the Reconcile Configuration option. It will overwrite the Gateway configuration with the template configuration.
To Reconcile the configuration
On the Template Configuration page select one or more Gateways and click Reconcile Configuration.
A prompt “Are you sure you want to reconcile all the selected gateways with group configuration?” appears.
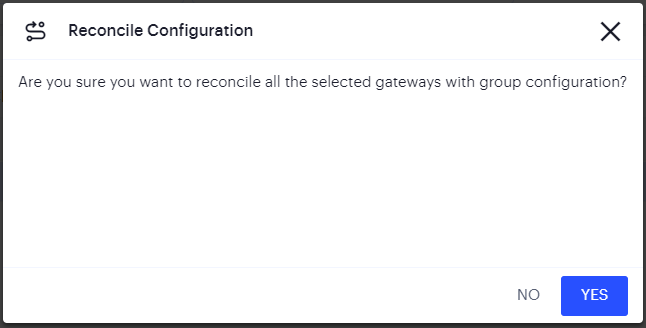
FIGURE 164 Reconcile Configuration
Click Yes. It overwrites the configuration of all the selected Gateways with the group configuration.
Config Synchronization
The config synchronization feature supports simple configuration management across an enterprise without requiring you to deploy the systems as a cluster. You synchronize a partial configuration from the running configuration on the source system to the running configuration on one or more target systems.
To configure config synchronization rule:
Log into the nSA as a Tenant Admin.
From the ICS menu, click Gateways, then click Multinode Configuration and then select Config Synchronization.
In the Config Synchronization page, click Create Config Sync Rule.
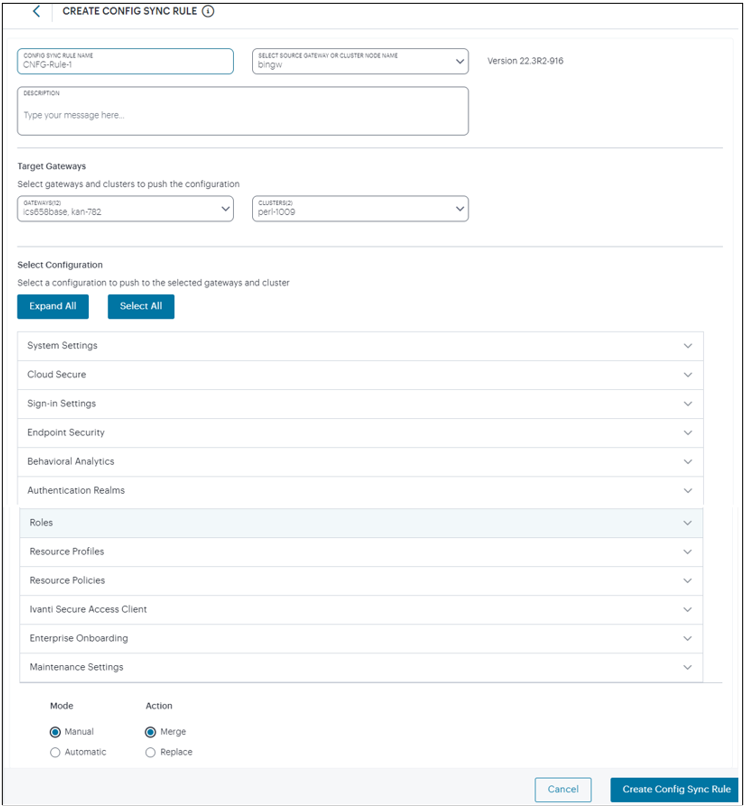
FIGURE 165 Create Config Sync Rule
Enter Config Sync Rule Name, select a Gateway or Cluster, and enter Description.
Under Target Gateways, select Gateways and Clusters to synchronize.
Under Select Configuration, select a configuration to synchronize to the target Gateways and Clusters.
You can expand all the configurations using Expand All and select all the configurations using Select All. You can expand each group and select the required settings.
Select the Mode: Manual or Automatic. Automatic option will sync the targets whenever there is change in source configuration.
Select the Action: Merge or Replace. The Merge option applies only changes in source to the targets, whereas the Replace option replaces the targets configuration with the source configuration.
Click Create Config Sync Rule.
The config sync rule gets listed in the Config Synchronization page.
To edit an existing config sync rule:
In the Config Synchronization page, click on the config sync rule name that you want to edit.
In the Update Config Sync Rule page, make the necessary changes. You cannot modify the rule name and source Gateway or Cluster.
Click Update Config Sync Rule.
To delete one or more config sync rule(s):
In the Config Synchronization page, select the check boxes next to the config sync rule names that you want to delete.
Click the Delete icon.
Click OK to confirm the deletion.
The following alerts are generated:
Config Sync Rule Deleted - This alert is generated when the Config Sync rule is deleted.
Config Sync Rule Updated - This alert is generated when the Config Sync rule is updated.
Config Sync Target Cluster Deleted - This alert is generated when the Target Cluster, which is in the Config Sync rule, gets deleted.
Viewing Template Logs
The Logs page enables you to view the Admin logs of the Gateways for the selected Template.
To view Templates logs:
Log into the nSA as a Tenant Admin.
From the ICS menu, click Gateways, then click Multinode Configuration, and then select Configuration Template.
The Configuration Template page appears, showing the full list of Templates currently configured on the nSA.
Select the required Template.
The Overview page appears for the selected Template.
From the ICS menu, click Gateways, then click Multinode Configuration, and then select Configuration Template > (one template) > Logs.
The Template Logs page appears showing the Admin logs.
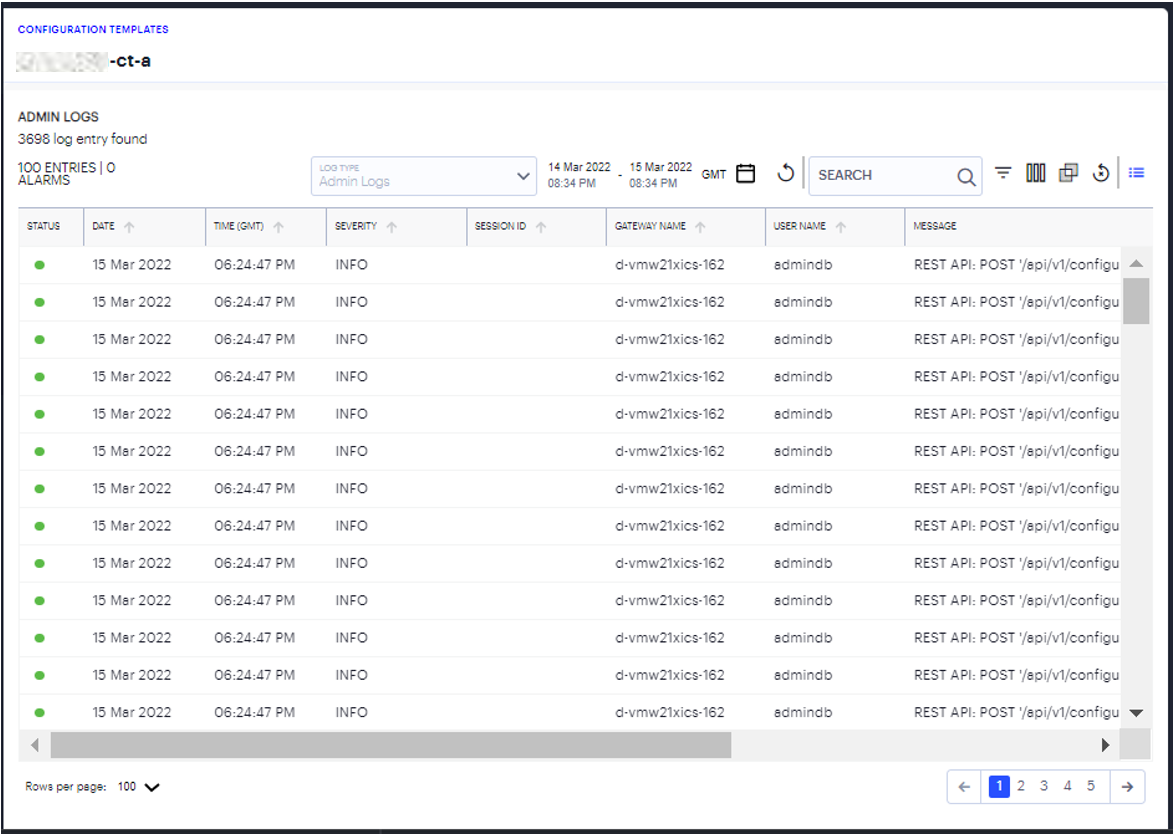
FIGURE 166 Gateways Admin Logs
To set a time period or range for the log results:
Click the calendar to show the selector:
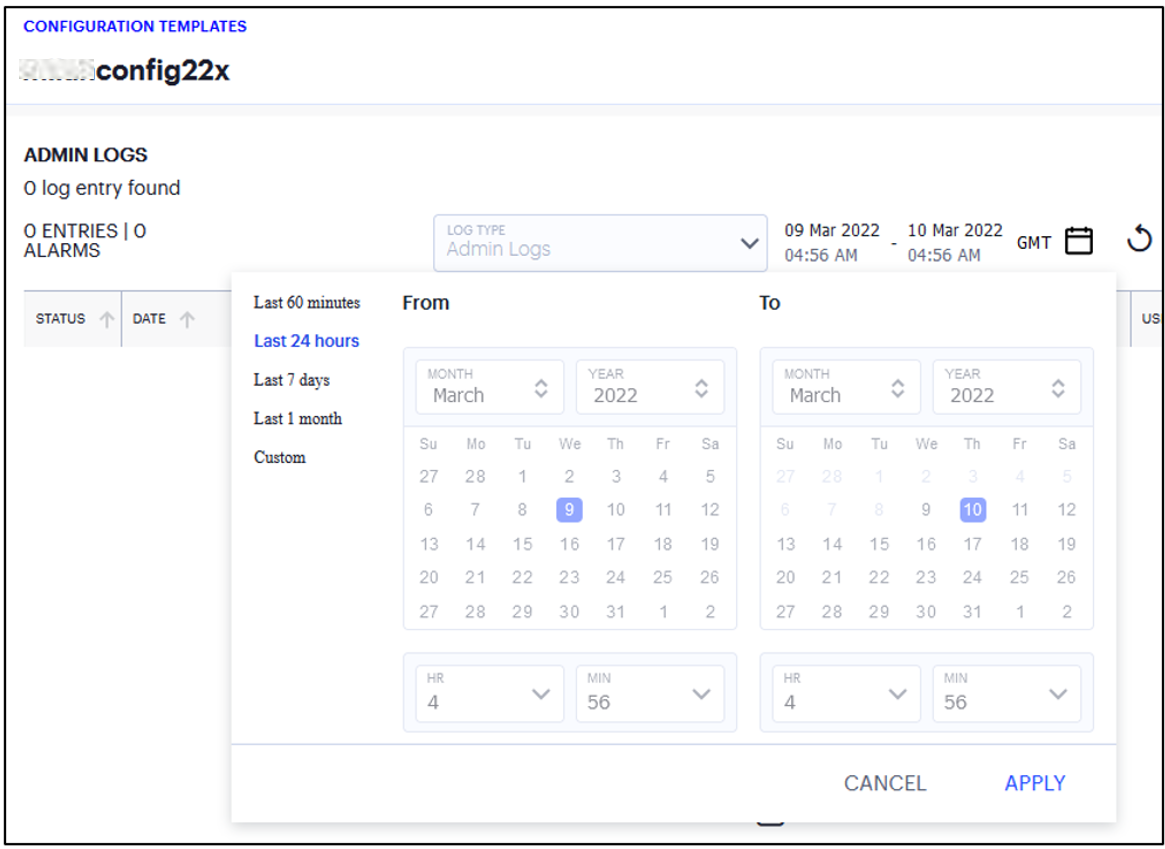
FIGURE 167 Setting a log time period
Set the time period you want to view using the available ranges at the top-left. Choose from:
Last 60 minutes
Last 24 hours (default)
Last 7 days
Last 1 month
Custom
For Custom, set a specific From and To to denote the start and end of your custom date/time range.
Note
The custom date/time calendar controls are enabled for only the Custom option. However, the calendar continues to identify the applicable start and end date-time for all predefined time periods.
To apply your changes, click Apply. The selected time period is displayed in the filter bar and data on the page updates accordingly.
Choose the Advanced filter icon to filter the logs based on Gateway name, User name, Severity, Log Message, and so on.

FIGURE 168 Applying a filter to the log display
Configuring Certificates
A trusted client CA is a CA that you deem trusted by adding it to the trusted client CA store. The system trusts any certificate issued by that CA. To use client CA certificates, you must install and enable the proper certificates. Additionally, you must install the corresponding client-side certificates in your users’ Web browsers.
Importing a Trusted Client CA Certificate
To import a trusted client CA certificate:
Log into the nSA as a Tenant Admin.
From the ICS menu, click Gateways, then click Multinode Configuration, and then select Configuration Template.
The Configuration Template page appears, showing the full list of Templates currently configured on the nSA.
Select the required Template.
The Overview page appears for the selected Template.
Select System > Configuration > Certificates > Trusted Client CAs to display the configuration page.
Click Import CA Certificate to display the configuration page.
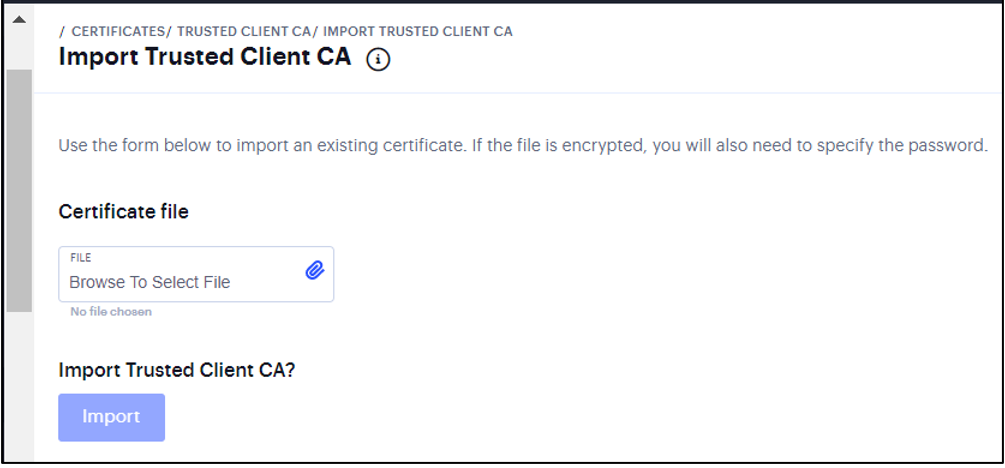
Import Trusted Client CA
Browse to the certificate file, select it, and click Import Certificate to complete the import operation.
Configuring Auto-Importing of Client Certificates
To enable auto-importing:
Select System > Configuration > Certificates > Trusted Client CAs.
Click the Auto-Import Options button to display the options.
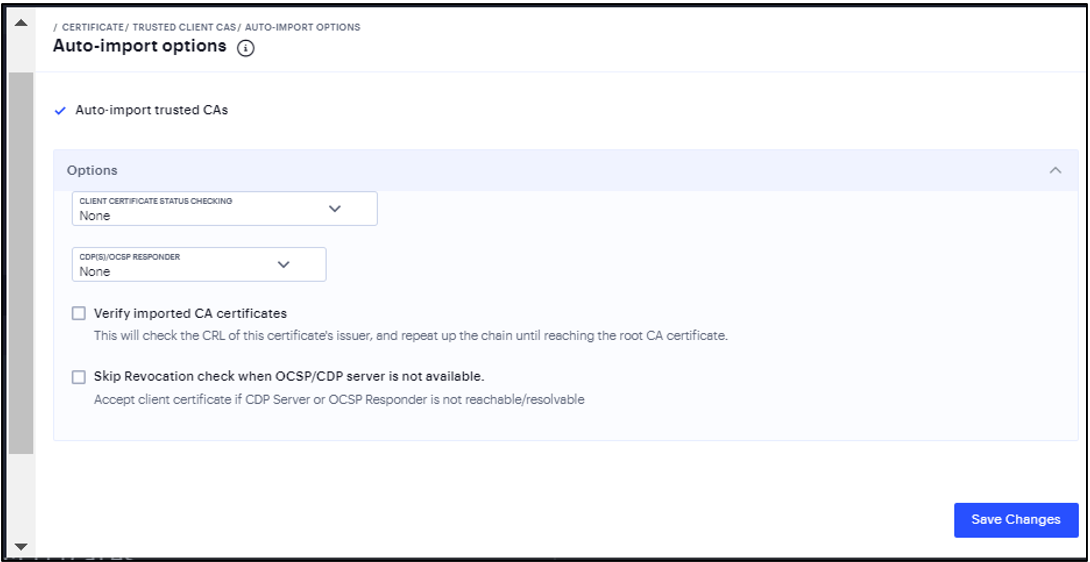
FIGURE 169 Auto-Import Trusted CAs
Complete the configuration.
Select Auto-import trusted CAs option to enable auto-import and display its configuration settings.
Select a method to validate the trusted client certificate.
Select the location of the responder value.
Select Skip Revocation check when OCSP/CDP server is not available option to instruct ICS to skip revocation check and accept end user certificates when either OCSP server or CDP server is not accessible over the network.
Configuring a Proxy Server for CRL Downloads and OCSP Status Checks
You can configure the system to send CRL download requests and OCSP status checks to the proxy server and collect the response. You might want to do this if you deploy proxy server to control access to the Internet.
To configure a proxy server:
Select System > Configuration > Certificates > Trusted Client CAs.
Click Proxy Settings to display the page.
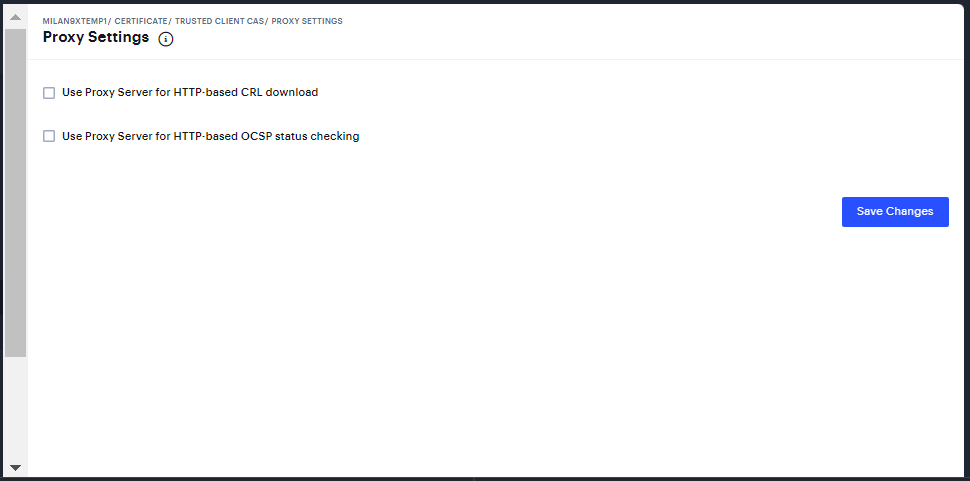
FIGURE 170 Proxy Settings
Complete the configuration and save the configuration.
Select Use Proxy Server for HTTP-based CRL download to enable the CRL operations to use a proxy server.
Select Use Proxy Server for HTTP-based OCSP status checking to enable the OCSP operations to use a proxy server.
Configuring SAML
In a SAML deployment, the system can act as a SAML service provider, a SAML identity provider, or both.
Managing SAML Metadata Files
You use the System > Configuration > SAML pages to maintain a table of SAML metadata files for the SAML service providers and identity providers in your network.
To add metadata files:
Log into the nSA as a Tenant Admin.
From the ICS menu, click Gateways, then click Multinode Configuration, and then select Configuration Template.
The Configuration Template page appears, showing the full list of Templates currently configured on the nSA.
Select the required Template.
The Overview page appears for the selected Template.
Select System > Configuration > SAML.
Click the Add icon to display the configuration page.
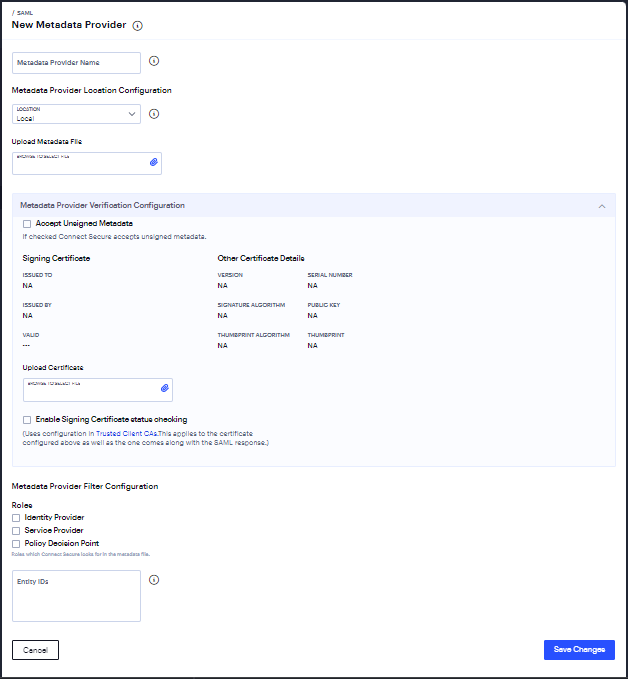
FIGURE 171 SAML Metadata Configuration
Complete the configuration.
Metadata Provider Location Configuration - Select one of the following methods: Local, Remote
Accept Untrusted Server Certificate - Select this option to allow the system to download the metadata file even if the server certificate is not trusted.
Accept Unsigned Metadata - If this option is not selected, unsigned metadata is not imported.
Signing Certificate - Browse and locate the certificate that verifies the signature in the metadata file.
Roles - Select whether the metadata file includes configuration details for a SAML service provider, identity provider, or Policy Decision Point.
Entity IDs To Import - Enter the SAML Entity IDs to import from the metadata files.
Save changes. The Metadata provider will be listed in the SAML page.
Telemetry Settings
This page allows you to enable Google Analytics and Crash Analytics.
To configure Telemetry settings:
Log into the nSA as a Tenant Admin.
From the ICS menu, click Gateways, then click Multinode Configuration, and then select Configuration Template.
The Configuration Template page appears, showing the full list of Templates currently configured on the nSA.
Select the required Template.
The Overview page appears for the selected Template.
Select System > Configuration > Telemetry.
In the Telemetry Settings page, select the required check boxes and save changes.
Google Analytics helps in tracking how frequently customer is using a particular feature.
Crash Analytics collects logs when user faces any crash.
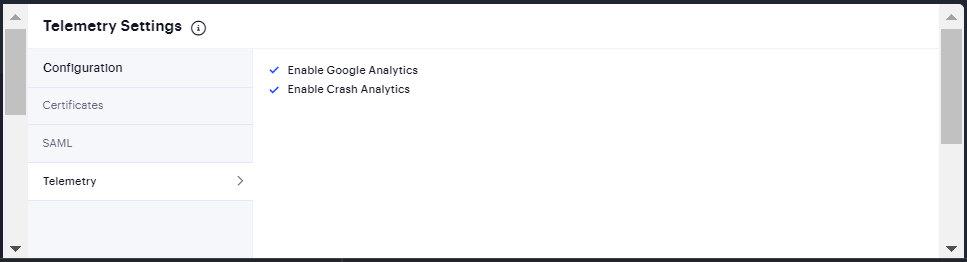
FIGURE 172 Telemetry Settings
Configuring Host Checker Policy
Host Checker is a software component that performs endpoint compliance checks on hosts that connect to the IPS. It supports two types of rules within a policy; predefined and custom. The pre-defined inspection capabilities consist of health and security checks including antivirus versions, antispyware, OS versions, hard disk encryption status and patch checks. The pre-defined rules are provided by OPSWAT and it uses the ESAP plug-in for pre-defined checks.
To configure a Host Checker policy, perform these tasks:
Log into the nSA as a Tenant Admin.
From the ICS menu, click Gateways, then click Multinode Configuration, and then select Configuration Template.
From the Configuration Templates list, select the Configuration Template for which you want to configure Host Checker.
From the ICS menu, select Authentication > Endpoint Security > Host Checker.
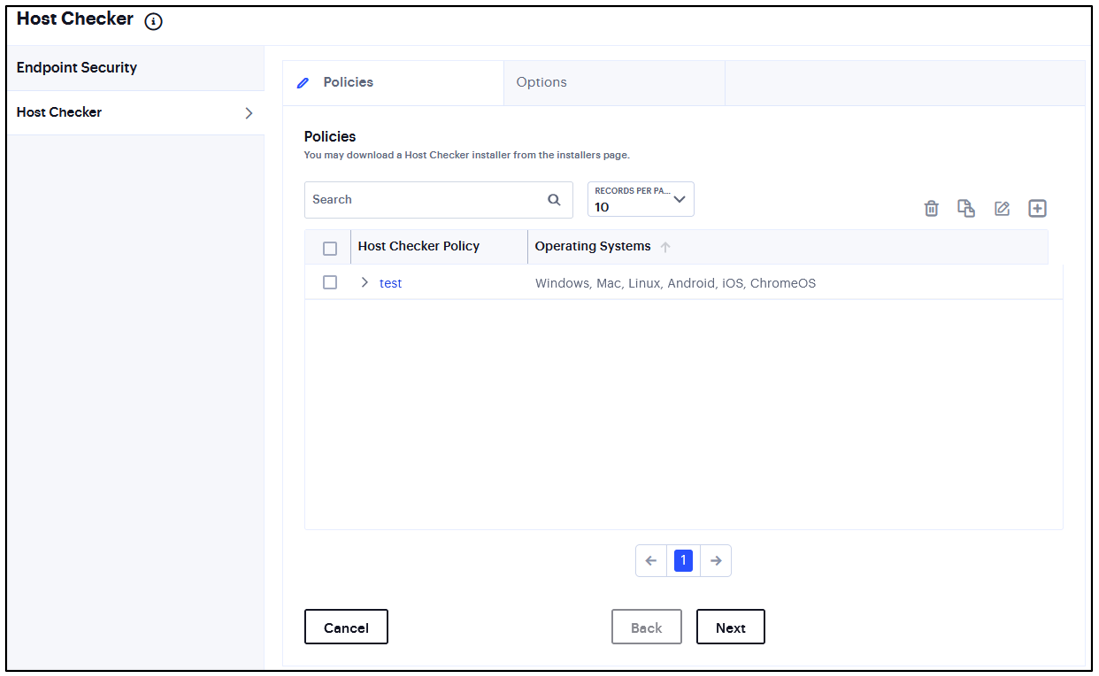
FIGURE 173 Host Checker
Under Policies, click the ‘+’ icon.
Enter a name for the policy and then click Save Changes.
A list of all the added policies is displayed.
Create one or more rules to associate with the policy.
In the Options tab, enter time limit for performance check and logout time if the device is inactive.
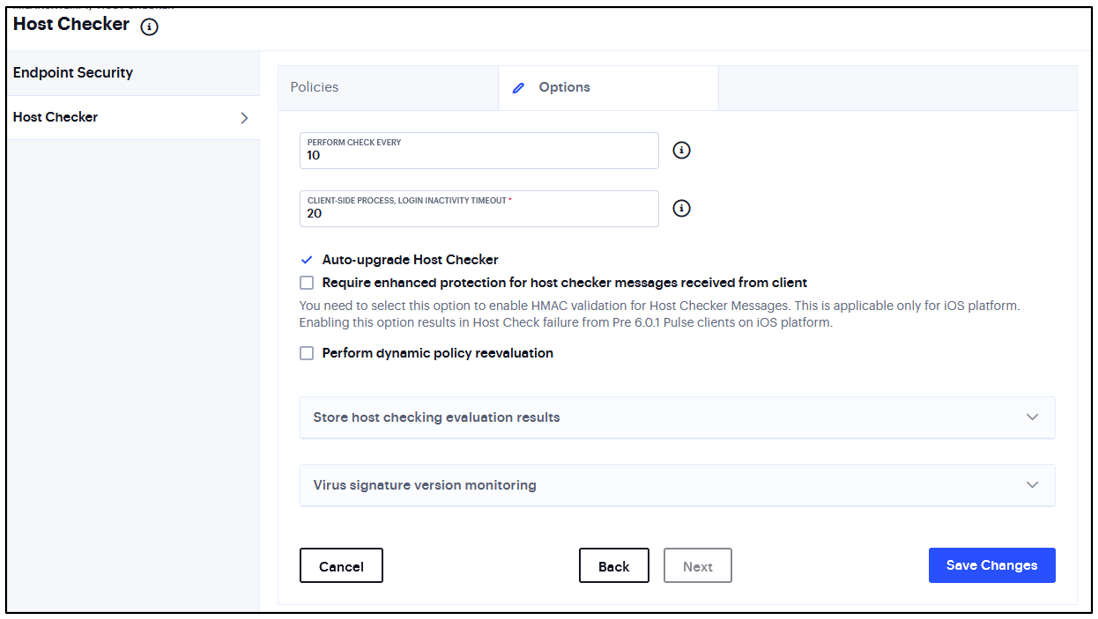
FIGURE 174 Host Checker Options
You can select Auto-upgrade Host Checker, Require enhanced protection for host checker messages received from client, and Perform dynamic policy reevaluation.
Note
You need to select this option to enable HMAC validation for Host Checker messages. This is applicable only for iOS platform. Enabling this option results in Host Check failure from Pre 6.0.1 Ivanti Secure Access clients on iOS platform.
Select Store Host Checking evaluation results to cache the result for the certain number of days.
Select Cache results if any of the roles is assigned or Cache results only if any of the selected roles are assigned and select the roles from Available Roles.
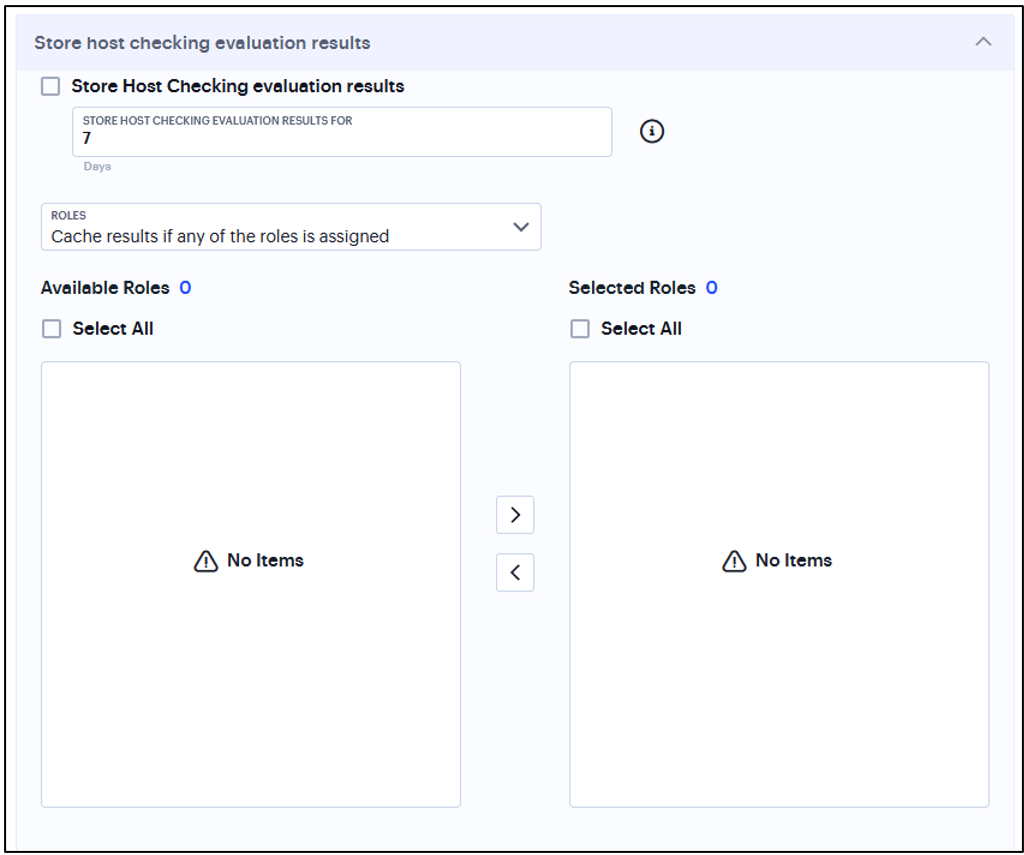
FIGURE 175 Store Host Checking Evaluation Results
In Virus signature version monitoring, select Auto-update virus signatures list.
For Download path, leave the existing URL(s) of the staging site(s) where the current list(s) are stored.
For Download interval, specify how often you want the system to automatically import the current list(s).
For Username and Password, enter your Connect Secure credentials.
To use a proxy server as the auto-update server, select Use Proxy Server and provide the proxy server details.
Note
You can also import the virus signatures manually by importing signature list.
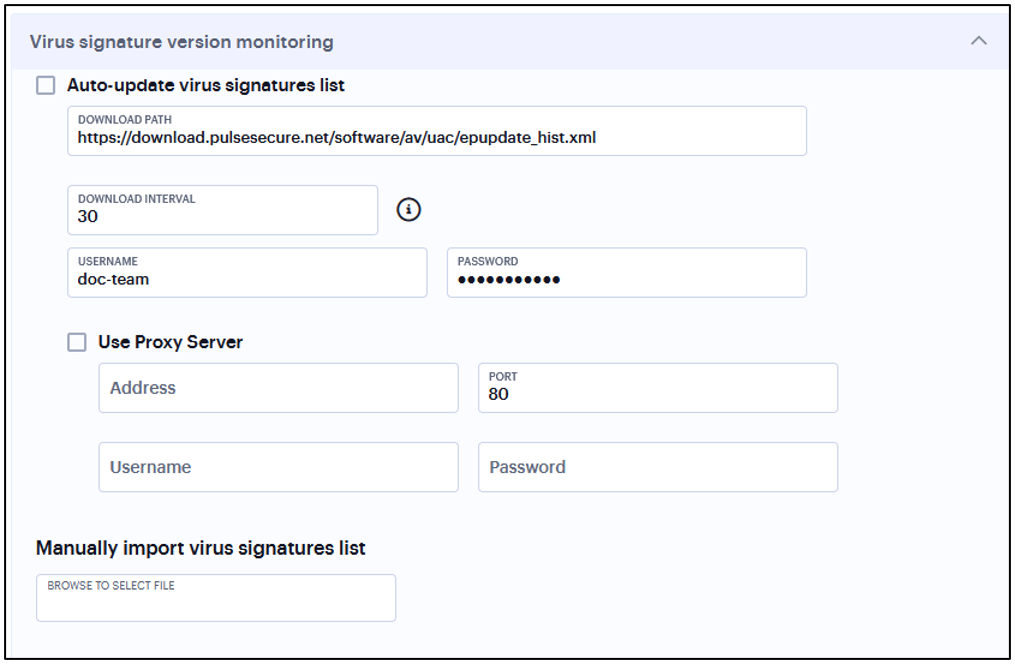
FIGURE 176 Virus Signature Version Monitoring
To edit an existing policy, select the corresponding check box and click the Edit icon.
To delete one or more policies, select the corresponding check boxes and click the Delete icon.
Checking for Third-Party Applications Using Predefined Rules
Host Checker comes pre-equipped with a vast array of predefined rules that check for antivirus software, firewalls, malware, spyware, and specific operating systems from a wide variety of industry leaders. You can enable one or more of these rules within a Host Checker client-side policy to ensure that the integrated third-party applications that you specify are running on your users’ computers in accordance with your specifications. For firewall and antivirus rules, you can specify remediation actions to automatically bring the endpoint into compliance.
Add Rule: Antivirus Rule with Remediation Options
To configure a Predefined Antivirus rule:
Select one of the following supported platforms:
Windows
Mac
Enter a Rule Name.
Under Criteria, click Require specific products/vendors. A new window will open with a list of all of the products that support the feature.
Select your vendor(s) and product(s) by using either the Require any supported product from a specific vendor or Require specific products check box.
If your product is supported, select the check box for any or all of the remediation actions that you want to apply.
(Optional) Select or clear the check box next to Successful System Scan must have been performed in the last, and enter the number of days in the field.
If you select this check box, a new option appears. If the remediation action to start an antivirus scan has been successfully begun, you can override the previous check.
(Optional) Select or clear the check box next to Check for the Virus Definition files. Enter a number between 1 and 20. If you enter 1, the client must have the latest update.
(Optional) Select Monitor this rule for change in result to continuously monitor the policy compliance of endpoints.
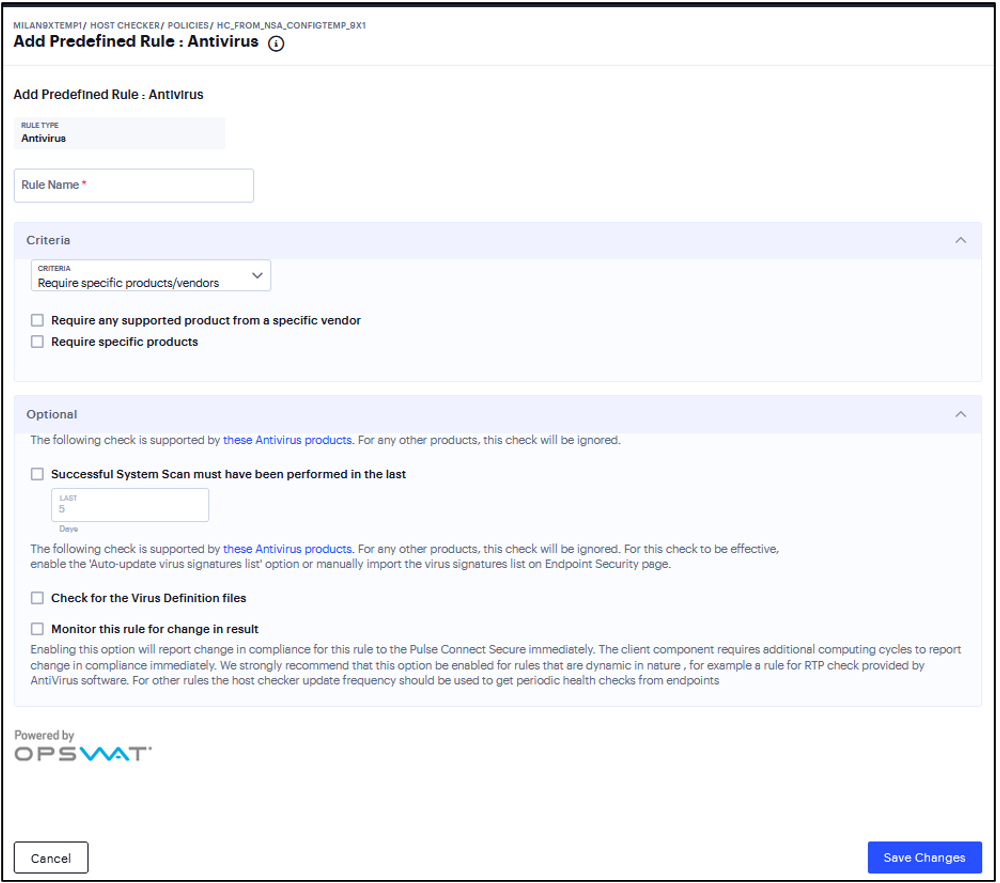
FIGURE 177 Antivirus Rule
Note
Use this option only for dynamic rules, such as checking whether Real Time Protection is enabled on the antivirus software. Use the host checker update frequency to monitor other rules periodically.
Monitor this rule for change in result for port check is applicable only for Windows and not for Linux or MAC machines.
Add Rule: Firewall Rule with Remediation Options
When you enforce the Host Checker rule with firewall remediation actions, if an endpoint attempts to log in without the required firewall running, Host Checker can attempt to enable the firewall on the client machine.
Select one of the following supported platforms:
Windows
Mac
Enter a Rule Name.
Under Criteria, click Require specific products/vendors. A new window will open with a list of all of the products that support the feature.
Select your vendor(s) and product(s) by using either the Require any supported product from a specific vendor or Require specific products check box.
(Optional) Select Monitor this rule for change in result to continuously monitor the policy compliance of endpoints. If this check box is selected, and a change in compliance status on an endpoint that has successfully logged in occurs, the system initiates a new handshake to re-evaluate realm or role assignments.
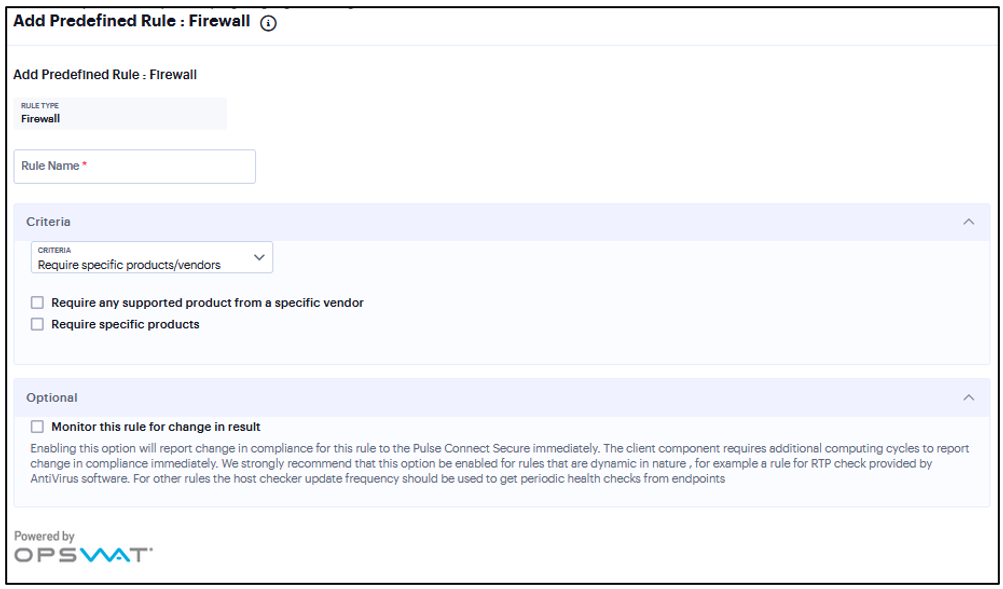
FIGURE 178 Firewall Rule
Note
Monitor this rule for change in result for port check is applicable only for Windows and not for Linux or MAC machines.
Add Rule: AntiSpyware
You can configure Host Checker to check for installed antispyware on endpoints.
To configure a Host Checker Predefined Spyware rule:
Select one of the following supported platforms:
Windows
Mac
Enter a Rule Name.
Under Criteria, click Require specific products/vendors. A new window will open with a list of all of the products that support the feature.
Select your vendor(s) and product(s) by using either the Require any supported product from a specific vendor or Require specific products check box.
(Optional) Select Monitor this rule for change in result to continuously monitor the policy compliance of endpoints. If this check box is selected, and a change in compliance status on an endpoint that has successfully logged in occurs, the system initiates a new handshake to re-evaluate realm or role assignments.
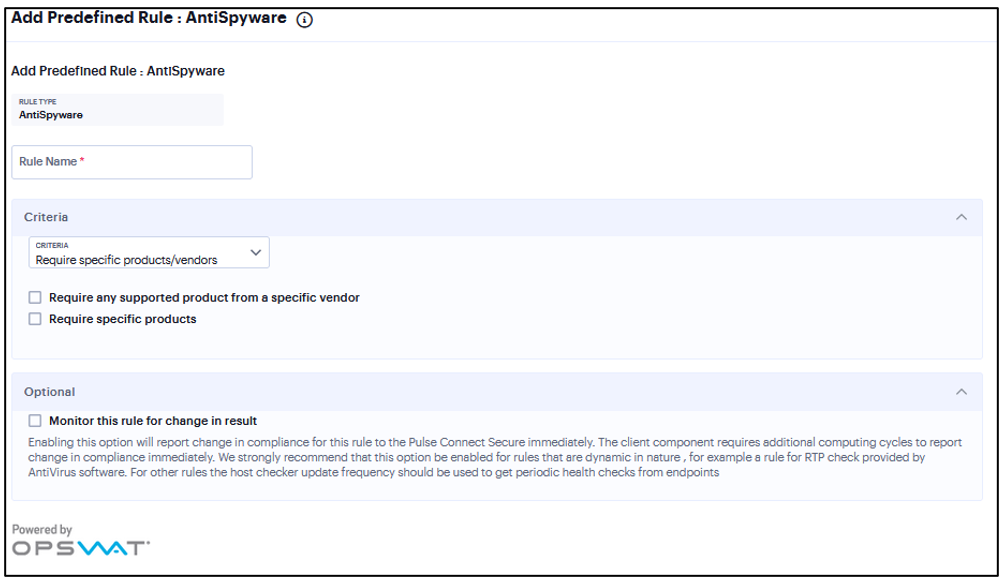
FIGURE 179 AntiSpyware
Note
Monitor this rule for change in result for port check is applicable only for Windows and not for Linux or Mac machines.
Add Rule: Hard Disk Encryption
You can configure Host Checker to check for installed Hard Disk Encryption on endpoints and specify the drives which needs to be encrypted using these software.
To configure a predefined hard disk encryption rule:
Select one of the following supported platforms:
Windows
Mac
Enter a Rule Name.
Under Criteria, click Require specific products/vendors. A new window will open with a list of all of the products that support the feature.
Select your vendor(s) and product(s) by using either the Require any supported product from a specific vendor or Require specific products check box.
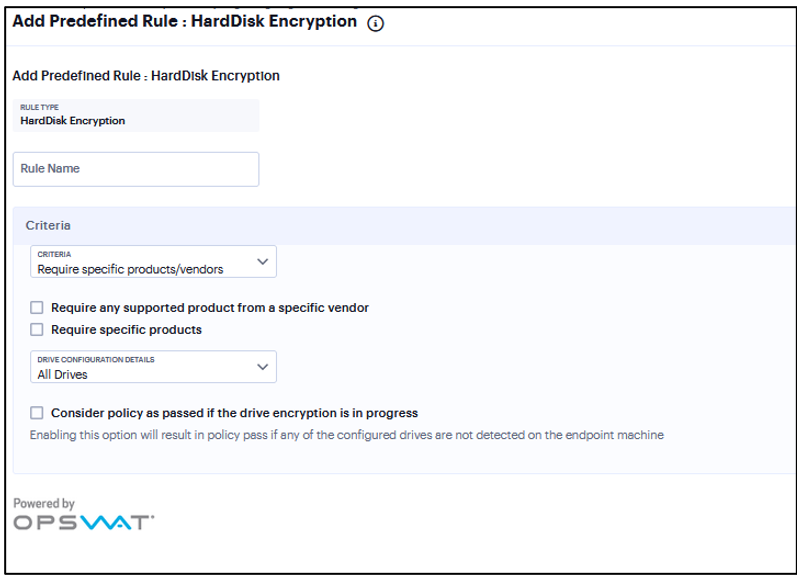
FIGURE 180 HardDisk Encryption
Under Drive Configuration Details, select the required option:
All Drives - (Default) Select this option to check if all the drives on the client machine are encrypted.
Specific Drives - Select this option to check if only specific drives on the client machine are encrypted.
Drive Letters - Enter the drive name. For example, C, D, E.
Select the Consider policy as passed if the drive Encryption is in progress option to allow the Host Checker policy to pass if the encryption process is in progress and the drive is not fully encrypted.
Note
The drive encryption process takes time to complete depending up on the drive size and contents.
For multiple drives, the Host Checker policy passes only if the encryption process is in progress in all the drives.
Add Rule: Patch Management
You can configure Host Checker to check for installed Patch management Software on endpoints.
To configure a predefined patch management rule:
Select one of the following supported platform options:
Windows
Mac
Enter a Rule Name.
Under Criteria, select the product name.
Default “Severity” options selected in policy are Critical, Important.
Default “Category” options selected in policy are Security Update, Critical Update, Regular Update, Driver Update.
To automatically enable patch deployment, select Enable Automatic Patch Deployment.
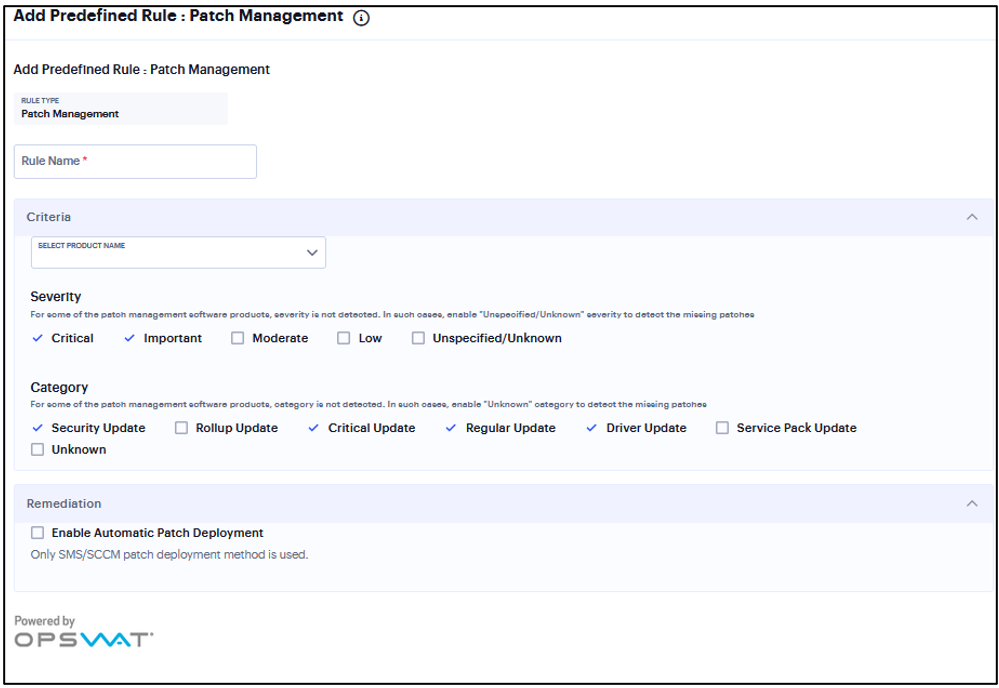
FIGURE 181 Patch Management
Add Rule: Common Vulnerability and Exposure (CVE)
The CVE check rule helps in identifying the endpoints which are vulnerable using the OPSWAT library.
This rule is applicable only to Windows platform.
To configure a predefined CVE check rule:
Enter a Rule Name.
From the Criteria, select if you require all the CVE checks from OPSWAT or choose the specific CVE checks from the available CVE checks list.
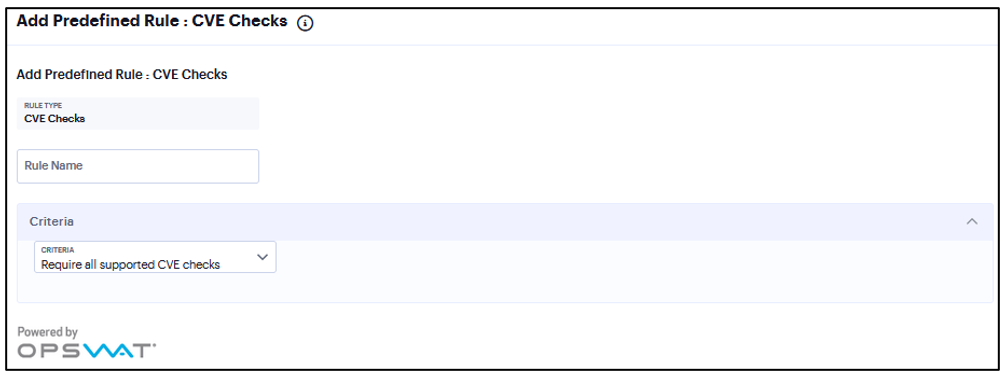
FIGURE 182 CVE Checks
Add Rule: OS Checks
You can configure Host Checker to check the version of the windows operating systems and minimum service packs.
This rule is applicable only to Windows platform.
To configure a Host Checker Predefined OS Checks rule:
Enter a rule name.
Under Criteria, select the service pack/version to ignore.
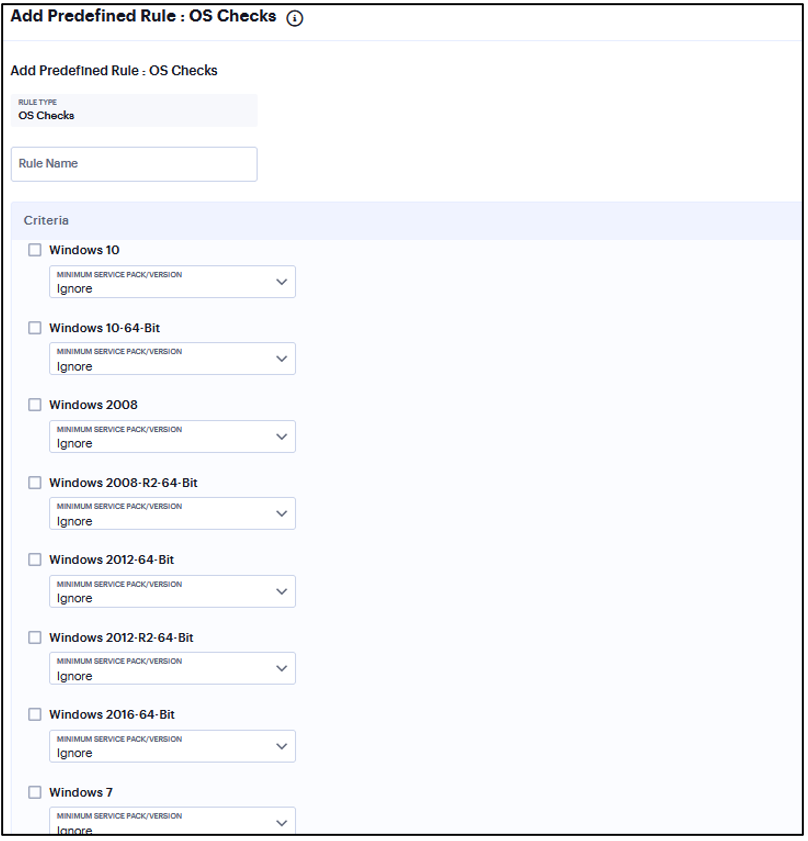
FIGURE 183 CVE Checks
Specifying Customized Requirements Using Custom Rules
In addition to the predefined policies and rules that come with the system, you can create custom rules within a Host Checker policy to define requirements that your users’ computers must meet.
Add Rule: Ports
Use this rule type to control the network connections that a client can generate during a session. This rule type ensures that certain ports are open or closed on the client machine before the user can access the device.
To configure the Ports rule:
Select one of the following supported platform options:
Windows
Mac
Linux
Enter the rule name.
Under Criteria, enter the Port list.
Click Status and select Required/Deny.
Required: Select this to enable access from a listed port.
Deny: Select this to disallow access from a listed port.
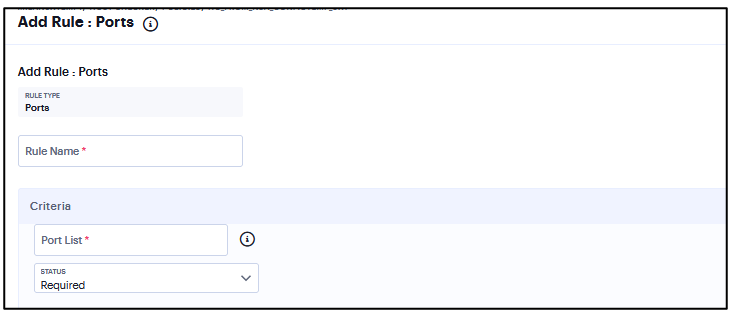
FIGURE 184 Ports
Add Rule: Process
To configure the Process rule:
Select one of the following supported platform options:
Windows
Mac
Linux
Enter the rule name.
Under Criteria, enter the Process name. For example, explorer.exe.
Click Status and select Required/Deny.
Required: Select this to allow access if the process exists.
Deny: Select this to deny access if the process does not exist.
(Optional) Enter the MD5 Checksums/SHA256 Checksums.
Select Monitor this rule for change in result to check if there is any change in compliance result.
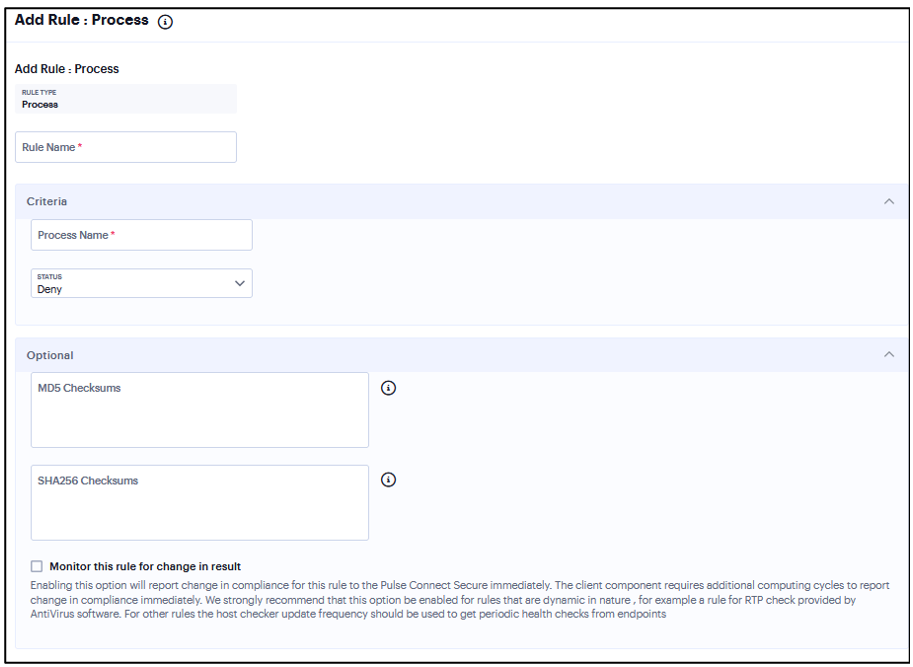
FIGURE 185 Process Rule
Add Rule: File
To configure the File rule:
Select one of the following supported platform options:
Windows
Mac
Linux
Enter the rule name.
Enter a full file name and path in File Name. For example, “c:test.txt” or “/Users/exampleuser/Downloads/test.txt”.
Under Criteria, click Status and select Required/Deny.
Required: Select this to allow access where the file exists and is valid.
Deny: Select this to deny access if the file does not exist or is invalid.
(Optional) Enter the MD5 Checksums/SHA256 Checksums value for the file.
Select Monitor this rule for change in result to check if there is any change in compliance result.
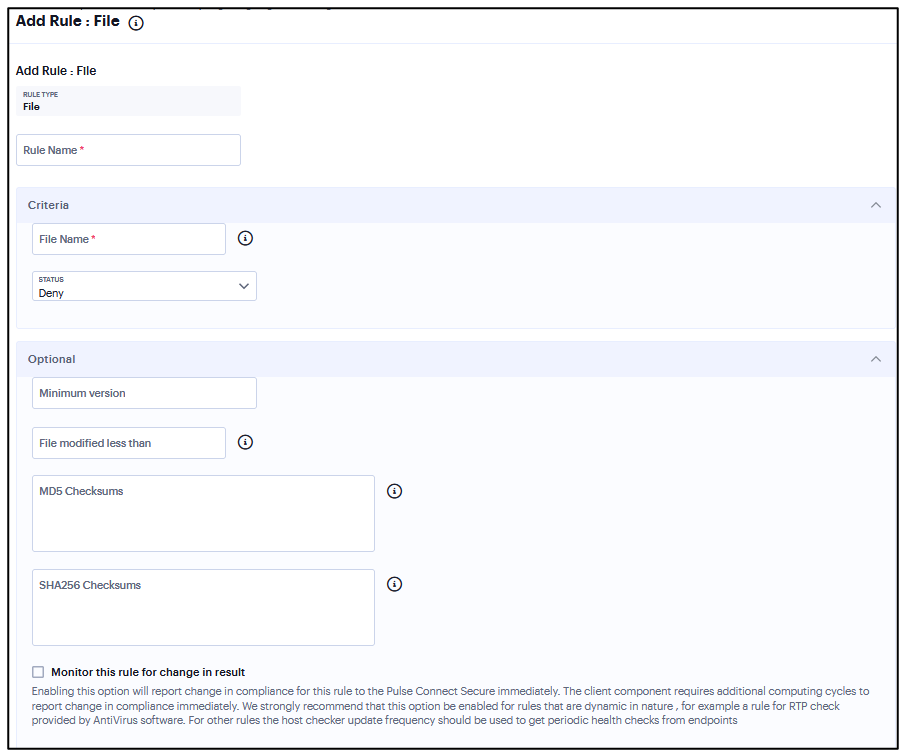
FIGURE 186 File Rule
Add Rule: NetBIOS
To configure the NetBios rule:
Select one of the following supported platform options:
Windows
Mac
Enter the rule name.
Enter the Netbios domain Names as a comma-separated list (without spaces) of domain names. Each name can be 15 characters. Duplicate names are not supported. For example, WINDOWS-PC,WIN*-PC,*-PC,WINDOWS*
Under Criteria, click Status and select Required/Deny.
Required: Select this to allow access from a listed Netbios domain name.
Deny: Select this to deny access from a listed Netbios domain name.
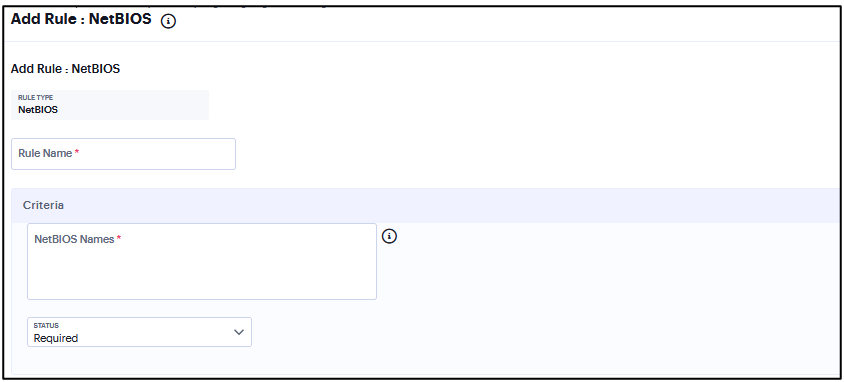
FIGURE 187 NetBIOS Rule
Add Rule: MAC Address
To configure the MAC Address rule:
Select one of the following supported platform options:
Windows
Mac
Enter the rule name.
Under Criteria, Enter the MAC address as a comma-separated list (without spaces) of MAC addresses in the form HH:HH:HH:HH:HH:HH where the HH is a two-digit hexadecimal number. Duplicate MAC addresses are not supported.
Click Status and select Required/Deny.
Required: Select this to enable access from a listed MAC address.
Deny: Select this to disallow access from a listed MAC address.
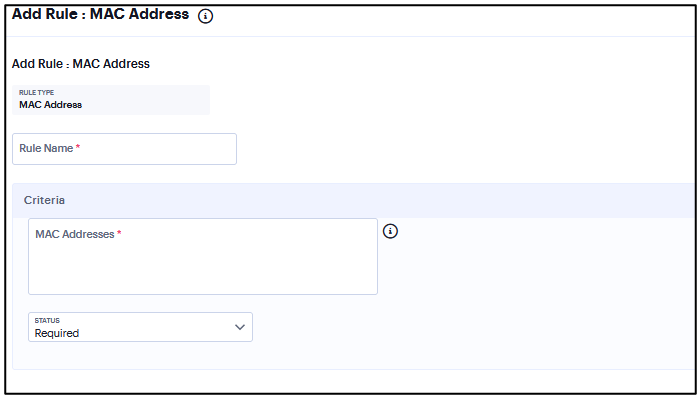
FIGURE 188 MAC Address Rule
Add Rule: Machine Certificate
To configure the Machine Certificate rule:
Select one of the following supported platform options:
Windows
Mac
Enter the rule name.
Under Criteria, select Any certificate to allow access with any certificate.
(Optional) Enter specific values in the machine certificate.
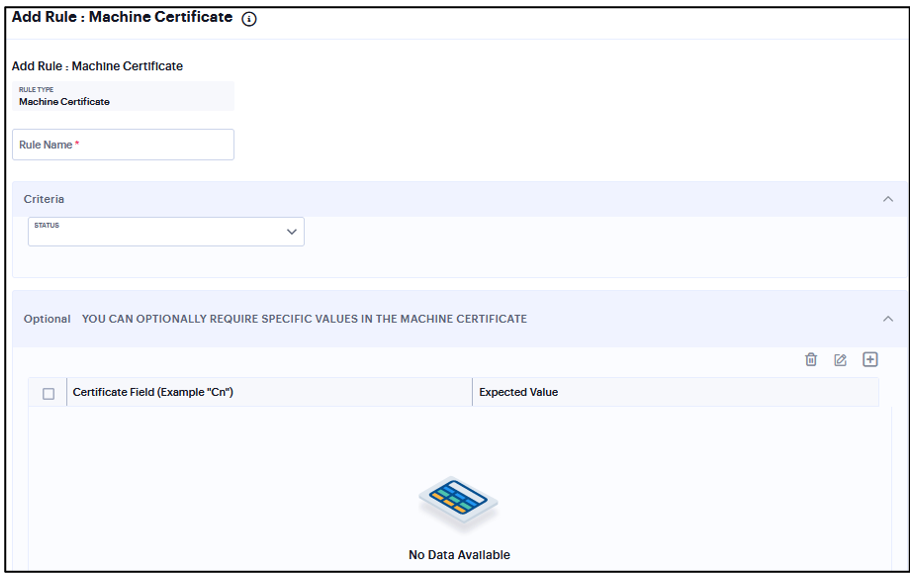
FIGURE 189 Machine Certificate
Add Rule: Registry Setting
Note that Registry Setting rule is applicable only to Windows platform.
To configure the Registry Setting rule:
Enter the rule name.
Under Criteria, select one of the following options:
HKEY_LOCAL_MACHINE
HKEY_USERS
HKEY_CURRENT_USER
HKEY_CURRENT_CONFIG
HKEY_CLASSES_ROOT
Enter a Subkey for the registry path.
Under Key Type, select one of the following key types:
string
dword
binary
Enter a Key name.
Enter a Value for the registry key.
Select the 64-bit check box to use the 64-bit registry store. Clear this check box to use the 32-bit registry store.
(Optional) Select Monitor this rule for change in result to check if there is any change in compliance result.
Under Optional, select Monitor this rule for change in result to continuously monitor the policy compliance of endpoints.
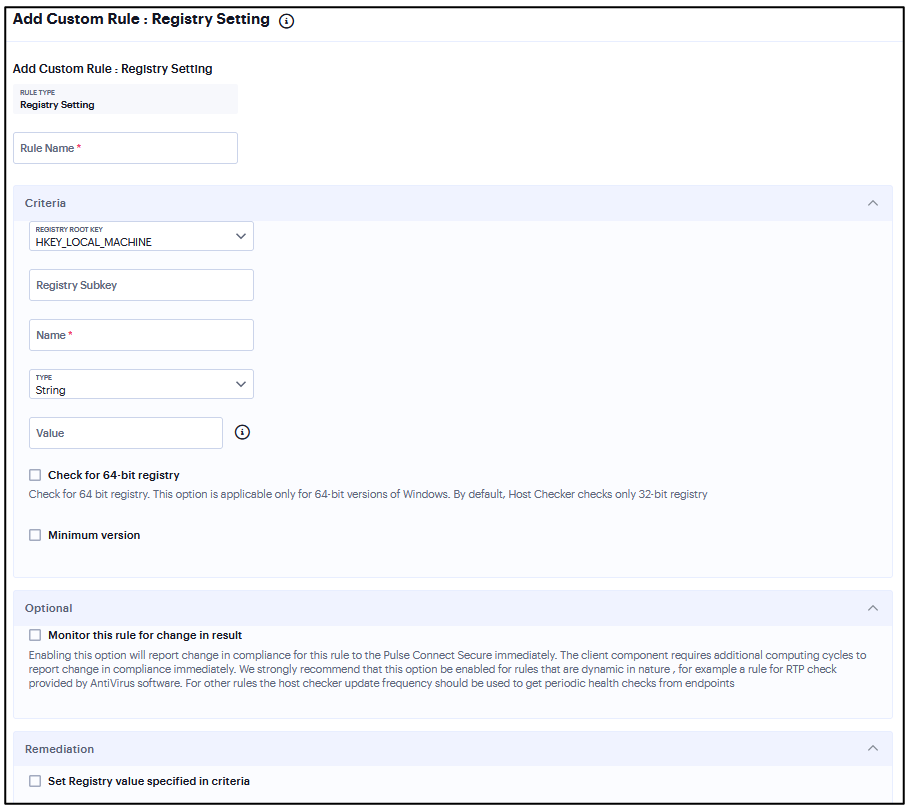
FIGURE 190 Registry Setting
Add Rule: Advanced Host Checking
Note that Advanced Host Checking rule is applicable only to Windows platform.
To configure the Advanced Host Checking rule:
Enter the rule name.
Under Criteria, select one of the following options:
ports
process
File
NETBIOS
MAC Address
Enable Required/Deny.
Select the registry root key- HKEY_LOCAL_MACHINE, HKEY_USERS, HKEY_CURRENT_USER, HKEY_CURRENT_CONFIG, or HKEY_CLASSES_ROOT.
Enter the registry subkey.
Enter the name of the registry.
Select the type of the registry- String, Binary, or DWORD.
Select “Check for 64-bit registry” to check the 64 bit registry on Windows. The default is 32 bit registry.
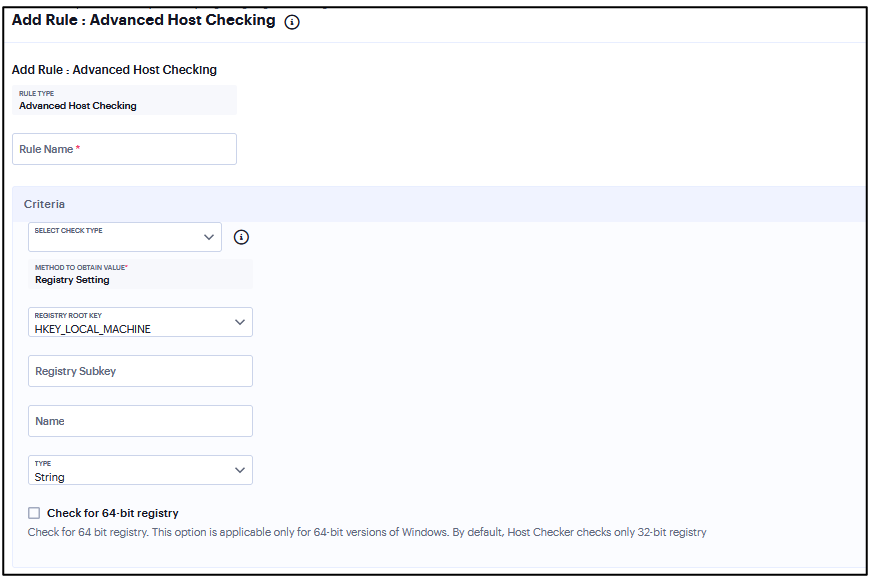
FIGURE 191 Advanced Host Checking
Add Rule: Jail Breaking Detection
Note that Jail Breaking Detection rule is applicable only to iOS platform.
To configure the Jail Breaking Detection rule:
Select one of the supported iOS platform options.
Enter the rule name.
Under Criteria, select Don’t allow Jail Broken devices
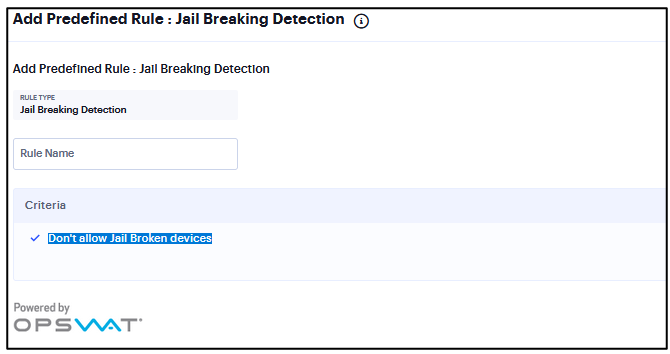
FIGURE 192 Jail Breaking Detection
Configuring Authentication Servers
The access management framework supports the following types of AAA servers: Local, External (standards-based), and External (other).
Local includes “Local Authentication Server”, “Certificate Server”.
External (standards-based) includes “LDAP Server”, “RADIUS Server”.
External (other) includes “MDM Server”, “RSA ACE Server”, “TOTP Server”.
To add an authentication server, click the Add icon and select the Authentication server type from the list.
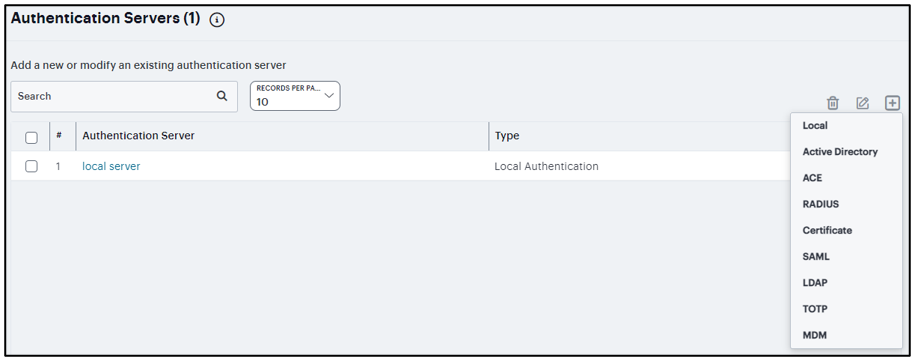
FIGURE 194 Configuring Authentication Servers
Configuring Local Authentication Server
You can create multiple local authentication server instances. When you define a new local authentication server, you must give the server a unique name and configure options for passwords.
To create a local authentication server:
Select Authentication > Authentication Servers.
Click the Add icon and select Local from the list to display the configuration page.
Complete the configuration and save changes.
Enter a Server Name.
Select Password Options.
Select the Allow users to change passwords option if you want users to be able to change their passwords.
Select the Force password change after option to specify the number of days after which a password expires. The default is 64 days.
Select the Prompt users to change password option to specify when to prompt the user to change passwords.
Select the Enable account lockout for users option to manage user authentication failures for admin users of local authentication server.
Enter the number of consecutive wrong password attempts after which the admin user account will be locked. The default value is 3 retries.
Enter the time in minutes for which admin user account will remain locked. The default value is 10 minutes.
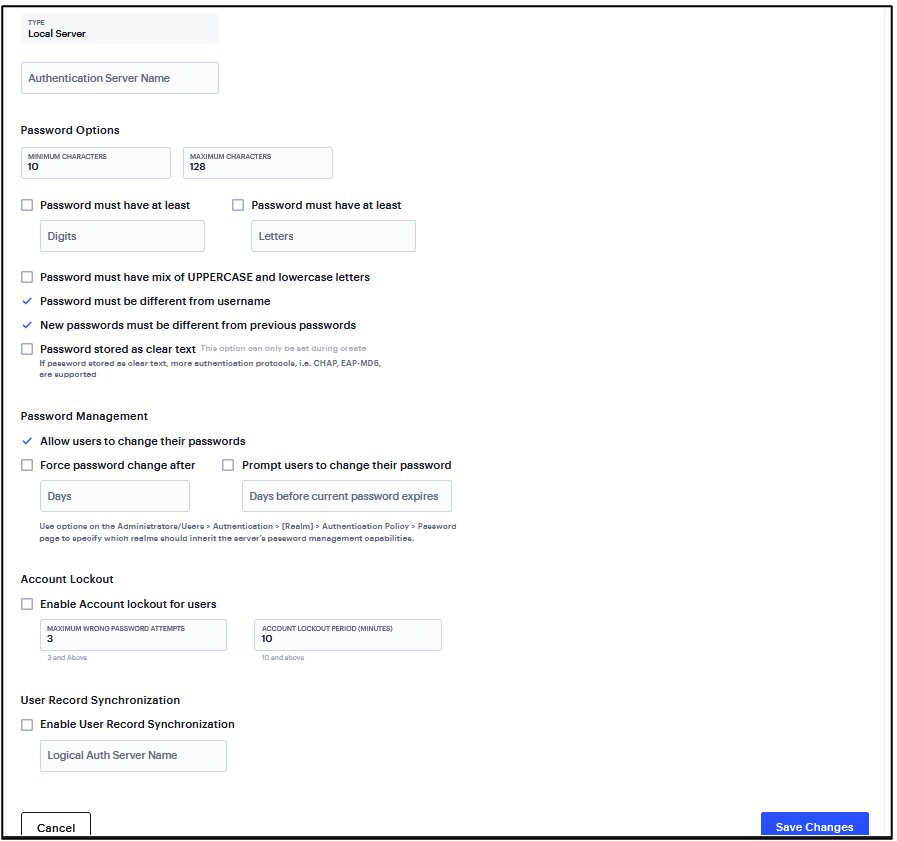
FIGURE 195 Local Authentication Server
Configuring ACE Authentication Server
RSA Authentication Manager (formerly known as ACE/Server) is an authentication and authorization server that allows user authentication based on credentials from the RSA SecurID® product from RSA Security Inc.
To configure authentication with the ACE server:
Select Authentication > Authentication Servers.
Click the Add icon and select ACE from the list to display the configuration page.
Complete the configuration and save changes.
Enter a Server Name.
Enter the default port of the authentication server.
Click and browse Import New Config File to upload the sdconf.rec configuration file.
Select the Enable User Record Synchronization option to retain the bookmarks and individual preferences regardless of which system you log in to.
Enter a logical authentication server name.
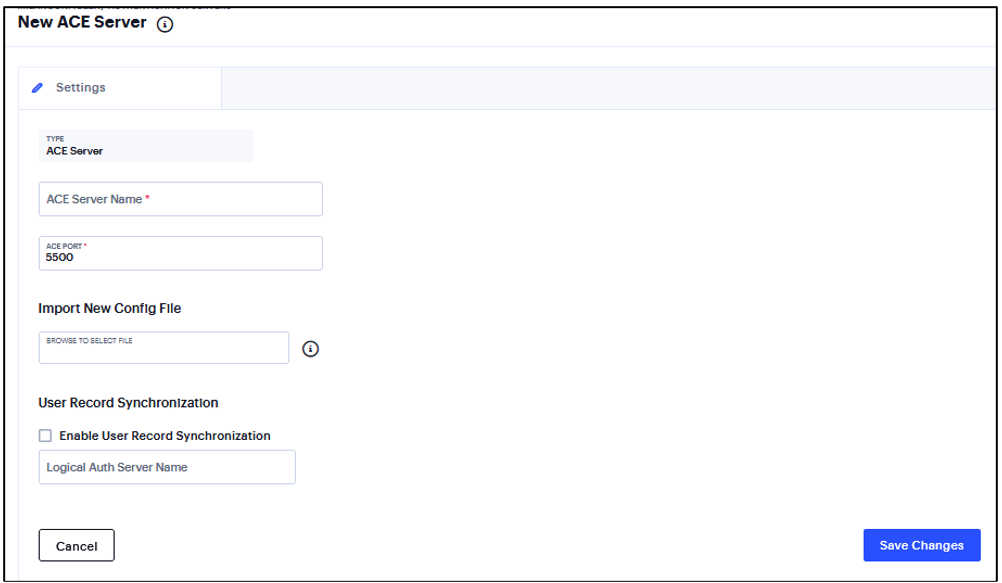
FIGURE 196 ACE Authentication Server
Configuring RADIUS Authentication Server
To configure authentication with the RADIUS server:
Select Authentication > Authentication Servers.
Click the Add icon and select RADIUS from the list to display the configuration page.
Complete the configuration and save changes.
Settings page
Enter a Server Name.
Enter the name that identifies the Network Access Server (NAS) client to the RADIUS server.
Enter the name or IP address of the RADIUS server.
Enter the authentication port value for the RADIUS server. Default port number: 1812, 1645 (legacy servers).
Enter the NAS IP address. If you leave this field empty, the internal IP address is passed to RADIUS requests. You can also fill this field with IPv6 address.
Enter the interval of time in seconds to wait for a response from the RADIUS server before timing out the connection.
Enter the number of times to try to make a connection after the first attempt fails.
Select the Users authenticate using tokens or one-time passwords option to prompt the user for a token instead of a password.
Click Next.
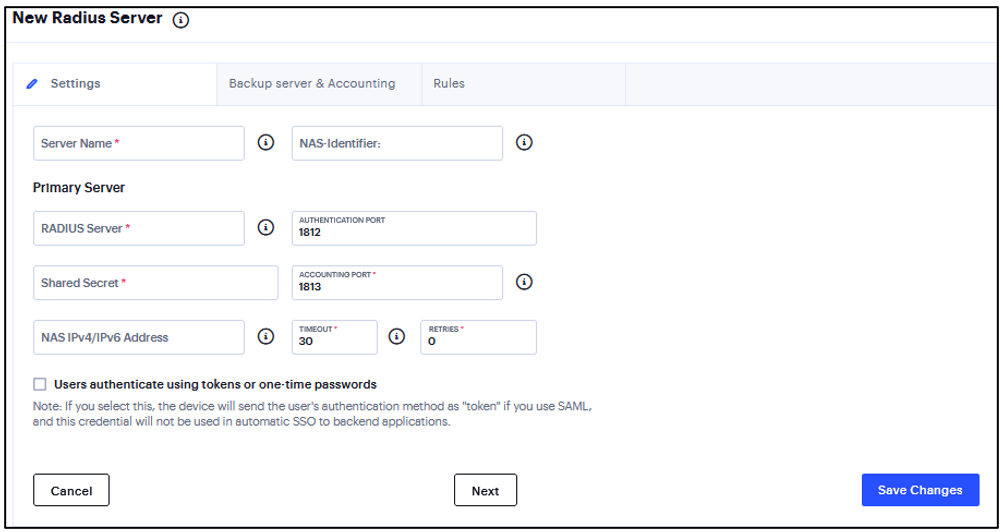
FIGURE 197 RADIUS Authentication Server
Backup server & Accounting page (required only if Backup server exists)
Enter the secondary RADIUS server.
Enter the Authentication Port.
Enter the Shared Secret.
Enter the Accounting Port.
Enter the user information to the RADIUS accounting server.
Enter Interim Update Interval in minutes to achieve more precise billing for long-lived session clients and during network failure.
Select the Use VPN Tunnel assigned IP Address for FRAMED-IP-ADDRESS/FRAMED-IPV6-ADDRESS attribute value in RADIUS Accounting option to use the VPN Tunneling IP address for the FRAMED-IP-ADDRESS/FRAMED-IPV6-ADDRESS attribute instead of the pre-authenticated (original) IP address. Framed IPv6 addresses based attribute fetching and parsing:
NAS-IPv6-Address
Login-IPv6-Host
Enable the Send Interim Updates for sub sessions created inside parent sessions check box to send interim updates for sub sessions (child sessions) created inside parent sessions.
Click Next.
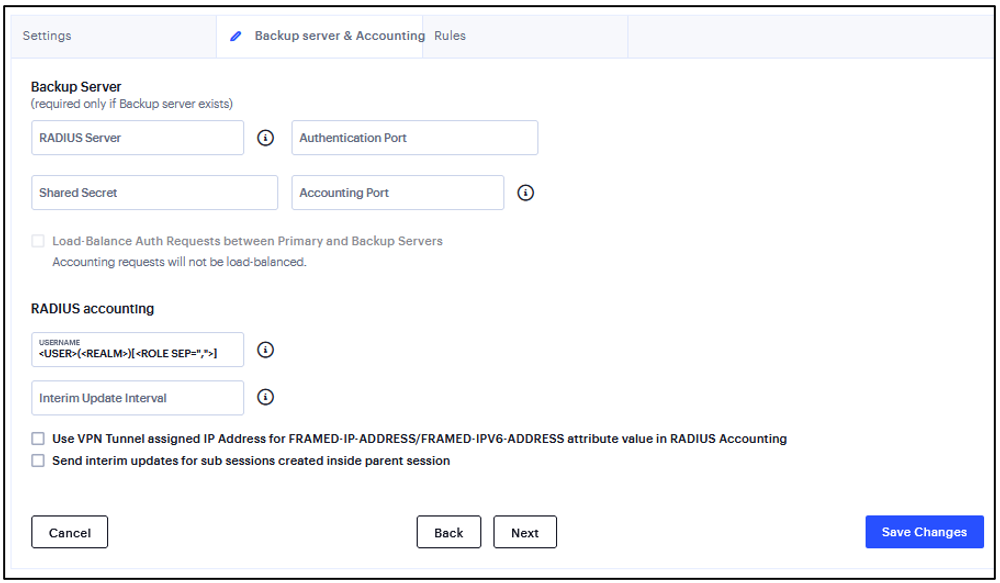
FIGURE 198 RADIUS Authentication Server
Rules page
Select the Enable processing of Radius Disconnect Requests check box. The Radius Disconnect requests received from the backend Radius server will terminate sessions that match the attributes in the request.
Select the Enable User Record Synchronization option to retain the bookmarks and individual preferences regardless of which system you log in to.
Enter a logical authentication server name.
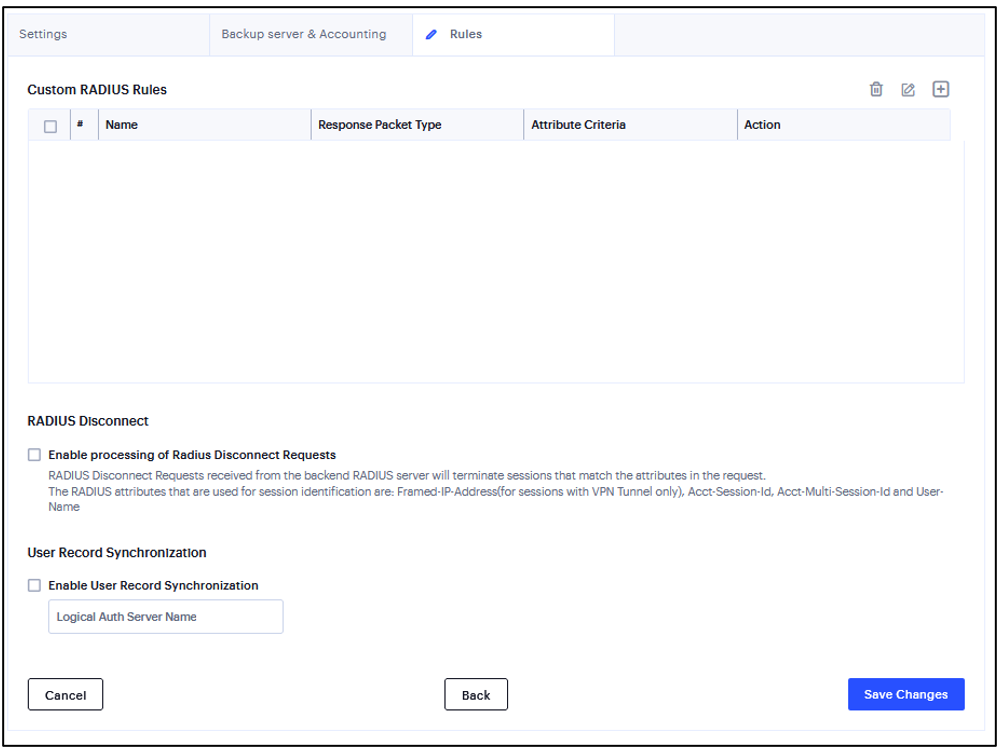
FIGURE 199 RADIUS Authentication Server
Configuring Certificate Authentication Server
The certificate server is a local server that allows user authentication based on the digital certificate presented by the user without any other user credentials.
To configure authentication with the Certificate server:
Select Authentication > Authentication Servers.
Click the Add icon and select Certificate from the list to display the configuration page.
Complete the configuration and save changes.
Enter a Server Name.
Enter a username template. Specify how the system should construct a username. You may use any combination of certificate variables contained in angle brackets and plain text.
Select the Enable User Record Synchronization option to retain the bookmarks and individual preferences regardless of which system you log in to.
Enter a logical authentication server name.
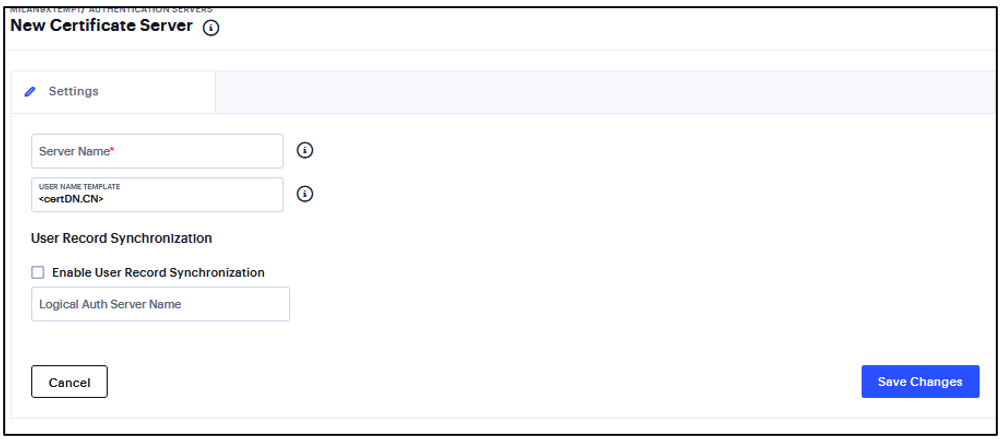
FIGURE 200 Certificate Authentication Server
Configuring LDAP Authentication Server
Lightweight Directory Access Protocol (LDAP) facilitates the access of online directory services. LDAP directory consists of a collection of attributes with a name, known as a distinguished name (DN). Each of the entry’s attributes, known as a relative distinguished name (RDN), has a type and one or more values. The types are typically mnemonic strings, such as CN for common name. The valid values for each field depend on the types.
To configure authentication with the LDAP server:
Select Authentication > Authentication Servers.
Click the Add icon and select LDAP from the list to display the configuration page.
Complete the configuration and save changes.
Settings page
Enter a Server Name.
Select the Enable Domain Name option if you want to fetch a list of servers from the DNS server. Clear this option if you want to manually enter all the domain controllers host names.
Enter the LDAP server name or the IP address.
(Optional) Enter the parameters for backup LDAP server1. Default port number: 389
Enter the parameters for backup LDAP port1.
(Optional) Specify the parameters for backup LDAP server2.
Enter the parameters for backup LDAP port2.
Select the backend LDAP server type from the following choices: Generic, Active Directory, iPlanet, Novell eDirectory.
Select one of the following options for the connection to the LDAP server:
Unencrypted - The device sends the username and password to the LDAP Directory Service in cleartext.
LDAPS - The device encrypts the data in the LDAP authentication session using the Secure Socket Layer (SSL) protocol before sending it to the LDAP Directory Service.
Start TLS - The device allows both secure and plain requests against an LDAP server on a single connection.
Enter the time (in seconds) to wait for connection to the primary LDAP server, and then to each backup LDAP server. Default: 15 seconds
Enter the time (in seconds) to wait for search results from a connected LDAP server.
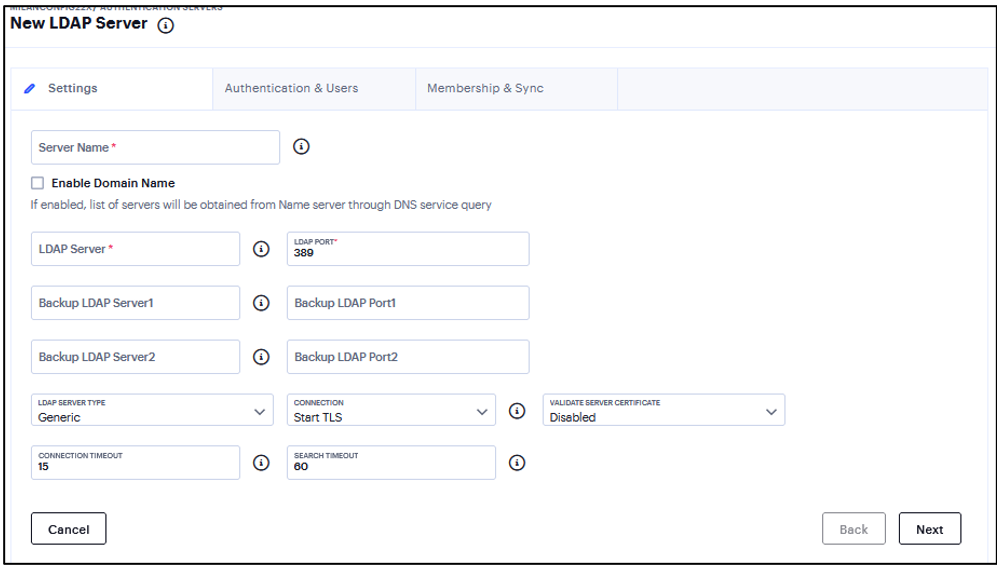
FIGURE 201 LDAP Authentication Server
Click Next.
Authentication & Users page
Select the Authentication required to search LDAP option to require authentication when performing search or password management operations.
Enter the administrator DN for queries to the LDAP directory.
Enter the password for the LDAP server.
Enter the backup administrator DN for queries to the LDAP directory, as a fallback when primary Admin DN fails (due to account expiration).
Enter the backup administrator password for the LDAP server.
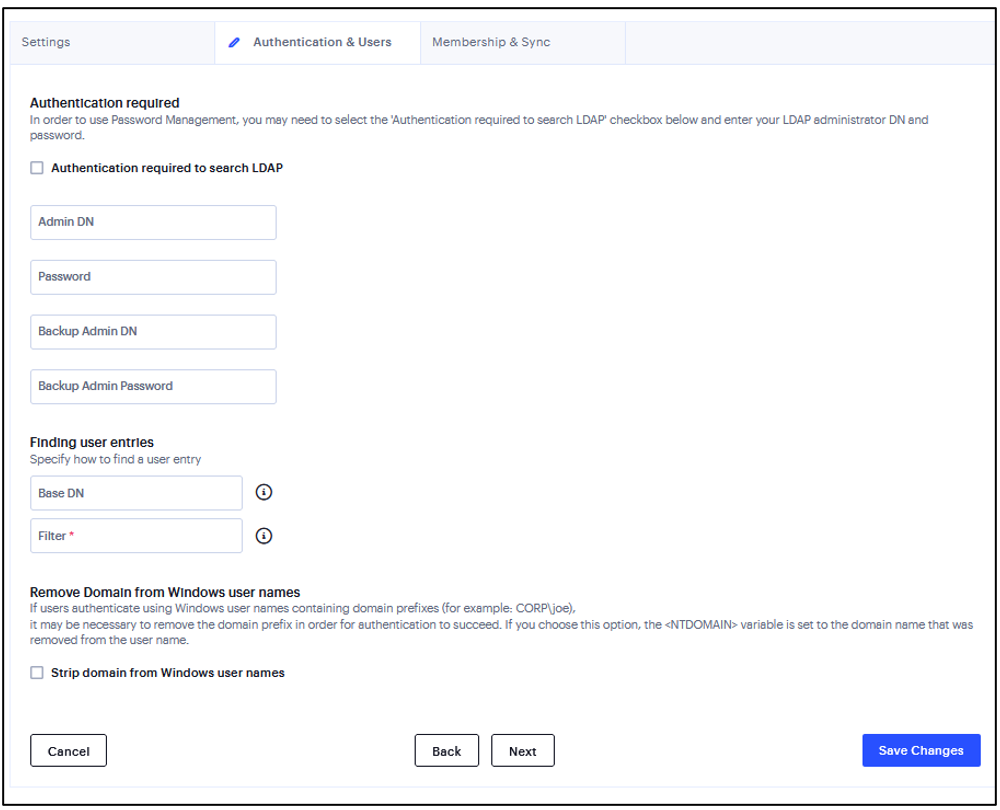
FIGURE 202 Finding user entries
Under Finding user entries:
Enter the base DN under which the users are located. For example, dc=sales,dc=acme, dc=com.
Enter a unique variable that can be used to do a fine search in the tree. For example, samAccountname=<username> or cn=<username>.
Select the Strip domain from Windows username option to pass the username without the domain name to the LDAP server.
Click Next.
Membership & Sync page
Enter the base DN to search for user groups.
Enter a unique variable which can be used to do a fine search in the tree. For example, samAccountname=<username> or cn=<GROUPNAME>.
Enter all the members of a static group. For example, member or uniquemember (iPlanet specific Deprecated for 21.x).
Select the Reverse group search option to start the search from the member instead of the group. This option is available only for Active Directory server types.
Enter an LDAP query that returns the members of a dynamic group. For example, memberURL.
Enter how many levels within a group to search for the user. The higher the number, the longer the query time, so we recommend that you specify to perform the search no more than two levels deep.
Select one of the following options: Nested groups in Server Catalog, Search all nested groups.
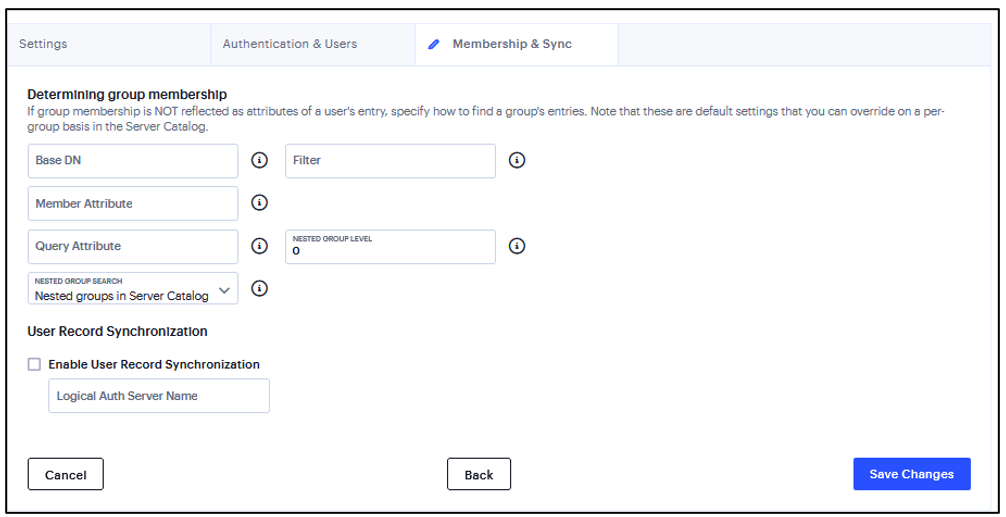
FIGURE 203 Determining group membership
Configuring SAML Authentication Server
SAML is an XML-based framework for communicating user authentication, entitlement, and attribute information. The standard defines the XML-based assertions, protocols, bindings, and profiles used in communication between SAML entities. SAML is used primarily to implement Web browser single sign-on (SSO). SAML enables businesses to leverage an identity-based security system like Ivanti Connect Secure to enforce secure access to web sites and other resources without prompting the user with more than one authentication challenge.
For complete details on the SAML standard, see the OASIS web site:
To configure authentication with the SAML server:
Select Authentication > Authentication Servers.
Click the Add icon and select SAML from the list to display the configuration page.
Complete the configuration and save changes.
Settings
Enter a name to identify the server instance.
Select SAML version used by the SAML IdP.
Select to override the Host FQDN for the SAML server. Host FQDN is used to update the Unique SAML Identifier and ACS URL of the SAML Authentication Server.
Select Manual or Metadata for Configuration Mode. If a metadata file or location is available from the SAML identity provider, use the metadata option to make configuration simpler and less prone to error.
Enter Identity Provider Entity ID. The identity provider entity ID is sent as the Issuer value in the assertion generated by the SAML identity provider.
Enter Identity Provider Single Sign On Service URL. The identity provider SSO service URL is a URL provisioned by the SAML identity provider. The setting is required to support service-provider-initiated SSO.
Specify User Name Template to derive the username from the assertion.
Specify the maximum allowed difference in time between the system clock and the SAML identity provider server clock.
Select Support Single Logout. Single logout is a mechanism provided by SAML for logging out a particular user from all the sessions created by the identity provider. Select this option if the system must receive and send a single logout request for the peer SAML identity provider.
Click Save Changes. The SAML Authentication Server gets listed in the Authentication Servers page.
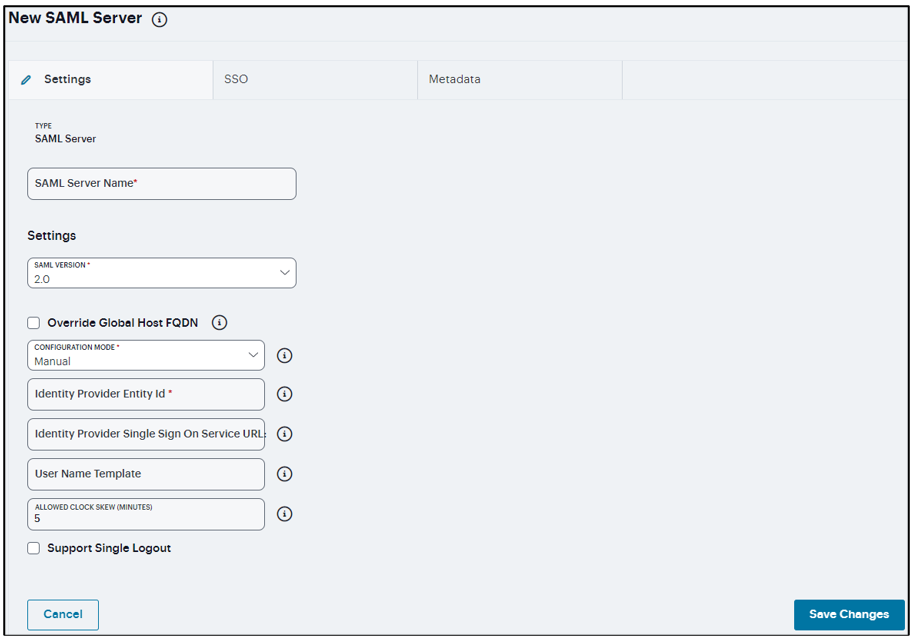
FIGURE 204 SAML Authentication Server Settings
SSO
Select the SSO tab.
Select Artifact to use the Artifact binding. The system then contacts the Artifact Resolution Service (ARS) to fetch the assertion using SOAP protocol. If the ARS is hosted on a HTTPS URL, then the certificate presented by the ARS is verified by the system.
Select POST to use the POST binding, the system uses a response signing certificate to verify the signature in the incoming response or assertion. The certificate file must be in PEM or DER format. The certificate you select should be the same certificate used by the identity provider to sign SAML responses.
Use the Add and Remove buttons to select authentication context classes to be sent in the authentication requests to the SAML identity provider. These are included in the RequestedAuthnContext element.
Click Save Changes.
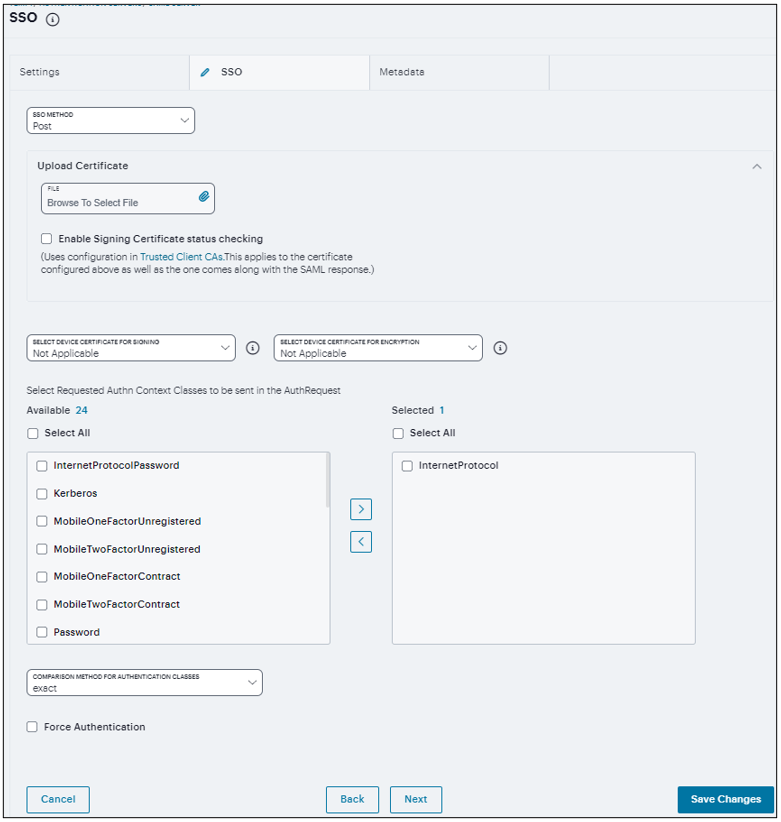
FIGURE 205 SSO Settings
Metadata Settings
Select the Metadata tab.
Enter the number of days the metadata is valid. Valid values are 0 to 9999. 0 specifies the metadata does not expire.
Select Do Not Publish SA Metadata if you do not want to publish the metadata at the location specified by the Entity ID field.
Select Download Metadata. This button appears only after you have saved the authentication server configuration. Use this button to download the metadata of the current SAML service provider.
Click Save Changes.
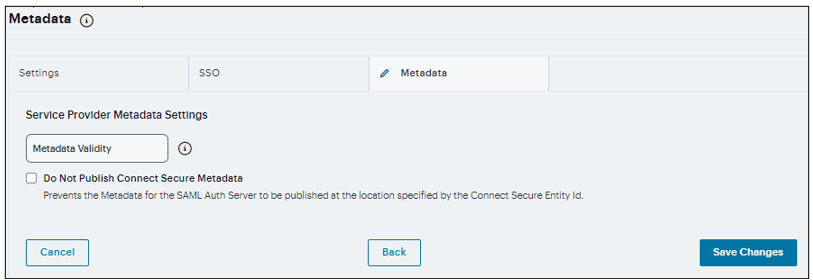
FIGURE 206 Metadata Settings
Configuring TOTP Authentication Server
Time-based One-Time Password (TOTP) algorithm as defined in RFC6238 is an authentication mechanism where a one-time password (a.k.a token) is generated by the authentication server and client from a shared secret key and the current time. ICS can act as TOTP authentication server. Any third-party TOTP applications (for example, Windows Authenticator or Google Authenticator) available on the mobile and desktop client platforms generate TOTP tokens.
To configure the TOTP server as Local:
Select Authentication > Authentication Servers.
Click the Add icon and select TOTP from the list to display the configuration page.
Complete the configuration and save changes.
TOTP Auth Server Settings - Local
Select Local as Server Type. TOTP context is created locally and user database is maintained locally on the same device.
Time Skew - Specify maximum time difference between Ivanti Connect Secure and end user device while authenticating a user’s token. (minimum: 1 minute, maximum: 5 minutes).
Number of attempts allowed - Specify maximum number of consecutive wrong attempts allowed after which account will be locked (minimum: 1 attempt, maximum: 5 attempts).
Custom message for registration page - Specify a custom message which can be shown on new TOTP user registration web-page.
Allow Auto Unlock - When checked, locked account will be automatically unlocked after specified period. (minimum: 10 minutes, maximum: 90 days).
Allow new TOTP user registration to happen via external port - When unchecked (default), new TOTP user registrations will happen only via internal port.
Accept TOTP authentication from remote ICS devices - When checked, REST access to this TOTP server is allowed from other Ivanti Connect Secure devices.
Display QR code during user registration - When checked, displays QR code during user registration.
Disable generation of backup codes - When unchecked, generates backup codes.
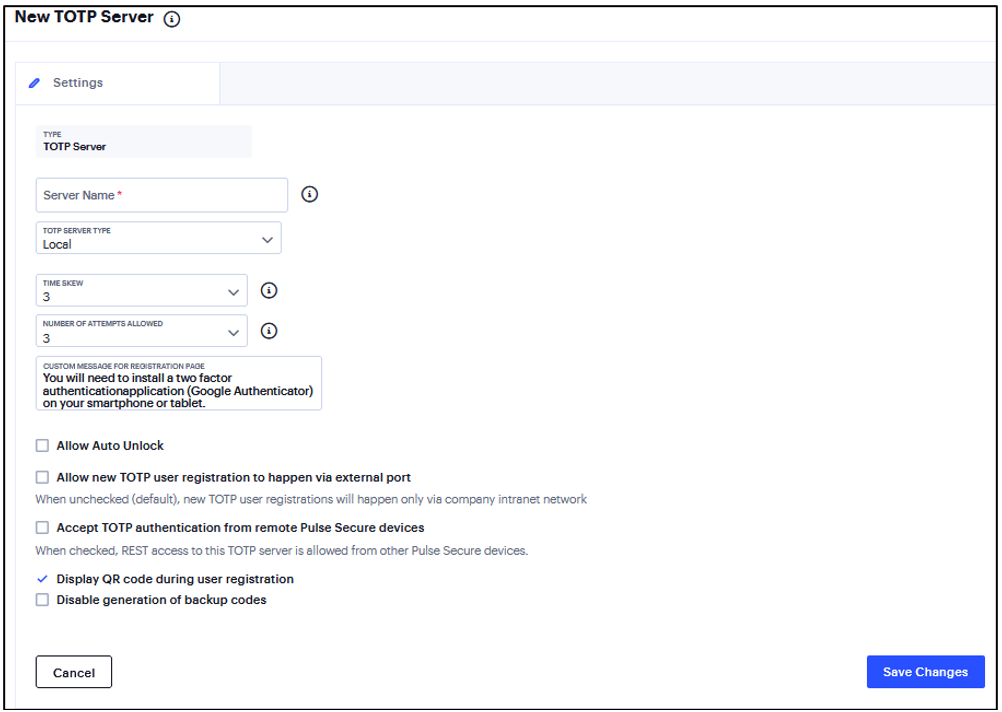
FIGURE 207 TOTP Authentication Server
TOTP Auth Server Settings - Remote
Select Remote as Server Type. In this configuration, authentication checks take place on the remote TOTP server.
If the Allow new TOTP user registration to happen via external port option is not selected, new TOTP user registrations happen only via company intranet network.
Enter remote host name or IP address where the TOTP server is configured. The IP address or host name must match the common name mentioned in the remote TOTP server certificate.
Enter TOTP Server Name configured on the Remote TOTP server.
Enter the REST API login name.
Enter the REST API password.
Enter the realm name, which refers to the realm that should be used for authenticating the REST user (using the auth. server mapped to the Realm).
Use the Test Connection button to validate the connection to the remote TOTP server.
Configuring MDM Authentication Server
The access management framework MDM authentication server configuration includes details on how the system communicates with the MDM Web RESTful API service and how it derives the device identifier from the certificates presented by endpoints.
To configure authentication with the MDM server:
Select Authentication > Authentication Servers.
Click the Add icon and select MDM from the list to display the configuration page.
Complete the configuration and save changes.
Type - Select one of the following options: AirWatch, MobileIron, Microsoft Intune
Applicable to AirWatch and MobileIron
Enter the URL for the MDM server. This is the URL the MDM has instructed you to use to access its RESTful Web API (also called a RESTful Web service).
Enter the URL for the MDM report viewer. This URL is used for links from the Active Users page to the MDM report viewer.
Enter a timeout period (5-60 seconds) for queries to the MDM server. The default is 15 seconds.
Enter the username and password for an account that has privileges to access the MDM RESTful Web API.
(AirWatch only) Copy and paste the AirWatch API tenant code.
Applicable to Microsoft Intune
Enter Azure AD Tenant ID.
Enter Web application ID that has been registered in Azure AD.
Enter Secret key of the web application registered in azure AD.
Enter a timeout period (5-60 seconds) for queries to the MDM server. The default is 15 seconds.
Device Identifier
Construct a template to derive the device identifier from the certificate attributes. The template can contain textual characters as well as variables for substitution.
Select the device identifier type that matches the selection in the MDM SCEP certificate configuration:
UUID - The device Universal Unique Identifier. This is the key device identifier supported by MobileIron MDM.
Serial Number - The device serial number.
UDID - The device Unique Device Identifier. This is the key device identifier supported by AirWatch MDM.
IMEI - The device unique identifier. IMEI (15 decimal digits: 14 digits plus a check digit) or IMEISV (16 digits) includes information on the origin, model, and serial number of the device. This is the key device identifier supported by Microsoft Intune.
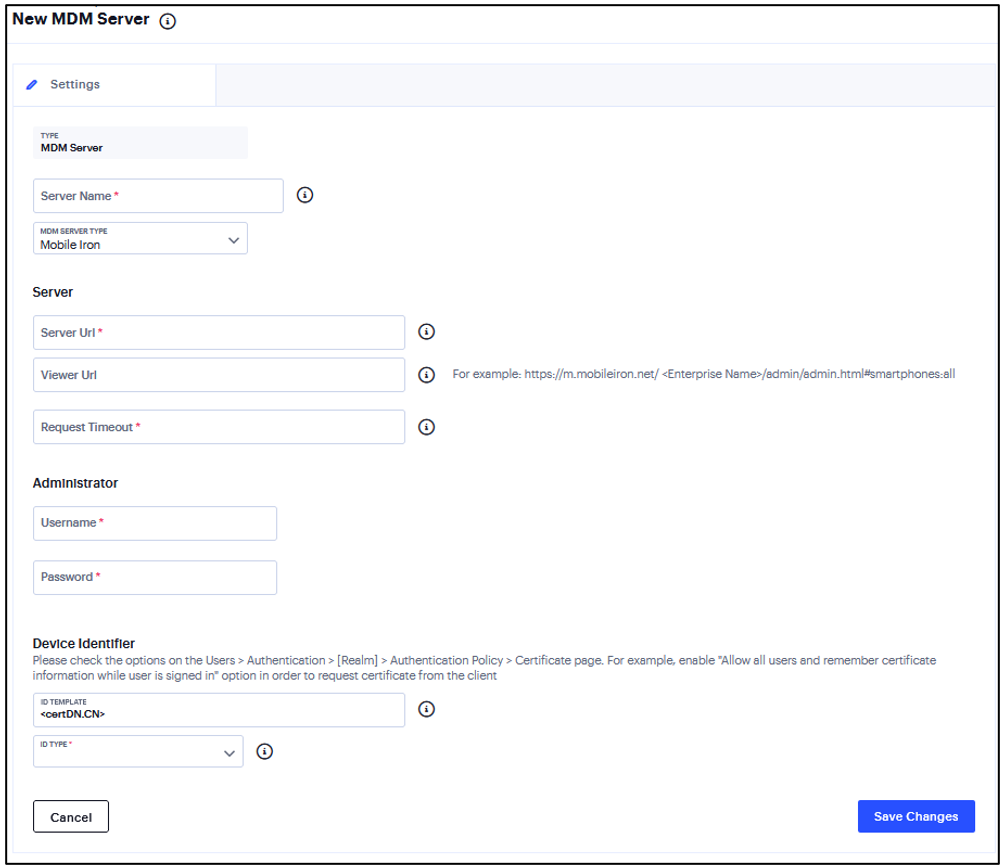
FIGURE 208 MDM Authentication Server
Configuring Active Directory Authentication Server
Active Directory is a directory service used in Windows domain networks. It is included in most Windows server operating systems. Enterprise servers that run Active Directory are called domain controllers. An Active Directory domain controller authenticates and authorizes users and computers in a Windows domain network.
When you use Active Directory as the authentication and authorization service for your Ivanti access management framework, users can sign in to Ivanti Connect Secure using the same username and password they use to access their Windows desktops. You can also use Active Directory group information in role mapping rules.
To configure authentication with the MDM server:
Select Authentication > Authentication Servers.
Click the Add icon and select Active Directory from the list to display the configuration page.
Complete the configuration and save changes.
Specify a name to identify the server within the system.
Specify the NetBIOS domain name for the Active Directory domain.
Specify the FQDN of the Active Directory domain.
Specify a username that has permission to join computers to the Active Directory domain.
Specify the password for the special user.
Select Save Credentials. If this setting is not enabled, the credentials entered will be destroyed after successfully joining the domain.
Specify the machine account name. The default computer name is derived from the license hardware in the following format: 0161MT2L00K2C0. We recommend the Computer Name string contain no more than 14 characters to avoid potential issues with the AD/NT server. Do not include the ‘$’ character.
Specify the protocol to use during authentication. The system attempts authentication using the protocols you have enabled in the order shown on the configuration page. For example, if you have selected the check boxes for Kerberos and NTLMv2, the system sends the credentials to Kerberos. If Kerberos succeeds, the system does not send the credentials to NTLMv2. If Kerberos is not supported or fails, the system uses NTLMv2 as the next protocol in order.
Contact trusted domains. Select this option to contact domain controllers of trusted domains directly without proxying authentication requests and group membership checks through the domain controller.
Enter the maximum number of simultaneous domain connections (1 to 10).
Enable periodic password change of machine account. Select this option to change the domain machine account password for this configuration.
Click Save Changes.
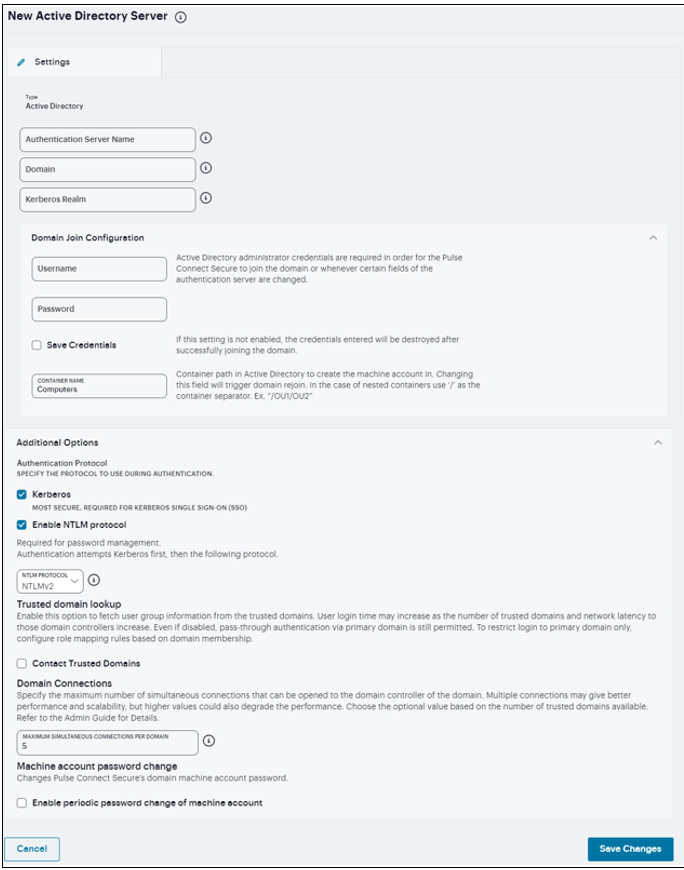
FIGURE 209 Active Directory Authentication Server
Archiving Servers
You can schedule periodic archiving for system logs, system configuration files, and system snapshots. Periodic archiving occurs only at the scheduled time. “Unscheduled” archiving does not occur automatically.
To configure log archiving:
In the Maintenance > Archiving > Archiving Servers page, select Method from the drop-down list.
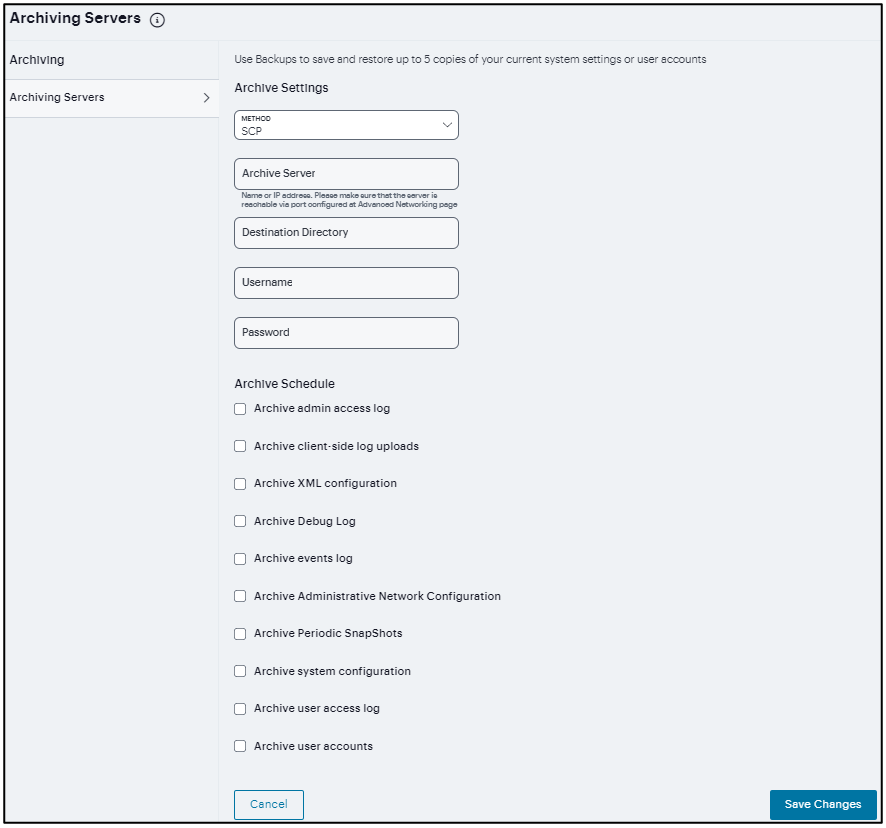
FIGURE 210 Archiving Server
Enter the fully qualified Domain name or IP address of the server to which to send the archive files.
Enter the Destination directory.
Enter a Username and Password that has privileges to log into the server and write to the destination directory.
Select the required Archive Schedule options.
Click Save Changes.