Sign-in Policies
Introduction
Sign-in policies define the URLs that users and administrators use to access the device and the sign-in pages that they see. The system has two types of sign-in policies - one for users and one for administrators. When configuring sign-in policies, you associate realms, sign-in pages, and URLs.
For example, in order to allow all users to sign in to the device, you must add all user authentication realms to the user sign-in policy. You may also choose to modify the standard URL that the end-users use to access the system and the sign-in page that they see. Or, if you have the proper license, you can create multiple user sign-in policies, enabling different users to sign into different URLs and pages.
You can create multiple sign-in policies, associating different sign-in pages with different URLs. When configuring a sign-in policy, you must associate it with a realm or realms. Then, only members of the specified authentication realm(s) may sign in using the URL defined in the policy. Within the sign-in policy, you may also define different sign-in pages to associate with different URLs.
For example, you can create sign-in policies that specify:
Members of the “Partners” realm can sign in to the device using the URLs: partner1.yourcompany.com and partner2.yourcompany.com. Users who sign into the first URL see the “partners1” sign-in page; users who sign into the second URL see the “partners2” sign-in page.
Members of the “Local” and “Remote” realms can sign into the device using the URL: employees.yourcompany.com. When they do, they see the “Employees” sign-in page.
Members of the “Admin Users” realm can sign into the device using the URL: access.yourcompany.com/super. When they do, they see the “Administrators” sign-in page.
When defining sign-in policies, you may use different hostnames (such as partners.yourcompany.com and employees.yourcompany.com) or different paths (such as yourcompany.com/partners and yourcompany.com/employees) to differentiate between URLs.
To create or configure user sign-in policies:
Navigate to Authentication > Signing In > Sign-in Policies.
Select the Enable multiple user sessions check box to allow users to have multiple concurrent sessions, and specify whether the user can log in when the maximum number of sessions is reached:
Deny any more session from the user - Displays a message saying the login is denied because it would exceed the maximum number of concurrent sessions.
Allow the user to login - Allows the user to log in. If the Display open user session[s] warning notification option is enabled, the user can select which session to close; otherwise the session that has been idle the longest is closed automatically.
Select the Display open user session[s] warning notification check box to allow users who have met the maximum session count to close one of their existing sessions before continuing with the current log in. If this option is disabled, the system terminates the session that has been idle the longest. This option applies only if Enable multiple user sessions is enabled along with Allow the user to log in. Specify when the user is warned about concurrent sessions:
Select Always to notify users each time they log in when they already have another active session
Select If the maximum session limit per user for the realm has been reached to display the warning message only when the user’s maximum session count has been met.
To enable or disable an individual policy, select the check box next to the policy that you want to change, and then click Enable or Disable.
Note
If you select this option, all user sessions are immediately terminated. If this device is part of a cluster, all user sessions across all nodes in the cluster are immediately terminated.
To create a new sign-in policy, click ‘+’. Or, to edit an existing policy, click a URL in the Administrator URLs or User URLs column.
Select Users to specify which type of user can sign in using the access policy.
In the Sign-in URL field, enter the URL that you want to associate with the policy. Use the format <host>/<path> where <host> is the hostname of the device, and <path> is any string you want users to enter. For example: partner1.yourcompany.com/outside. To specify multiple hosts, use the * wildcard character.
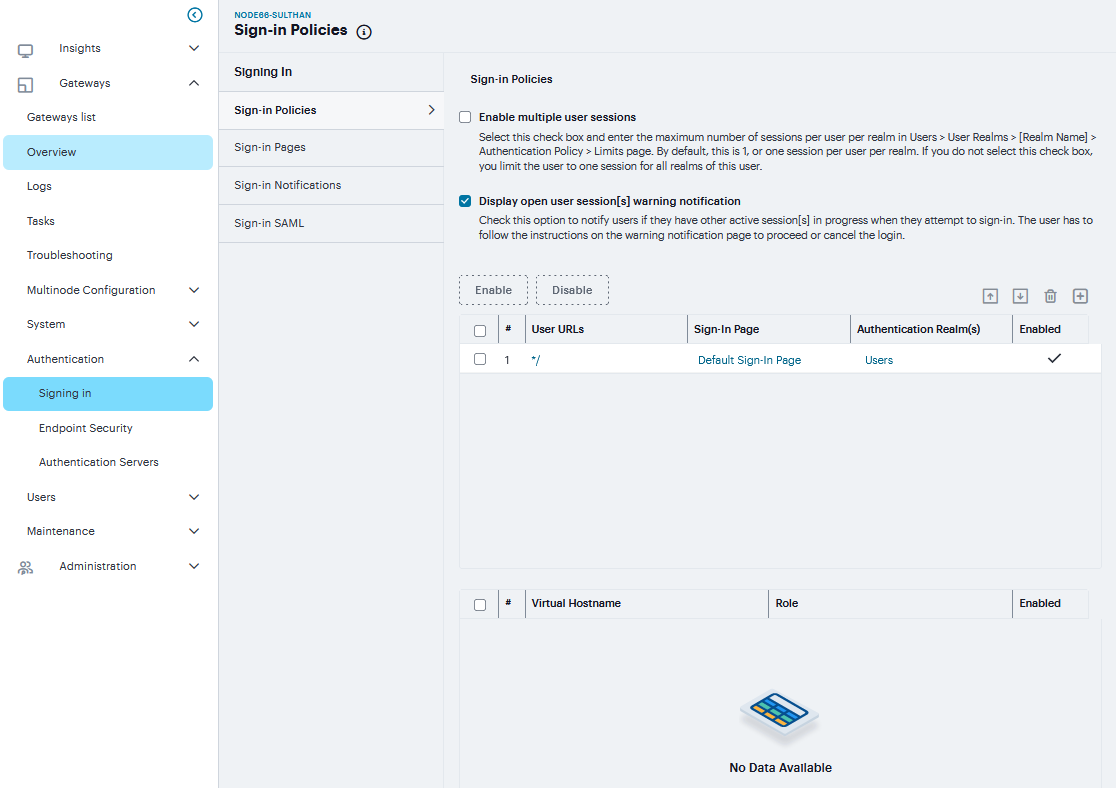
FIGURE 301 Sign-in Policies
To specify that all administrator URLs should use the sign-in page, enter (/admin)*.
You may only use wildcard characters (*) in the beginning of the hostname portion of the URL. The system does not recognize wildcards in the URL path.
SAML authentication does not support sign-in URLs that contain multiple realms. Instead, map each sign-in URL to a single realm.
(optional) Enter a Description for the policy.
From the Sign-in Page list, select the sign-in page that you want to associate with the policy. You may select the default page that comes with the system, a variation of the standard sign-in page, or a custom page that you create using the customizable UI feature.
Under Authentication realm, specify which realm(s) map to the policy, and how users and administrators should pick from amongst realms. If you select:
User types the realm name - The system maps the sign-in policy to all authentication realms, but does not provide a list of realms from which the user or administrator can choose. Instead, the user or administrator must manually enter his realm name into the sign-in page.
User picks from a list of authentication realms - The system only maps the sign-in policy to the authentication realms that you choose. The system presents this list of realms to the user or administrator when he signs-in to a device and allows him to choose a realm from the list. (Note that the system does not display a drop-down list of authentication realms if the URL is only mapped to one realm. Instead, it automatically uses the realm you specify.)
To move Available realms to Selected realms use the arrows. Similarly use arrows to move vice versa.
Under Configure Sign-in Notifications, select the check box for Pre-Auth Sign-in Notification, Post-Auth Sign-in Notification, or both.
After Pre-Auth Sign-in Notification, select a previously configured sign-in notification from the drop-down menu.
After Post-Auth Sign-in Notification, select the option for Use a common Sign-in Notification for all roles or Use the Sign-in Notification associated to the assigned role.
Click Save Changes.
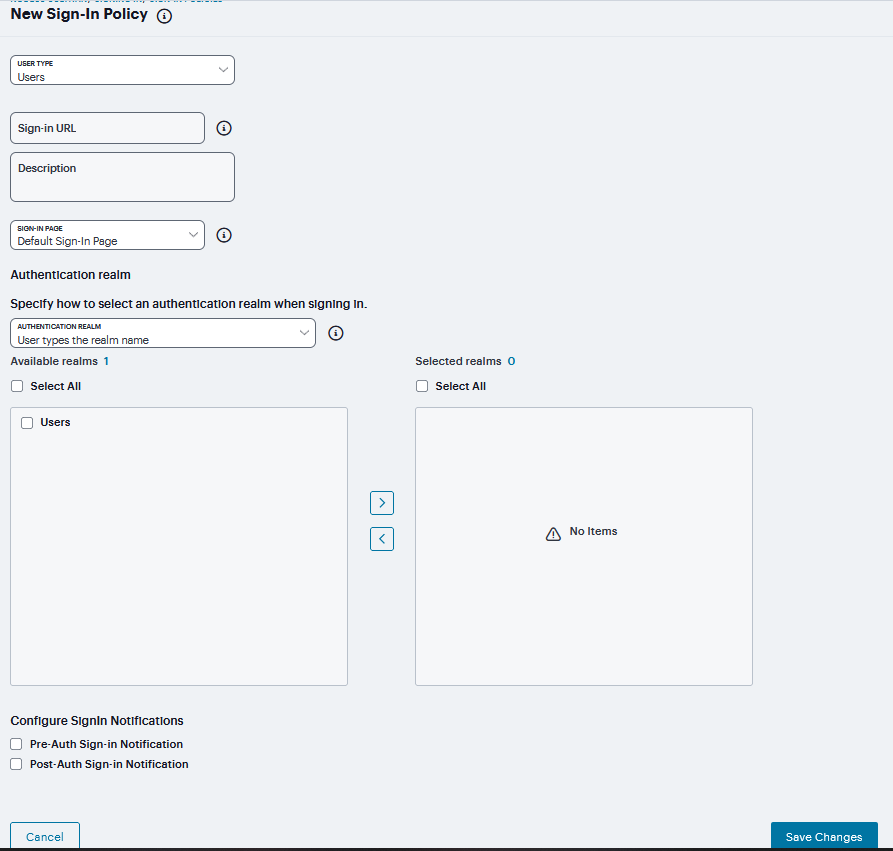
FIGURE 302 Users
Defining Authorization-Only Access Policies
Authorization-only access is similar to a reverse proxy. Typically, a reverse proxy is a proxy server that is installed in front of webservers. All connections coming from the Internet addressed to one of the webservers are routed through the proxy server, which may either deal with the request itself or pass the request wholly or partially to the main webserver.
With an authorization-only access, you select a user role. the system then acts as reverse proxy server and performs authorization against the server for each request.
For example, the authorization-only access feature satisfies the following business needs:
If you have a third-party AAA policy management server, the system acts as an authorization-only agent.
If your user sessions are managed by a third-part session management system, there is no need to duplicate the user session management in the system.
With authorization-only access, there is no SSO from the system. SSO is controlled by your third-party AAA infrastructure.
To create or configure authorization-only access policies:
In the admin console, choose Authentication > Signing In > Sign-in Policies.
To create a new authorization only access policy, click ‘+’ and select authorization only access. Or, to edit an existing policy, click a URL in the Virtual Hostname column.
In the Virtual Hostname field, enter the name that maps to the system’s IP address. The name must be unique among all virtual hostnames used in pass-through proxy’s hostname mode. The hostname is used to access backend application entered in the Backend URL field. Do not include the protocol (for example, http:) in this field.
For example, if the virtual hostname is myapp.ivehostname.com, and the backend URL is http://www.example.com:8080/, a request to https://myapp.ivehostname.com/test1 via the system is converted to a request to http://www.example.com:8080/test1. The response of the converted request is sent to the original requesting web browser.
In the Backend URL field, enter the URL for the remote server. You must specify the protocol, hostname and port of the server. For example, (http://www.mydomain.com:8080/)*.
When requests match the hostname in the Virtual Hostname field, the request is transformed to the URL specified in the Backend URL field. The client is directed to the backend URL unaware of the redirect.
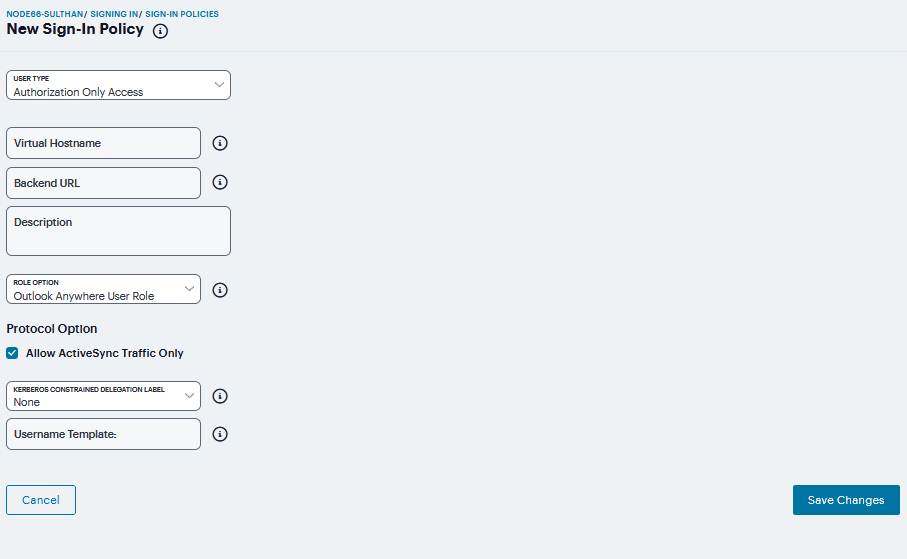
FIGURE 303 Authorization-Only Access Policies
(optional) Enter a Description for this policy.
Select a user role from the Role Option drop-down menu. Only the following user role options are applicable for authorization-only access.
Allow browsing un-trusted SSL web sites (Users > User Roles > RoleName > Web > Options > View advanced options)
HTTP Connection Timeout (Users > User Roles > RoleName > Web > Options > View advanced options)
Source IP restrictions (Users > User Roles > RoleName > General > Restrictions)
Browser restrictions (Users > User Roles > RoleName > General > Restrictions)
Ensure the user role you select has an associated Web Access policy.
Select the Allow ActiveSync Traffic only option to perform a basic of validation of the HTTP header to ensure the request is consistent with ActiveSync protocol. If you select this option only ActiveSync protocol requests can be processed. If validation fails, a message is created in the user’s event log. If you do not select this option, both ActiveSync and non-ActiveSync requests are processed.
Select the Kerberos Constrained Delegation Label option to configure a KCD policy for Active Sync. This would list the existing configured Constrained Delegation labels. Selecting any one of the valid Constrained Delegation labels would force to use KCD for the Exchange Active Sync traffic. Also, this option is applicable only for Active Sync traffic.
This option also has the following dependencies:
Enforce client certificate requirement on virtual ports which are used for Active Sync.
Appropriate CA certificate should be imported under Trusted Client CAs.
The role configured to use for Active Sync should be configured to have Certificate Restrictions to Only allow users with a client-side certificate signed by Certification Authority to sign in.
Appropriate Constrained Delegation policy should be configured. Please refer to the section “Constrained Delegation” under configuring SSO policies
Note
External configurations should be appropriately configured to support Constrained Delegation SSO; Exchange server should be configured to allow Kerberos authentication, i.e., Windows Authentication.
If Kerberos Constrained Delegation Label policy is chosen, enter the appropriate Username Template from certificate attributes.
Click Save Changes.
Configuring Sign-In Pages
A sign-in page defines the customized properties in the end-user’s welcome page such as the welcome text, help text, logo, header, and footer. The system allows you to create two types of sign-in pages to present to users and administrators: * Standard sign-in pages - Standard sign-in pages are produced by Ivanti and are included with all versions of the Ivanti Connect Secure software. You can modify standard sign-in pages through the Authentication > Signing In > Sign-in Pages tab of the admin console. * Customized sign-in pages - Customized sign-in pages are THTML pages that you produce using the Template Toolkit and upload to the system in the form of an archived ZIP file. The customized sign-in pages feature enables you to use your own pages rather than having to modify the sign-in page included with the system.
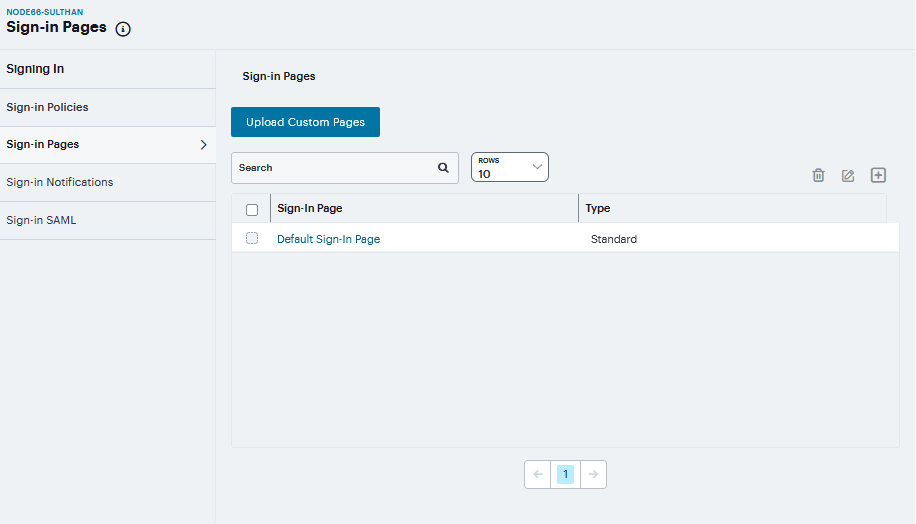
FIGURE 304 Sign-In Pages
Configuring Standard Sign-In Pages
Standard sign-in pages that come with the system include:
Default Sign-In Page - the system displays this page to users when they sign into the device.
You can modify the default sign-in page that the system displays to users when they sign into the device. You can also create new standard sign-in pages that contain custom text, logo, colors, and error message text using settings in the Authentication > Signing In > Sign-in Pages tab of the admin console.
To create or modify a standard sign-in page:
In the admin console, select Authentication > Signing In > Sign-in Pages.
If you are:
Creating a new page, Click ‘+’.
Modifying an existing page, select the link corresponding to the page you want to modify.
Enter a Name to identify the page.
In the Custom text section, revise the default text used for the various screen labels as desired. When adding text to the Instructions field, note that you may format text and add links using the following HTML tags: <i>, <b>, <br>, <font>, and <a href>. However, the system does not rewrite links on the sign-in page (since the user has not yet authenticated), so you should only point to external sites. Links to sites behind a firewall will fail.
If you use unsupported HTML tags in your custom message, the system may display the end user’s home page incorrectly.
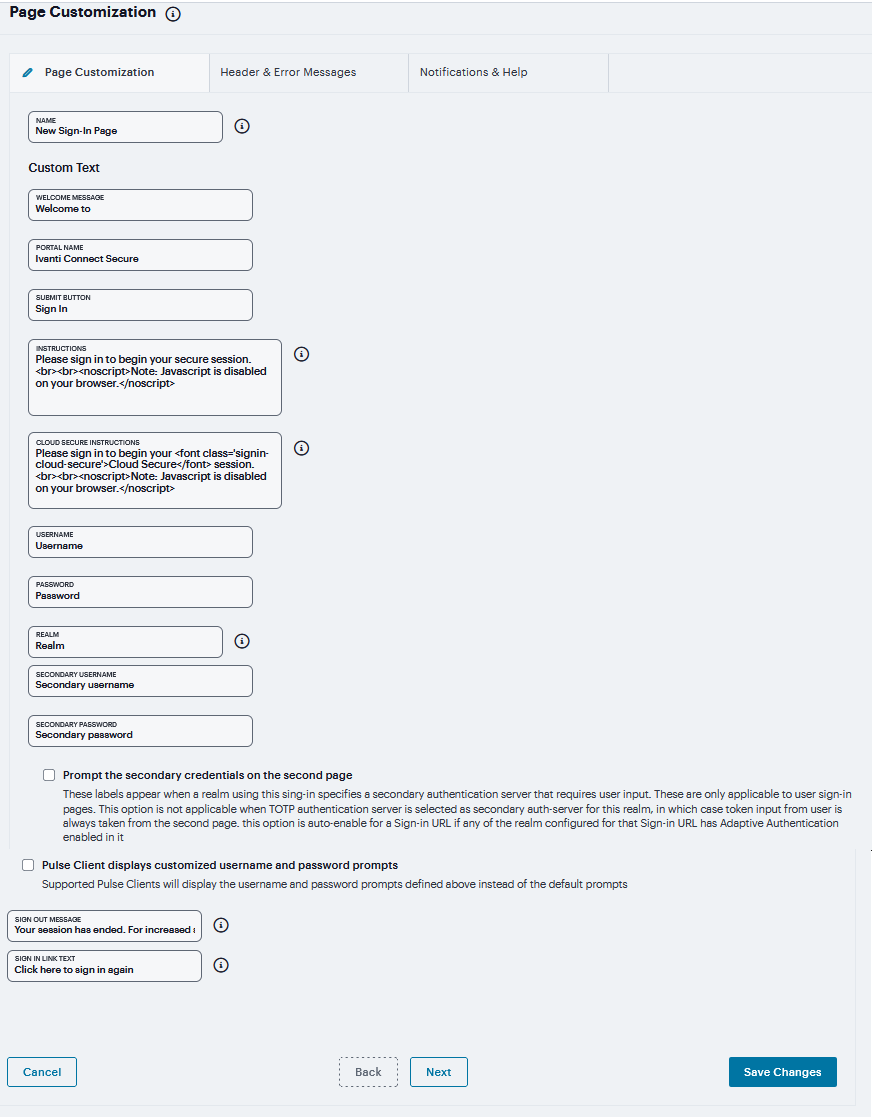
FIGURE 305 Page Customization
In the Header appearance section, specify a Custom logo image file for the header and a different Background color.
In the Custom error messages section, revise the default text that is displayed to users if they encounter certificate errors.
You can include <<host>>, <<port>>, <<protocol>>, and <<request>> variables and user attribute variables, such as <<userAttr.cn>> in the custom error messages. Note that these variables must follow the format <variable> to distinguish them from HTML tags which have the format <tag>.
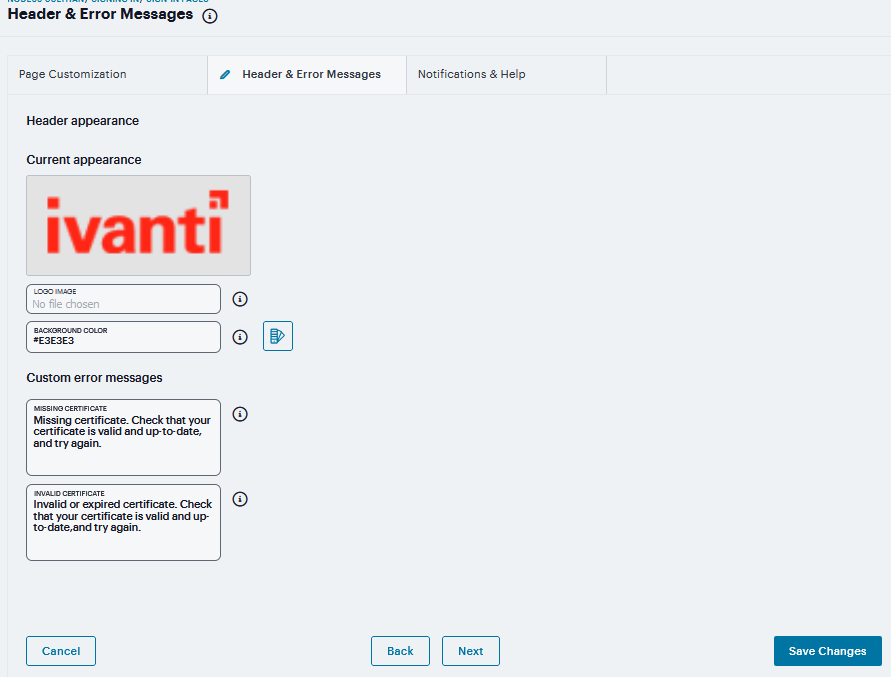
FIGURE 306 Header & Error Messages
The user is expected to read the content of the sign-in notification message and acknowledge by clicking a Proceed button. The user may indicate disagreement by clicking a Decline button, which ends the login attempt. To configure this provide Notification title, Proceed Button label, Decline Button label and Message on Decline. Select Display ‘Decline’ button check box to make the button visible to user. Perform the step for Pre-Auth Notification and Post-Auth Notification.
To provide custom help or additional instructions for your users, select Show Help button, enter a label to display on the button, and specify an HTML file to upload to the system. Note that the system does not display images and other content referenced in this HTML page.
Click Save Changes. The changes take effect immediately, but users with active sessions might need to refresh their Web browsers.

FIGURE 307 Notifications & Help
You can use Back and Next button to switch between tabs
Custom Sign-In Pages
Downloadable Zip Files
Although each zip file contains all the templates, each zip file is for a particular set of features:
Sample.zip — This zip file is for standard IPS/ICS pages, including standard pre- and post-authentication pages, ACE pre-authentication pages, ACE pre-authentication pages for use with eTrust SiteMinder, and password management pages.
SoftID.zip — This zip file is for use with the RSA Soft ID client.
Kiosk.zip — This zip file is for use by kiosk users or for any system in which you want to lock out keyboard-based login.
To upload custom sign-in Pages into ICS:
Download new “Sample Custom Page” from new Admin UI after login as Admin. (Authentication > Sign-In Pages > Upload Custom Sign-In Pages. Click on Sample It will download the Sample Folder as ZIP & save it on Local disk)
Copy the following files after unzip the folder (locally saved in previous step):
Logout.thtml
PleaseWait.thtml
Open pre-downloaded Sample Custom Sign-in folder as unzipped and replace all those files here.
Now select all the files and create (.ZIP) file to uploading custom sign-in page on latest build.
Log into ICS as admin which is running on latest build and follow the steps to upload new Custom Sign-In Page In new Admin UI Authentication > Sign-In Pages > Upload Custom Pages > Put the Name of Custom Sign-In Page > Click Template file field and select previously saved (.ZIP) file from local storage in step 4.
Select Use Custom Page for the Ivanti Desktop Client Logon check box will open a web browser and use custom pages for authentication instead of standard login prompts.
Select Prompt the secondary credentials on the second page check box to specifies a secondary authentication server that requires user input.
Now click on Upload Custom Pages. After successful upload, click Save Changes.
Once all the above steps are successful, we can see the new sign-in page added under Authentication -> Sign-In Pages.
Old variable names may change and new variables may be added. It is recommended that you convert old variable names to their new counterparts as the default values for the old variables may no longer exist. If you do not want to update your variable names, you can select the Skip validation checks during upload option in the Upload Custom Sign-In Pages page. If you select this option, you should review all your custom pages to ensure that they are still functioning correctly.
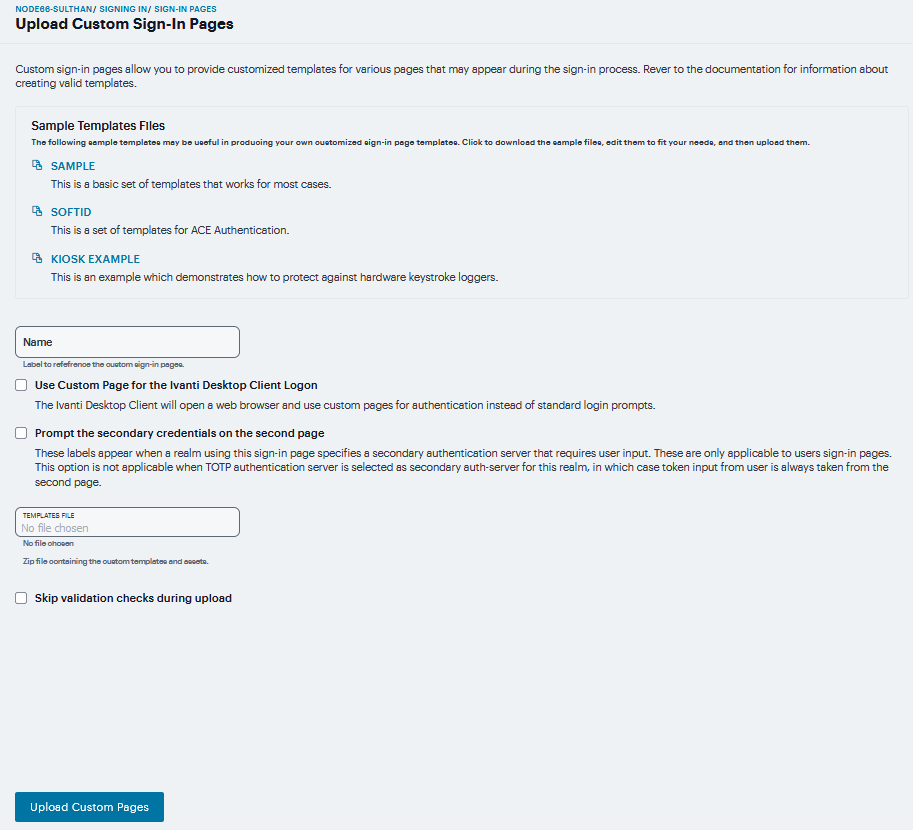
FIGURE 308 Custom Sign-In Pages
Sign-in Notifications
With sign-in notifications, you can create and configure detailed notification messages that appear for Ivanti Secure Access clients and for agentless access endpoints when the user attempts to sign in. For example, you could configure a notification message that explains terms of use, company-specific policies, a welcome page, an end user license agreement (EULA), or a message of the day (MOTD).
For a browser-based (agentless) login, the notification message appears in a separate page either before (pre-auth) or after (post-auth) user authentication during the sign-in process. For a Ivanti Secure Access client login, the notification messages appear in a Ivanti message box. The user is expected to read the content of the sign-in notification message and acknowledge by clicking a Proceed button. The user may indicate disagreement by clicking a Decline button, which ends the login attempt.
You can configure a sign-in policy to use a sign-in notification either as pre-auth or post-auth (or both). In the case of post-auth configuration, you can either use a common message for all roles or use separate messages for each role.
You can create a multi-language sign-in notification package that relies on the language setting of the endpoint. You can customize the sign-in notification page appearance for browser-based logins by modifying the related fields in a sign-in page in the Admin UI or by using a custom sign-in page.
Sign-in notifications are supported on Windows, Mac, and for browser-based access on mobile devices. However, sign-in notifications might not work well with all mobile devices due to device limitations.
Sign-in notifications (including uploaded packages) are included in XML exports.
If a Ivanti session is resumed or extended, the pre-auth notification message is not shown again. However, if the user switches roles when resuming a session, and that role change results in a new notification, Ivanti displays the message. You can configure the post-auth message to be skipped if it has already been seen. If the post-auth message is not marked to be skipped, then it always appears.
Sign-in notifications appear for Ivanti Secure Access client and for browser-based logins when the user attempts to sign in.
FIGURE 309 Sign-in Notifications
To configure and implement sign-in notifications:
In the admin console, select Authentication > Signing In > Sign-in Notifications.
Click ‘+’. Specify a Name for the notification. This name appears in the sign-in policies page, and in the UI Options page for a selected role.
Select Text or Package in the Type box.
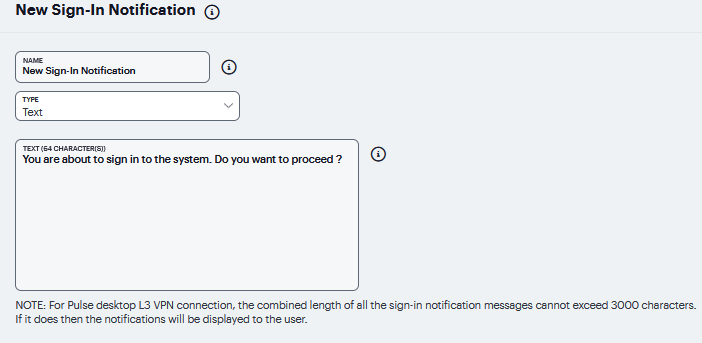
FIGURE 310 Custom Sign-In Pages Text
If you select Text, type the desired sign-in notification message, or copy and paste the relevant text into the Text field.
If you select Package, click the Package filed and navigate to a previously prepared .zip file. A package is typically used to provide different language versions of the notification message.
The zip file should include a default.txt file and one or more <language>.txt files (Example: en.txt).
Language-abbreviations should be strings that can appear in Accept-Language header of an HTTP request. For example:
Upload a zip file containing files with name format: <language-abbreviation>.txt (Example: en.txt).
Include ‘default.txt’ and one file for each language you want to support.
Language-abbreviations should be strings that can appear in Accept-Language header of an HTTP request.
The character encoding supported is UTF-8.
Note
When you create a zip file, do not add the folder containing the files, but add the files directly.
Click Save Changes.
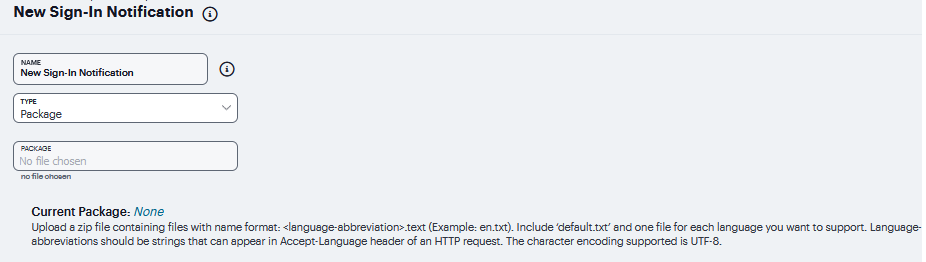
FIGURE 311 Custom Sign-In Pages Package
Sign-in SAML
SAML is an XML-based framework for communicating user authentication, entitlement, and attribute information. The standard defines the XML-based assertions, protocols, bindings, and profiles used in communication between SAML entities. SAML is used primarily to implement Web browser single sign- on (SSO). SAML enables businesses to leverage an identity-based security system like Ivanti Connect Secure to enforce secure access to web sites and other resources without prompting the user with more than one authentication challenge.
SAML Metadata Provider
Sign-in SAML metadata provider settings determine how the system identity provider metadata is published. To configure the identity provider metadata publication settings:
Select Authentication > Signing In > Sign-In SAML > Metadata Provider to display the configuration page.
Complete the settings described in the following table.
Click Save Metadata Provider to save your changes.
The following table lists the Sign-in SAML Metadata Provider Configuration Guidelines:
Setting |
Guidelines |
|---|---|
Entity ID |
This value is prepopulated. It is generated by the system, based on the value for the Host FQDN for SAML setting on the System > Configuration > SAML > Settings page. |
Metadata Validity |
Specify the maximum duration for which a peer SAML entity can cache the system SAML metadata file. Valid values are 1 to 9999. The default is 365 days. |
Do Not Publish SA Metadata |
Select this option if you do not want the system to publish the metadata at the location specified by the system Entity ID field. You can use this option to toggle off publication without deleting your settings. |
Download Metadata |
Use this button to download the system SAML identity provider metadata. |
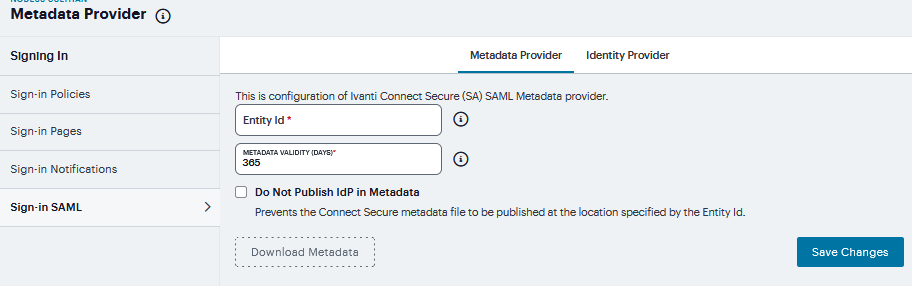
FIGURE 312 SAML Metadata Provider
SAML Identity Provider
The settings defined in this procedure are the default settings for the system SAML identity provider communication with all SAML service providers. If necessary, you can use the peer service provider configuration to override these settings for particular service providers. To configure sign-in SAML identity provider settings:
Select Authentication > Signing In > Sign-In SAML > Identity Provider to display the configuration page.
Complete the settings described in the following table.
Save the configuration.
The following table lists the Sign-in SAML Identity Provider Configuration Guidelines:
Setting |
Guidelines |
|---|---|
Basic Identity Provider (IdP) Configuration (Published in Metadata) |
|
Protocol Binding to use for SAML Response |
Select POST, Artifact, or both, depending on your total requirements. |
Signing Certificate |
Select the Certificate used to sign the SAML messages sent by the system. The certificates listed here are configured on the System > Configuration > Certificate > Device Certificates page. |
Decryption Certificate |
Select the Certificate used to decrypt the SAML messages sent by peer service providers. The public key associated with this certificate is used by the peer service provider to encrypt SAML messages exchanged with this identity provider. The decryption certificate must be configured if the peer service provider encrypts the SAML messages sent to the system. The certificates listed here are configured on the System > Configuration > Certificate > Device Certificates page. 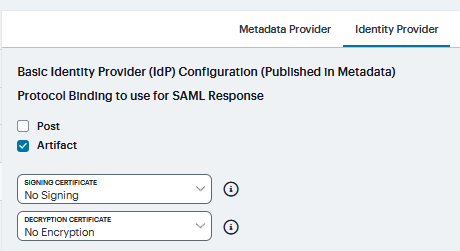
FIGURE 313 Basic Identity Provider (IdP) Configuration¶ |
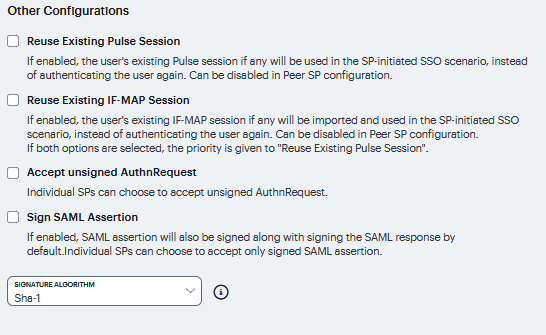
Other Configurations |
Reuse Existing NC (Ivanti Secure) Session. This feature applies to a service- provider-initiated SSO scenario - that is, when a user clicks a link to log into the service provider site. The service provider redirects the user to the identity provider SSO Service URL.
|
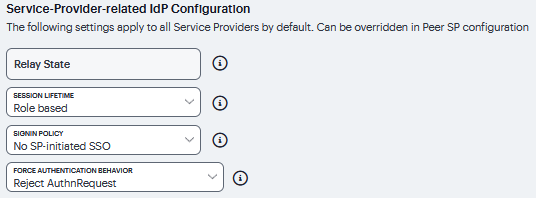
Service-Provider-Related IdP Configuration |
|
Relay State |
SAML Relay State attribute sent to the service provider in an identity-provider-initiated SSO scenario. If left blank, the RelayState value is the URL identifier of the resource being accessed. |
Session Lifetime |
Suggest a maximum duration of the session at the service provider created as a result of the SAML SSO. Select one of the following options: None. The identity provider does not suggest a session duration. Role Based. Suggest the value of the session lifetime configured for the user role. Customized. If you select this option, the user interface displays a text box in which you specify a maximum in minutes. |
Sign-In Policy |
Select the sign-in URL to which the user is redirected in a service-provider - initiated scenario. The list is populated by the sign-in pages configured on the Authentication > Signing In > Sign-in Policies page. The user is not redirected if he or she already has a session with the system and had authenticated through this sign-in policy. |
Force Authentication Behavior |
In an service-provider-initiated scenario, the service provider sends an AuthnRequest to the identity provider. If the service provider AuthnRequest includes the ForceAuthn attribute set to true and the user has a valid session, this setting determines how the identity provider responds. Select one of the following options:
|
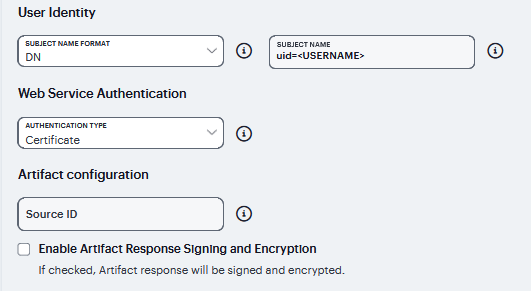
User Identity |
|
Subject Name Format |
Format of the NameIdentifier field in the generated assertion. Select one of the following options:
|
Subject Name |
Template for generating the username that is sent as the value of the NameIdentifier field in the assertion. You may use any combination of available system or custom variables contained in angle brackets and plain text. |
Web Service Authentication |
These settings apply when the HTTP Artifact binding is used. |
Authentication Type |
Method used to authenticate the service provider assertion consumer service to the identity provider on the system. Select one of the following options:
|
Artifact Configuration |
These settings apply when the HTTP Artifact binding is used. |
Source ID |
This is the Base64-encoded, 20-byte identifier of the Artifact Resolution Service on the identity provider. |
Enable Artifact Response Signing and Encryption |
If checked, the identity provider signs and encrypts the artifact response.
|
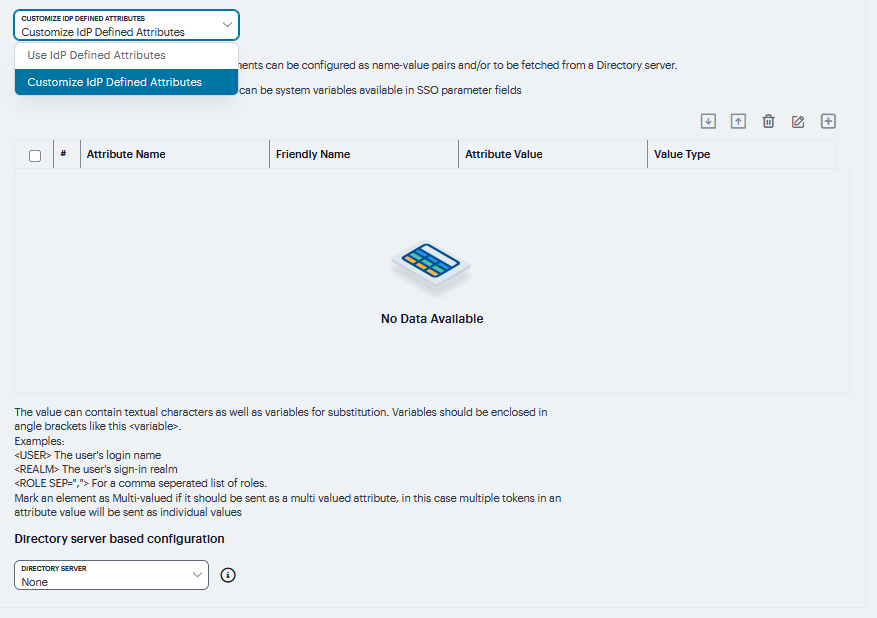
Attribute Statement Configuration |
Attributes to be sent in SAML Attribute statements can be specified manually as name-value pairs, or you can configure an option to fetch name-value pairs from an LDAP server (or you can specify both manual entries and LDAP entries). Click ‘+’ to add the attribute statements. |
Attribute Name |
An ASCII string. |
Friendly Name |
A more readable friendly name for the attribute. This is optional (an option included in the SAML standard). |
Attribute Value |
The attribute value can be specified as a hard-coded string, a custom variable, or a user attribute variable. System conventions for specifying user and custom tokens and variables apply.
|
Value Type |
Select Single-Valued or Multivalued.
|
Directory Server |
To fetch attribute name-value pairs from an LDAP server, complete the following settings: * Directory Server - Select the LDAP server from the list. You must add the LDAP server to the Authentication > Auth. Servers list before it can be selected. 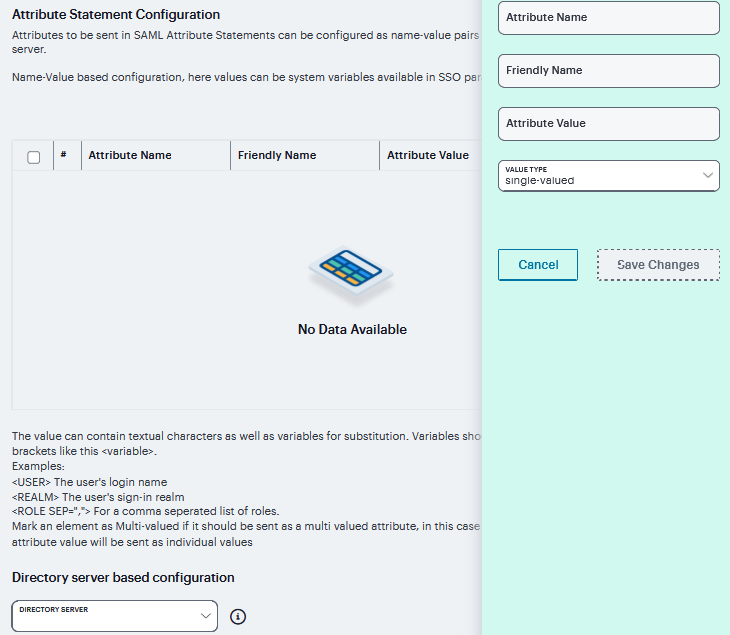
FIGURE 317 Attribute Statement Configuration¶ |
Configuring Peer SAML Service Provider Settings
The peer service provider list defines the set of service providers configured to communicate with he system SAML identity provider. When you add a peer service provider to the list, you can customize the SAML identity provider settings used to communicate with the individual service provider. If the service provider provides a SAML metadata file, you can use it to simplify configuration, or you can complete more detailed manual steps. If available, we recommend you use metadata so that configuration is simpler and less prone to error.
To configure peer SAML service provider settings:
Select Authentication > Signing In > Sign-In SAML > Identity Provider.
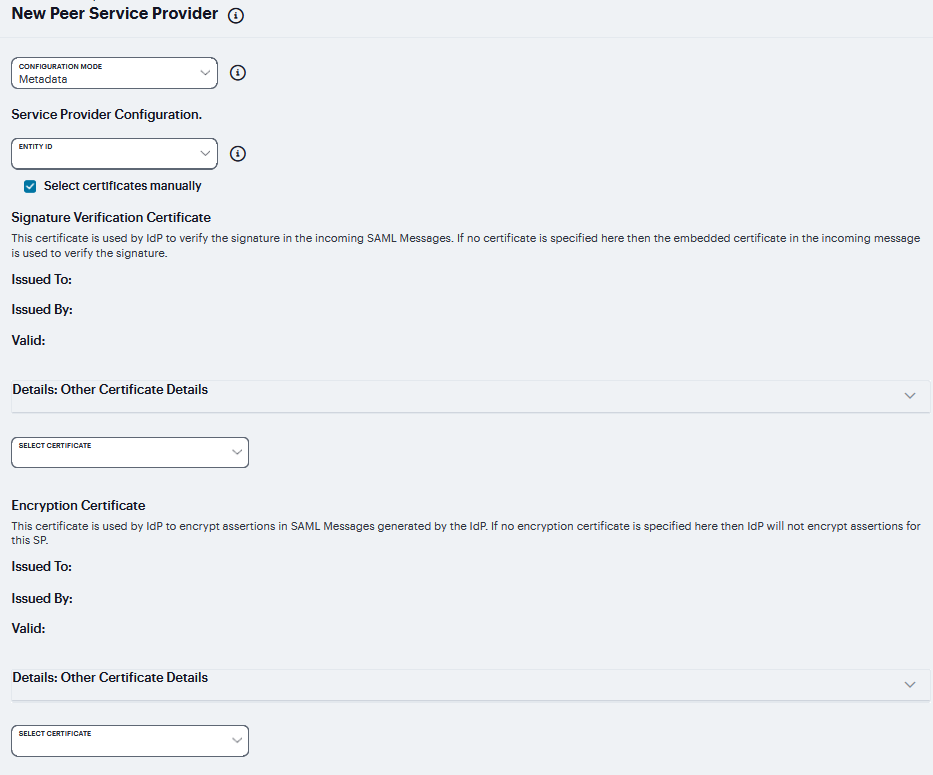
Under Peer Service Provider Configuration, create a list of service providers that are SAML peers to the system SAML identity provider. To add a service provider to the list, click ‘+’ to display the configuration page
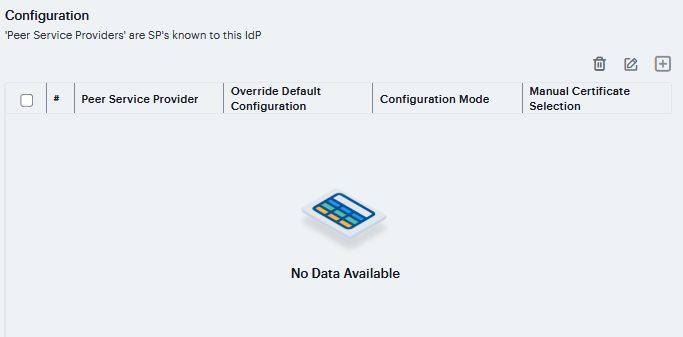
FIGURE 318 Peer SAML Service Provider
Complete the settings described in the following table.
Click Save Changes.
Setting |
Guidelines |
|---|---|
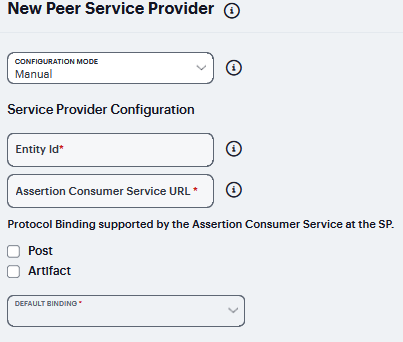
Configuration Mode |
Select Manual or Metadata. |
Service Provider Configuration - Metadata |
|
Entity Id |
If you use metadata, select the SAML entity ID of the service provider. This list contains all the service providers specified in all the metadata files added to the System > Configuration > SAML page. |
Select certificates manually |
When you use the metadata configuration, the system SAML identity provider iterates through all the signature verification certificates specified when verifying the incoming SAML messages coming from the service provider. Similarly, when encrypting the SAML messages going out, the system SAML identity provider encrypts the messages with the first valid encryption certificate encountered in the metadata. Select this option to override this default behavior and select certificates manually. |
Signature Verification Certificate |
If you select the Select certificates manually option, select the certificate to be used by the identity provider to verify the signature of incoming SAML messages.. |
Encryption Certificate |
If you select the Select certificates manually option, select the certificate to be used if the assertions sent by the identity provider must be encrypted.
|
Service Provider Configuration - Manual |
|
Entity Id |
If you are completing a manual configuration, ask the SAML service provider administrator for this setting. |
Assertion Consumer Service URL |
SAML service provider URL that receives the assertion or artifact sent by the identity provider. |
Protocol Binding supported by the Assertion Consumer Service at the SP |
Select POST, Artifact, or both. This setting must be consistent with the SAML identity provider configuration. |
Default Binding |
If both POST and Artifact bindings are supported, which is the default? Post Artifact This setting must be consistent with the SAML identity provider configuration.
|
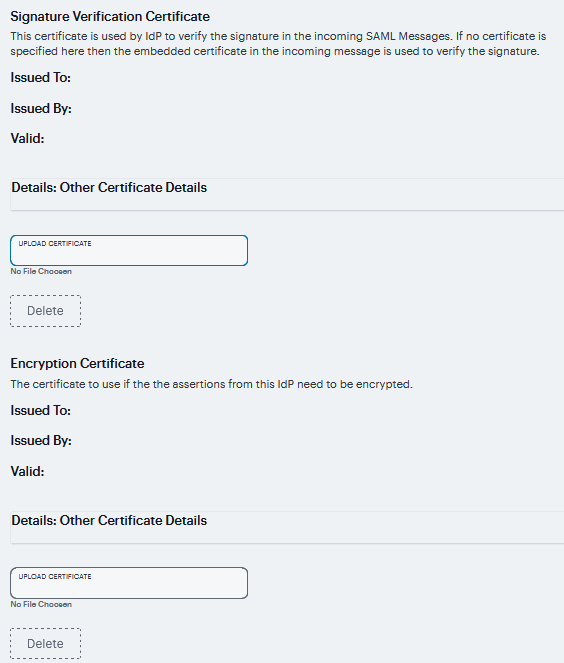
Signature Verification Certificate |
Upload the certificate to be used by the identity provider to verify the signature of incoming SAML messages. If no certificate is specified, the certificate embedded in the incoming SAML message is used for signature verification. |
Encryption Certificate |
Upload the certificate to be used if the assertions sent by the identity provider must be encrypted. If not certificate is specified, the assertions sent by the identity provider are not encrypted.
|
Certificate Status Checking Configuration |
|
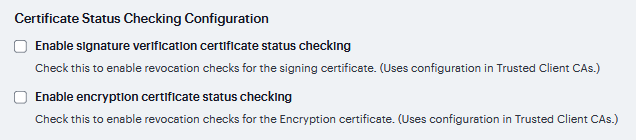
Enable signature verification certificate status checking |
Select this option to enable revocation checks for the signing certificate. Uses the configuration on the System > Configuration > Certificates > Trusted Client CAs page. |
Enable encryption certificate status checking |
Select this option to enable revocation checks for the encryption certificate. Uses the configuration on the System > Configuration > Certificates > Trusted Client CAs page.
|
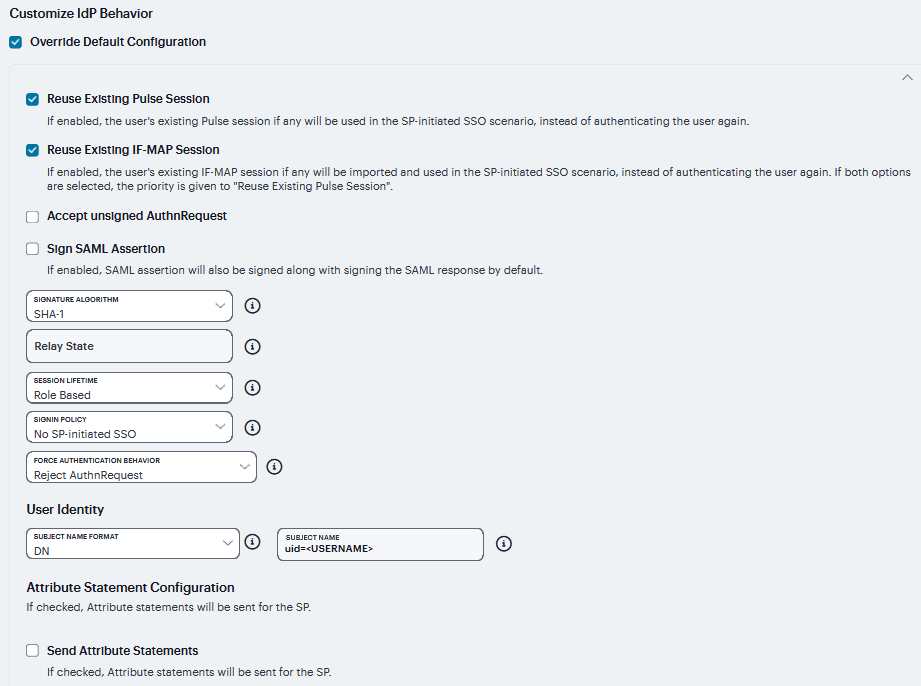
Customize identity provider Behavior |
|
Override Default Configuration |
Select this option to set custom behavior of the system SAML identity provider for this SP instance. If you select this option, the user interface displays the additional options listed next. |
Reuse Existing NC (Ivanti Secure) Session |
This option cannot be enabled here if it is not selected for the sign-in SAML identity provider default settings. |
Reuse Existing IF-MAP Session |
If enabled, the user’s existing IF-MAP session if any will be imported and used in the SP-initiated SSO scenario, instead of authenticating the user again. If both options are selected, the priority is given to “Reuse Existing Ivanti Secure Session”. |
Accept unsigned AuthnRequest |
|
Relay State |
SAML RelayState attribute sent to the service provider in an identity- provider-initiated SSO scenario. If left blank, the RelayState value is the URL identifier of the resource being accessed. |
Session Lifetime |
Suggest a maximum duration of the session at the service provider created as a result of the SAML SSO. Select one of the following options: None. The identity provider does not suggest a session duration. Role Based. Suggest the value of the session lifetime configured for the user role. Customized. If you select this option, the user interface displays a text box in which you specify a maximum in minutes. |
Sign-In Policy |
Select the sign-in URL to which the user is redirected in a service-provider - initiated scenario. The list is populated by the sign-in pages configured on the Authentication > Signing In > Sign-in Policies page. The user is not redirected if he or she already has a session with the system and had authenticated through this sign-in policy. |
Force Authentication Behavior |
|
User Identity |
|
Subject Name Format |
|
Subject Name |
Template for generating the username that is sent as the value of the NameIdentifier field in the assertion. You may use any combination of available system or custom variables contained in angle brackets and plain text. |
Attribute Statement Configuration |
|
Send Attribute Statements |
|
Attribute Name |
An ASCII string. |
Friendly Name |
A more readable friendly name for the attribute. This is optional (an option included in the SAML standard). |
Attribute Value |
|
Value Type |
|
Directory Server |
|
Single Logout |
Single logout is a mechanism provided by SAML for logging out a particular user from all the sessions created by the identity provider. Select this option if the system must receive and send a single logout request for the peer SAML identity provider. |
Enable Single Logout |
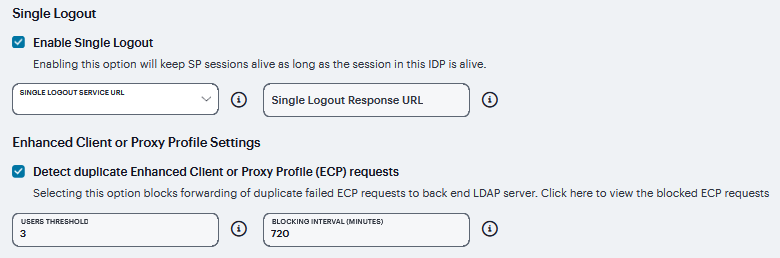
FIGURE 325 Single Logout¶ |
Enhanced Client or Proxy Profile Settings |
Select Detect duplicate Enhanced Client or Proxy Profile (ECP) requests option to block forwarding of duplicate failed ECP requests to back end LDAP server. |
Users Threshold |
Number of duplicate ECP requests that can be detected and blocked per user |
Blocking Interval |
In Minutes |
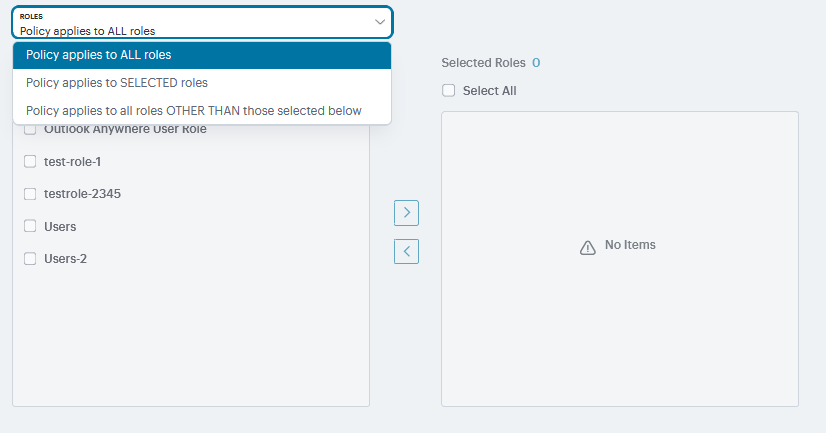
Roles |
|