Overview of Ivanti Neurons for Zero Trust Access
Securing a Diverse Application Infrastructure
To enhance an enterprise’s ability to protect its systems, services, and data, IT teams can adopt a zero-trust network security architecture. The zero-trust model works on the principle that no single client entity is automatically trusted, regardless of whether they are inside or outside the organizational network perimeter. Each client connection must have its identity verified by a trusted service or policy before access is granted.
As organizations move away from traditional application deployment models and begin to adopt hybrid and multi-cloud service-based infrastructures, the notion of zero-trust must be a extended to encompass the means to centrally manage application access and security for all users across the enterprise, regardless of device type and location.
For example, an enterprise with SaaS, 3rd-party cloud, and on-premise applications might need to define end-to-end secure access policies through a combination of:
User authentication method (Active Directory, LDAP, local authentication)
Device compliance policy (operating system, antivirus definition, root access)
Infrastructure type (AWS/Azure, on-premise vSphere, KVM)
Application type (SaaS applications such as O365/SFDC, Cloud apps, on-premise apps)
Additional security postures (such as location, time, usage patterns)
In addition, this model gives rise to complex requirements for visibility and compliance reporting. At any time, an organization might need to see the following types of information:
The current number of compliant users or devices
Application usage levels both in the cloud and on-premise
Visibility of any abnormal or compliance issues
Hyper-Converged Zero-Trust Access
Ivanti Neurons for Zero Trust Access (nZTA) addresses the requirement for an enterprise-level zero-trust secure access management platform. It offers the following features and benefits:
True zero-trust access as a service for hybrid and multi-cloud
Authentication and authorization before any access
Separation of control and data planes
All user data goes through only the relevant ZTA Gateway deployed in the organization’s datacenter or virtual private cloud
Dark cloud to reduce the attack surface
ZTA Gateways are not accessible by the client end-point until authorized to do so by the Controller
Client end-points never access the applications directly; only through an encrypted data tunnel via the ZTA Gateway
Smooth migration
Users continue to use existing VPN connection profiles through Ivanti Secure Access Client, while incorporating new nZTA profiles to access your managed application infrastructure
An Overview of Ivanti Neurons for Zero Trust Access
Ivanti Neurons for Zero Trust Access (nZTA) is a cloud-based SaaS (software as a service) application that forms part of the Ivanti Neurons for Secure Access family. It provides fully-managed zero-trust authentication and access control for an organization’s application infrastructure.
nZTA is developed according to the principle of SDP (Software Defined Perimeter). Where traditional network-based security architectures use firewalls at the network perimeter to limit access to resources, SDP is based on a need-to-know policy-driven model. Client devices are verified and authorized before access to applications is granted. Application infrastructure cannot be detected remotely, and has no visible DNS information or exposed IP addresses. This protects networked resources from many common network-based attacks.
nZTA enables system administrators to define end-to-end authorization and authentication policies that control application visibility, access, and security for all users and their devices. Administrators can deploy applications of any type in a variety of hybrid cloud and on-premise datacenter environments, with nZTA providing users seamless secure access to only those applications for which they are authorized to use, regardless of geographic location and client device platform.
nZTA facilitates authorization policy enactment for any combination of users, devices, applications, and infrastructure.
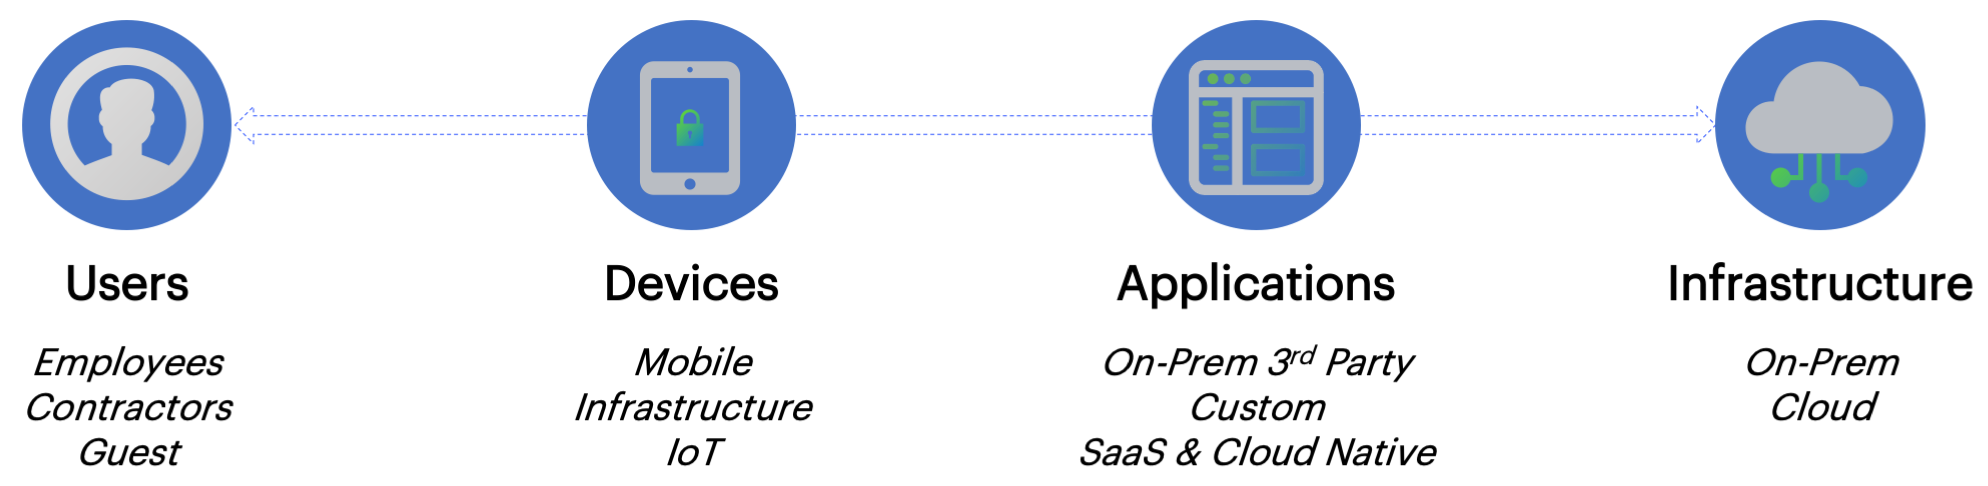
FIGURE 1 Four-dimensional authentication policy control
Deploying and Using nZTA
A nZTA deployment consists of a Controller service and one or more application Gateways positioned at each location an organization hosts its resources and applications. This might be in a public or private cloud, within a datacenter, or inside a virtual host environment.
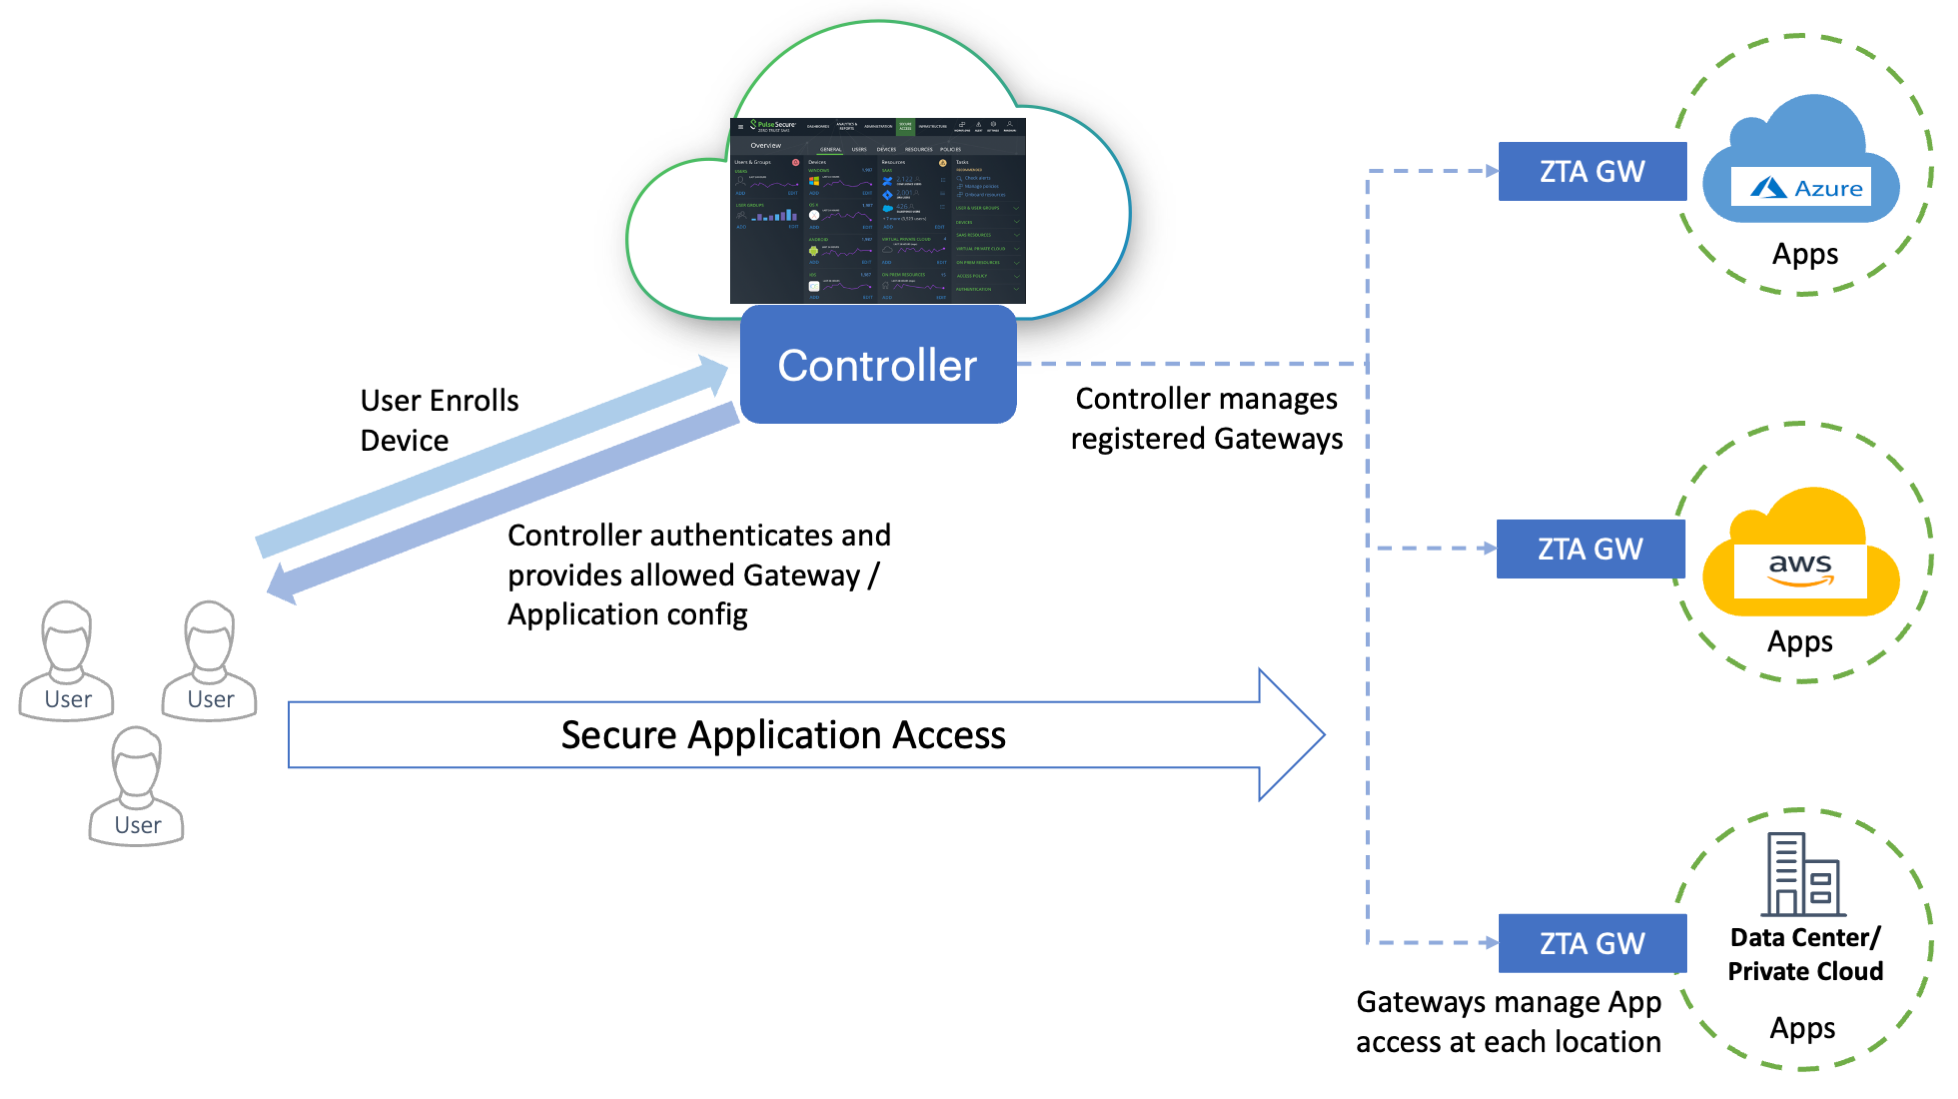
FIGURE 2 The topology of a nZTA deployment
End users use Ivanti Secure Access Client to authenticate with the Controller, which runs an Authentication, Authorization and Accounting (AAA) Service. The Controller then enables direct and encrypted communication between the user and the ZTA Gateways that protect the user’s authorized resources. This mechanism avoids the general exposure of public IP addresses, and separates the control plane from the data plane.
Note
To learn more about using Ivanti Secure Access Client with nZTA, see Enrolling Mobile/Desktop Clients and Using Ivanti Secure Access Client with nZTA.
After you have defined your secure access policy, or policies, the Controller automatically synchronizes the configuration out to your ZTA Gateways.
System administrators use the Controller to configure, provision, and monitor an enterprise’s application infrastructure. To achieve this, Ivanti provides a Tenant Admin Portal on the Controller. This portal facilitates the following actions:
Configure a custom domain at which your nZTA service is reached
Define and deploy ZTA Gateways
Register authentication services and policies
Publish resources and applications
Create authorization rules and policies for users and devices
Enroll users
Perform management and real-time analysis of traffic flow and application access across the enterprise
Manage your Tenant Admin Portal settings
To login to the Tenant Admin Portal, see Logging in as a Tenant Administrator.
Using a Custom Domain
Your nZTA tenant subscription is deployed, by default, as a unique endpoint at a domain provided by Ivanti. Enrollment and sign-in endpoints are then configured at this FQDN through user authentication policies.
Should you require it, you can provision a custom domain to be used in place of the Ivanti-provided domain.
IMPORTANT: It is essential to determine whether a custom domain is required at the outset of your subscription, and particularly before you have deployed any Gateways or enrolled any users.
To learn more, see Specifying a Custom Domain.
Deploying Gateways
nZTA requires you to set up Gateways to manage access to your applications and resources. You deploy one or more Gateway instances at each location your applications are hosted, whether at a physical datacenter, a private or public cloud-based service, or some hybrid combination. Each Gateway communicates with the Controller to ensure that access requests are authorized.
nZTA supports two main Gateway types, depending on your subscription:
ZTA Gateways
Ivanti Connect Secure (ICS) Gateways
This guide describes how to install and configure ZTA Gateways. For details pertaining to a ICS Gateway, refer instead to the “ICS Gateway Onboarding Guide” in the nSA documentation portal.
A ZTA Gateway is a virtual machine that operates as a headless instance at the perimeter of the logical network used by your datacenter or cloud. A ZTA Gateway must be contactable by the Controller, other ZTA Gateway instances at the same location, and the applications that reside there. nZTA supports ZTA Gateways running on Microsoft Azure, Amazon Web Services (AWS), and VMware vSphere. Ivanti provides template images for each environment.
Note
To obtain the latest ZTA Gateway virtual machine template images, see the Release Notes.
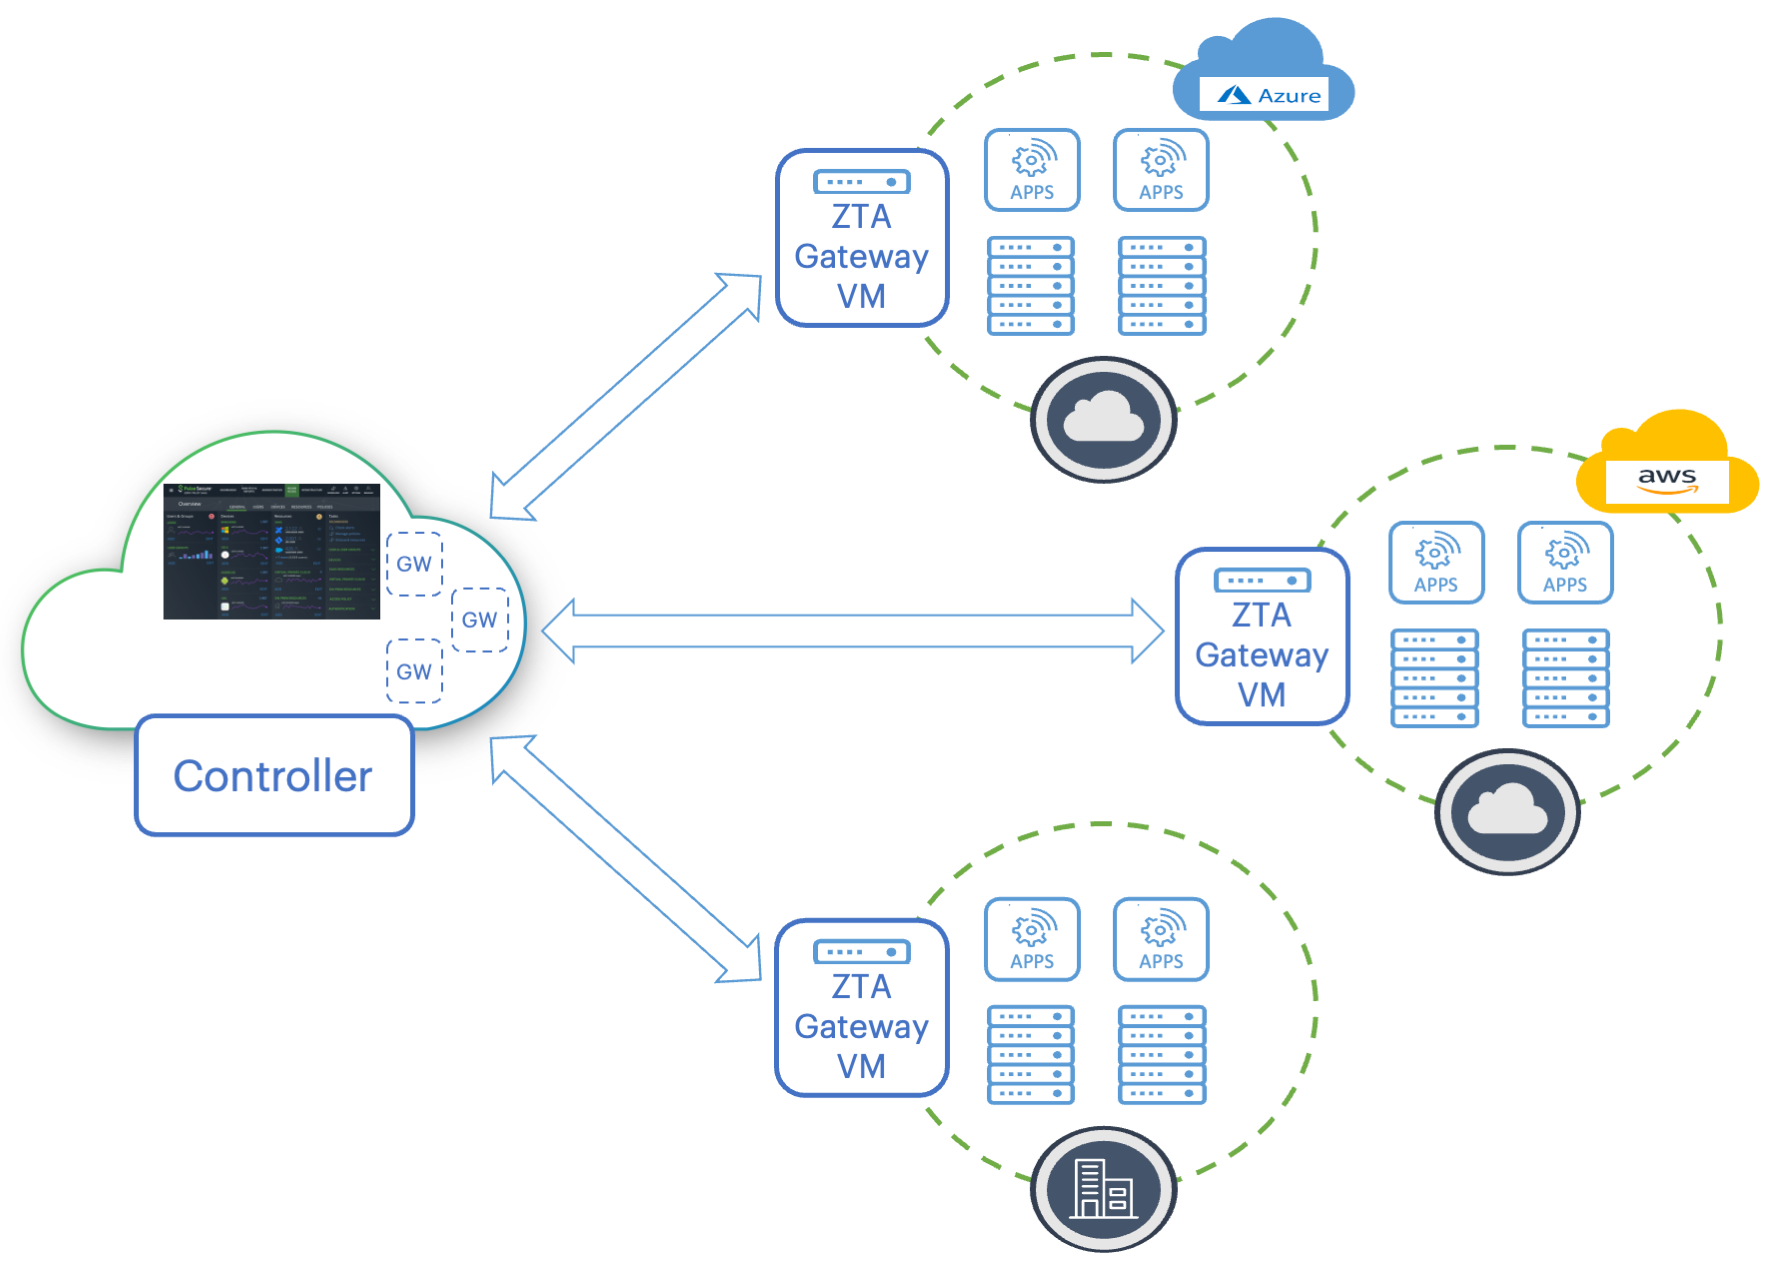
FIGURE 3 Deploying ZTA Gateways to your cloud and datacenter locations
The process of registering a ZTA Gateway identity with the Controller produces a package of settings known as a Gateway definition that you apply to the Gateway virtual machine during deployment. These settings enable the ZTA Gateway to establish secure communication with the Controller.
Note
Make sure the ZTA Gateway instance does not exist prior to registration with the Controller. The Gateway definition file is designed to be applied to a new virtual machine instance at deployment time only.
To register a new ZTA Gateway with the Controller, use the Tenant Admin Portal. The Controller provides a step-by-step workflow to define your ZTA Gateways, requiring basic identification and networking details. After you complete this process, you can download the definition file ready for insertion into your ZTA Gateway virtual machine at deploy time.
Note
A Gateway definition file is valid for 24 hours. If this period expires, you must replace the ZTA Gateway to generate a new definition file.
Then, when you create the ZTA Gateway virtual machine instance in your cloud or on-premise management console, you apply the definition file when requested by the template. A newly launched ZTA Gateway instance registers itself with the Controller, and any subsequent policy changes made on the Controller are automatically synchronized out to all ZTA Gateways.
To learn more about the process of creating and managing your ZTA Gateways, including network interface and subnet requirements, see Working with Gateways.
Using Gateway Groups for High Availability
nZTA provides the ability to enhance your application delivery by allowing the deployment of a group of two or more ZTA Gateway instances in front of the same applications. Depending on the approach taken, this can provide improvements for:
Availability: If one Gateway becomes overloaded or unresponsive, traffic is routed to another Gateway in the group.
Throughput: Balancing the load between all Gateways in the group to take full advantage of their capacity.
Load partitioning: A non-balancing approach to distributing traffic between Gateways in the group.
Latency reduction: Routing an end user’s traffic to the Gateway nearest to them.
A nZTA deployment provides two methods to control how traffic is routed:
The Controller chooses which Gateway to use, see Using Controller Gateway Selection.
You deploy a load-balancer to route traffic to the Gateways, see Using an Administrator-Deployed Load-Balancer.
The Controller uses the concept of Gateway Groups to manage each of these deployment models. A Gateway Group contains Gateways that are considered part of a single high-availability group, see Using Gateway Groups in your Secure Access Policies.
Note
To use active/standby and geo-proximity traffic distribution features with your nZTA deployment, your end-users must be running Ivanti Secure Access Client versions supported for use with nZTA version 21.3.2 or later. To learn more about supported client versions, see the Release Notes.
Using Controller Gateway Selection
To allow the Controller to select a Gateway, make sure your Gateway Group has no load-balancer defined as part of its configuration.
Note
In this scenario, no additional infrastructure is required.
When Gateways in the group are deployed across different locations, the Controller selects the Gateway that is geographically closest to the end-user, based on the end-user’s IP address. When Gateways in the group are configured with the same location, the end-user is directed to the Gateway that is alphabetically first by name. If a gateway fails, the end-user is automatically directed to use the next available Gateway in the group by the same criteria.
This mode provides improved availability over a standalone Gateway. In addition, when Gateways are deployed across multiple locations, it can partition load and reduce latency for end-users.
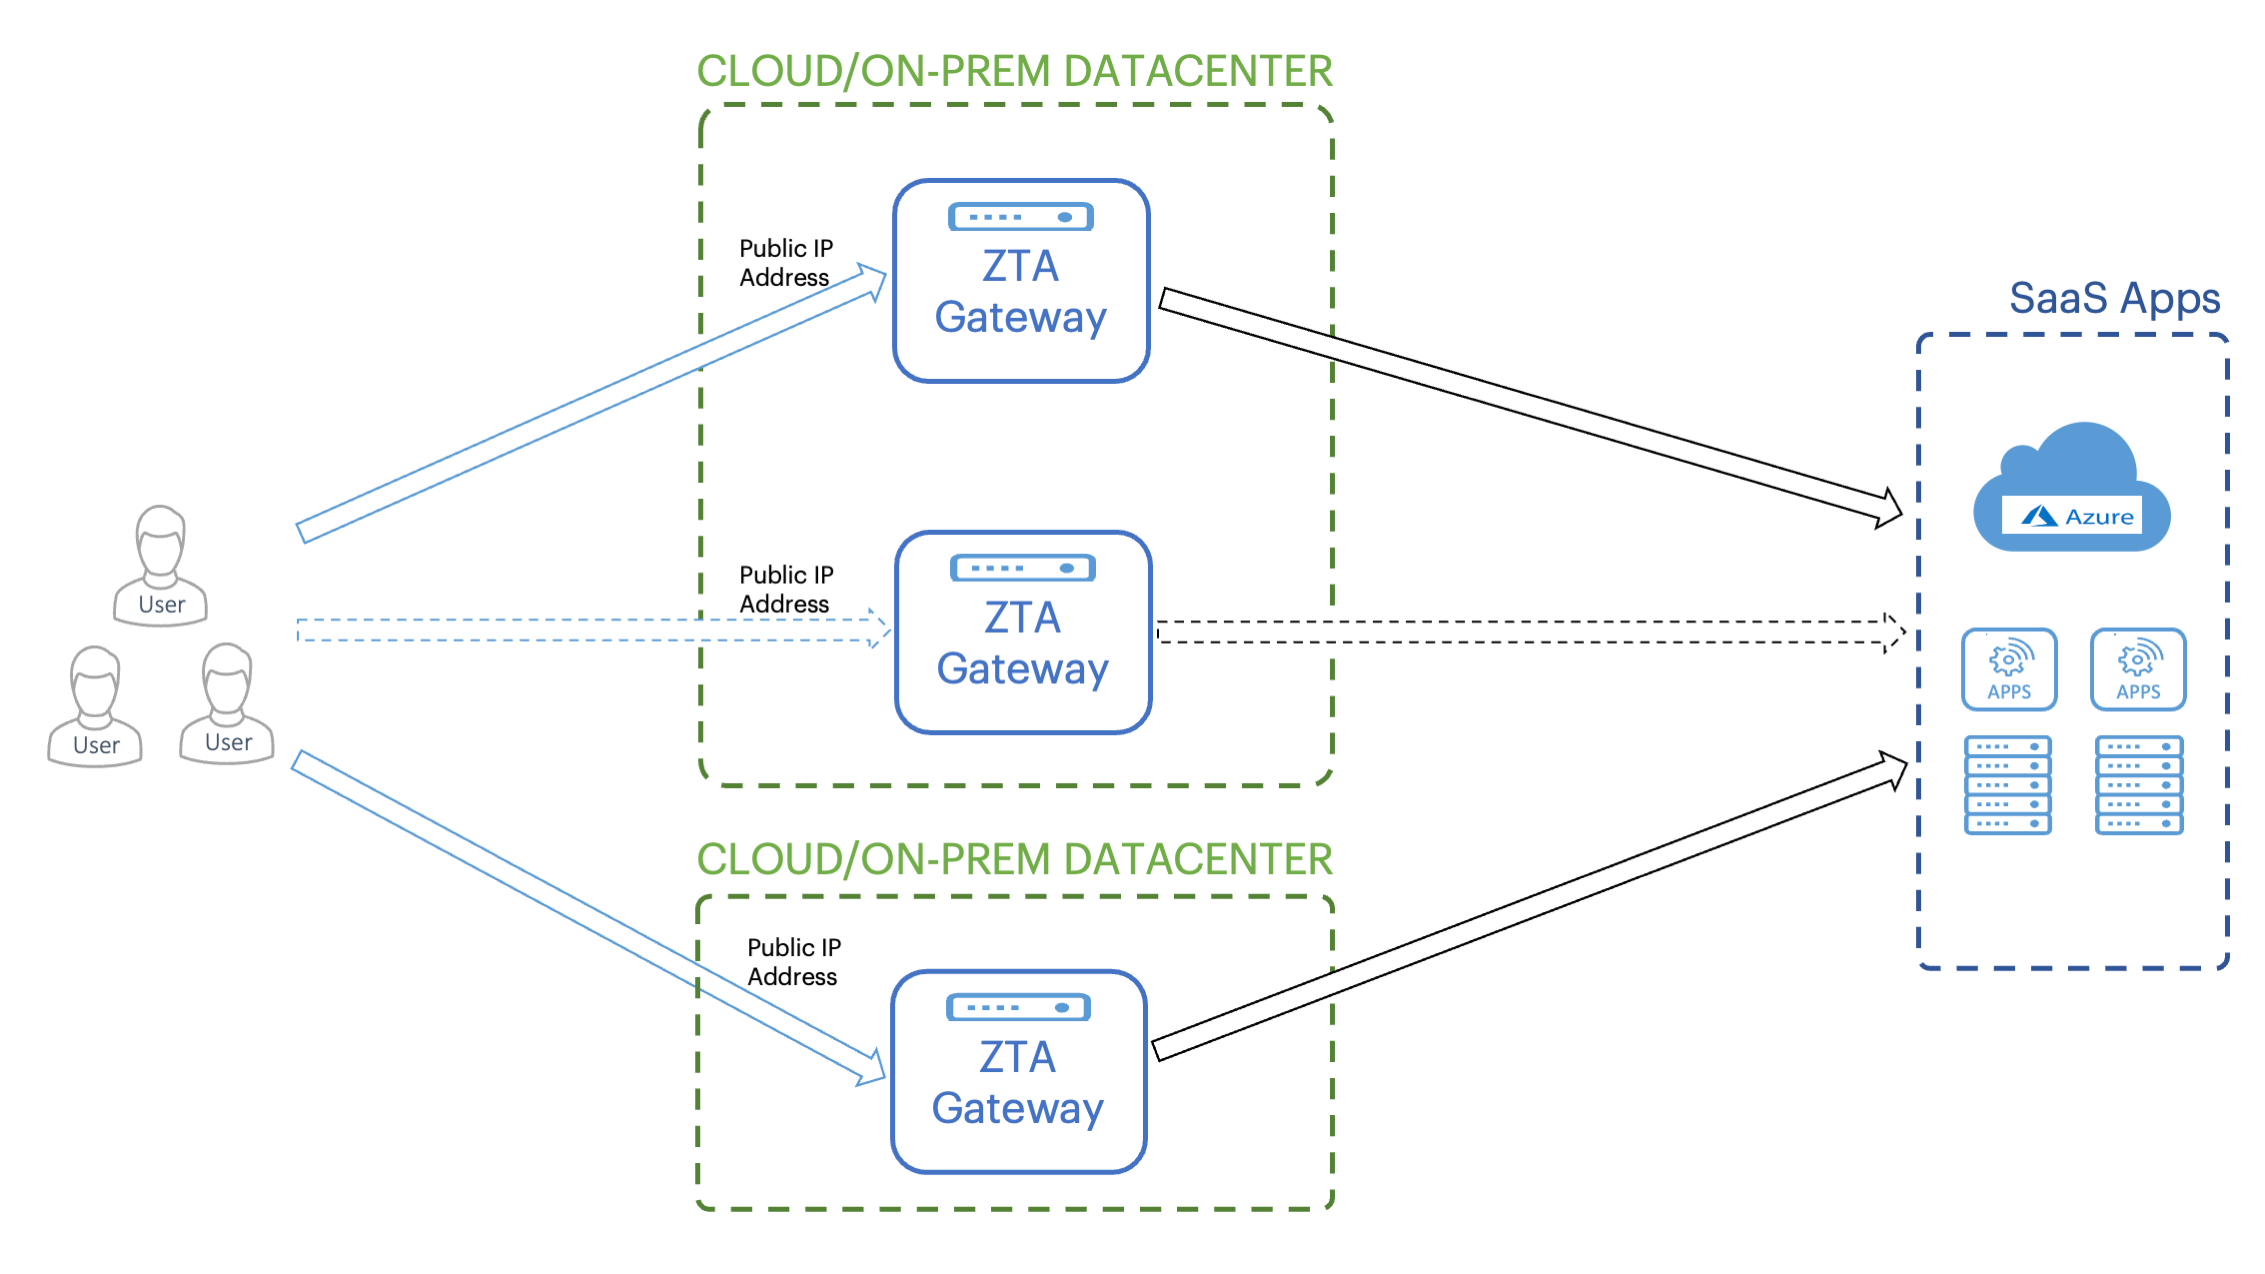
FIGURE 4 Using Controller Gateway Selection with Gateways over multiple locations
Using an Administrator-Deployed Load-Balancer
An administrator can deploy a load-balancer to distribute traffic between the Gateways in the group through the following scenarios:
As an in-path load-balancer to provide more rapid failure detection, and to load-balance traffic across Gateways when they are deployed in the same location to maximize throughput. An in-path load-balancer does not provide for latency reduction as all the Gateways in the group are deployed in the same location.
For on-premise Gateway deployments, Ivanti recommends Pulse Secure Virtual Traffic Manager (vTM). For cloud-based Gateway deployments, you can again use vTM or the built-in load balancing capabilities of AWS or Azure. To learn more about vTM, contact Ivanti Technical Support or visit www.ivanti.com. For more details on available load balancers in AWS or Azure, see the relevant product documentation.
Note
When using vTM for load-balancing, Ivanti recommends you configure the following settings in the vTM Admin UI to ensure proper fail-over functionality:
Click Services > Virtual servers and edit your designated HTTPS virtual server. In the virtual server configuration, click Protocol Settings > TCP Connection Settings and enable close_with_rst. This setting closes connections from clients with a RST packet rather than a FIN packet and avoids the TIME_WAIT state.
Click Services > Pools and edit your designated HTTPS pool. In the pool configuration, enable the following settings:
Click Protocol Settings > TCP Pool Settings and enable node_connclose. This setting closes all connections to a node if vTM detects that the node has failed.
Click Protocol Settings > TCP Protocol Options and enable node_close_with_rst. This setting closes connections from clients with a RST packet rather than a FIN packet and avoids the TIME_WAIT state.
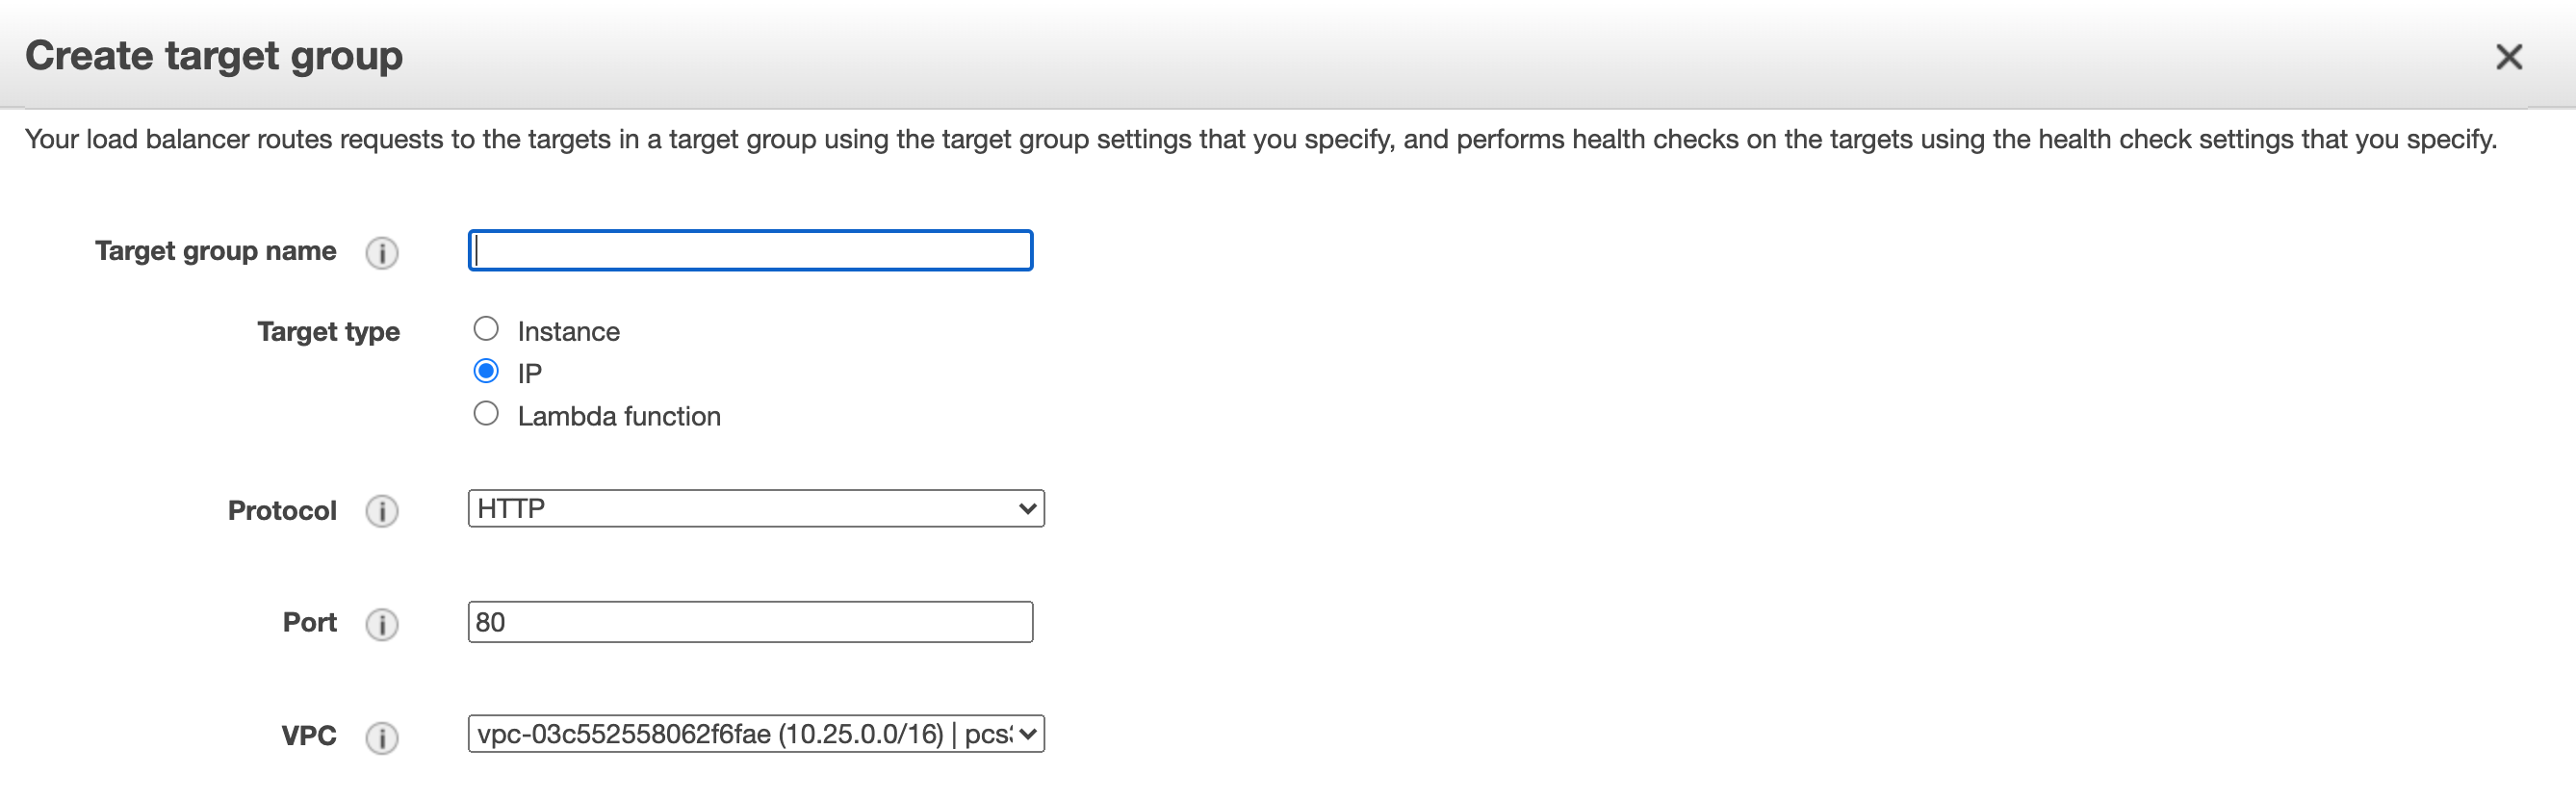
You deploy an in-path load-balancer in front of your Gateway instances and raise a public IP address on its front-end interface. You then configure the load balancer with a pool of nodes representing the external IP addresses of your Gateway instances. End users connect to the load-balancer, which in turn forwards on the connection to one of the available Gateways based on the load balancing algorithm you choose (such as round-robin). The load balancer can be configured with a health monitor to perform connectivity checks with your Gateways.
To use an in-path load-balancer, enter the IP address or FQDN of the load-balancer’s public interface in the load-balancer field of the Gateway Group configuration (see Working with Gateways).
Note
nZTA supports Gateway health monitoring using TCP port 443.
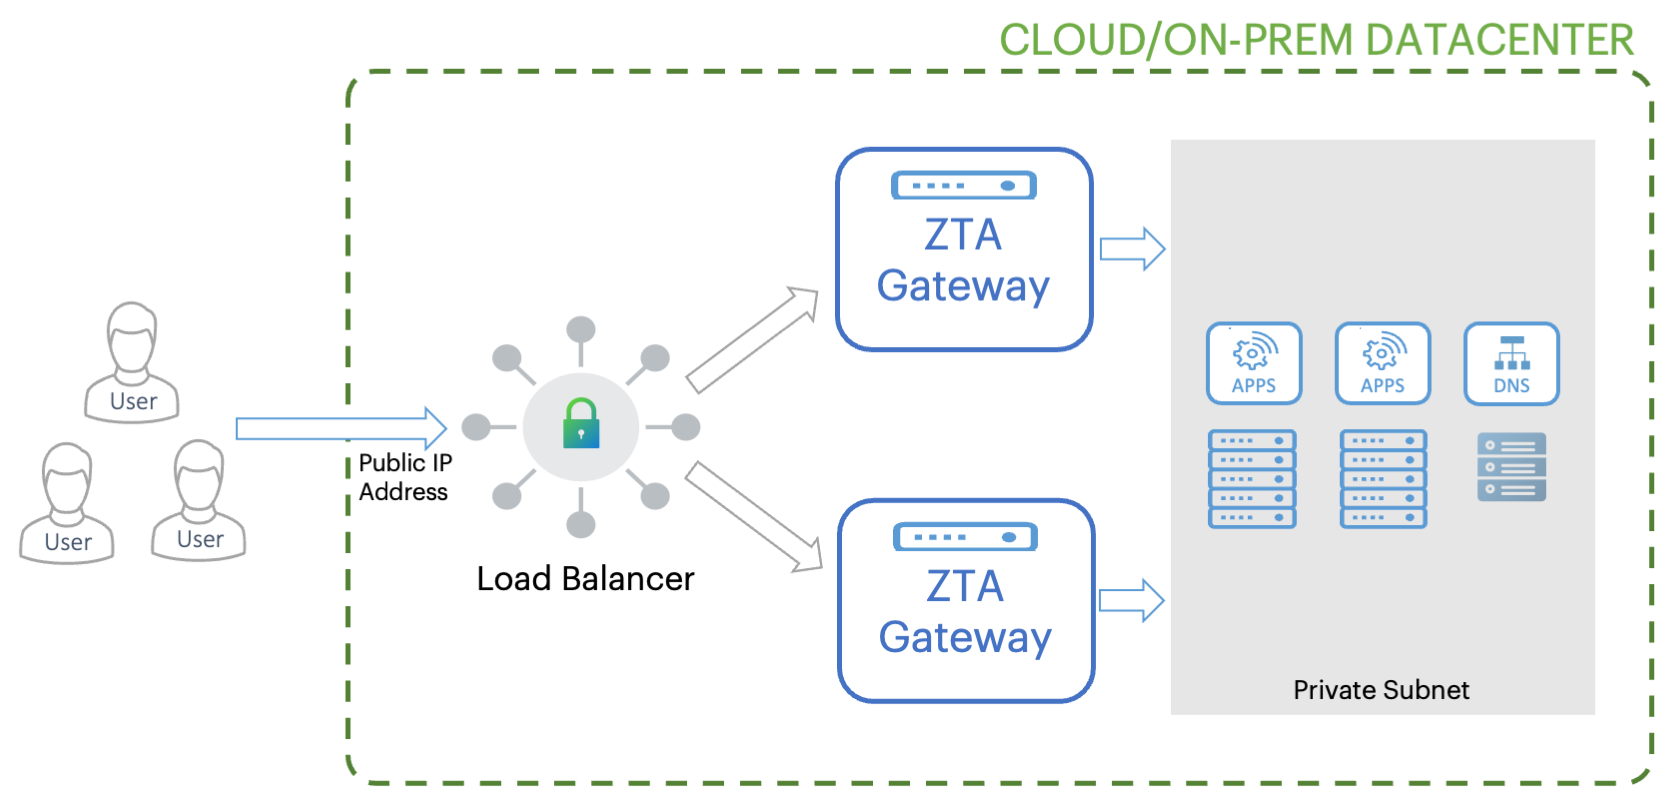
FIGURE 5 Deploying a pair of Gateways for high availability
Note
This diagram demonstrates high availability based on a pair of Gateways. You can add further Gateway instances according to the expected load on the applications at that location.
As a global load-balancer to distribute traffic between Gateway instances based on client proximity to the Gateway.
The global load-balancer should be configured to manage an FQDN and resolve it to the public IP address of the optimal Gateway instance. To use the global load-balancer, add the FQDN managed by the global load-balancer to the load-balancer field of your Gateway Group configuration.
Using Gateway Groups in your Secure Access Policies
To implement high availability, you configure a Secure Access Policy to use a Gateway Group rather than an individual Gateway. For all policy updates, the Controller automatically synchronizes changes with all Gateways in the group.
Note the following when using Gateway Groups:
A Gateway is available to be assigned to a Secure Access Policy as part of a Group, or as an individual instance, but not both. That is, a Gateway that is added to a Gateway Group is no longer available to be assigned to a Secure Access Policy by itself.
A Gateway must be registered and connected before it is available to be added to a Gateway Group.
Where the Controller is used for Gateway selection, all Gateways in an affected group must have a public IP address configured.
Gateway instances use different certificates for mTLS communication when part of a Gateway Group. When you add a Gateway to a Gateway Group, this triggers a task to renew the Gateway certificate to match that used by the Group. Conversely, if you remove a Gateway from a Gateway Group, this again triggers a task to renew the Gateway certificate to ensure validity as an individual instance.
A removed Gateway does not retain any user or device policies previous synchronized to it by the Controller.
To learn more about configuring a Gateway Group, see Working with Gateways.
Defining User Authentication
nZTA provides user authentication through authentication policies. Policies cover the primary scenarios of user enrollment, user sign-in, and administrator sign-in, and the Controller includes built-in policy definitions for all three. nZTA additionally allows you to define your own custom enrollment and sign-in policies to facilitate specific authentication paths for different groups of users or parts of your organization.
An authentication policy defines the application of an authentication method for a specified access URL. You create methods based on your user authentication requirements and assign them to the appropriate policies. As a user connects to the access URL defined in a policy, the associated method is employed to authenticate the user device.
nZTA facilitates Multi-Factor Authentication (MFA) through the configuration of an optional secondary authentication method in a policy. When MFA is deployed, a connecting user would need to satisfy the requirements of both primary and secondary authentication methods before access is granted. nZTA allows the use of Local authentication and Time-based One Time Password (TOTP) as secondary methods.
nZTA also provides for the definition of user rules and user groups. User rules act as filters and define the basic criteria by which users’ credentials must match in order for authentication to proceed. User groups encapsulate an authentication policy with one or more user rules to provide a complete user authentication definition for your Secure Access Policy.

FIGURE 7 The relationship between user groups, rules, authentication policies and methods
Ivanti recommends you define your authentication methods and user rules first. Then, create or update authentication policies for user enrollment and sign-in based on the authentication methods that you want to apply in that scenario. Finally, create a user group based on your policy and add any applicable user rules.
To read more about authentication methods, see Creating User Authentication Methods.
To read more about authentication policies, see Using User Authentication Policies.
To read more about user rules and groups, see Defining User Authentication Rules and Groups.
Creating User Authentication Methods
nZTA supports user authentication through the following methods:
local authentication
SAML authentication (through Azure AD or a custom defined service)
Time-based One Time Password (TOTP) authentication
Local Authentication
nZTA can operate a local authentication policy based on a defined list of users held internally in the Controller. User authentication requests are compared against this list to determine access rights. You create and manage this list manually through the Tenant Admin Portal.
Note
nZTA supports the use of Local Authentication as a primary or secondary authentication mechanism.
To learn more about defining local authenticators in nZTA, see Workflow: Creating a Local Authentication Policy.
SAML Authentication
SAML is an open-standard XML-based message framework, used to exchange information concerning the authentication and authorization of user agents attempting to access an organization’s web services. SAML is often used for web browser single sign-on (SSO) services.
SAML deployments typically involve two participant types:
Service Provider (SP): provides the resources to be protected
Identity Provider (IdP): performs the authentication and authorization checks required by your resources
nZTA can function as a SAML SP to control user access to your application infrastructure, using an externally-defined service (for example, Azure AD) as the IdP. Access is permitted only when a valid SAML token is presented by the requesting user agent, who has in turn obtained the token from the IdP.
Note
nZTA supports the use of SAML in Multi-Factor Authentication as a primary authentication mechanism only.
To configure nZTA to use a SAML authenticator, you must establish a trusted SAML connection between nZTA and a suitable identity provider. To create the connection, nZTA and the identity provider must both be configured with authentication data identifying each other.
In other words, when you configure an identity provider application to operate as a SAML IdP, you obtain an IdP metadata package file containing configuration details suitable for uploading to nZTA (as the SP). After you upload the IdP metadata to nZTA, nZTA in return generates its own SP configuration metadata package file for uploading back to the IdP.
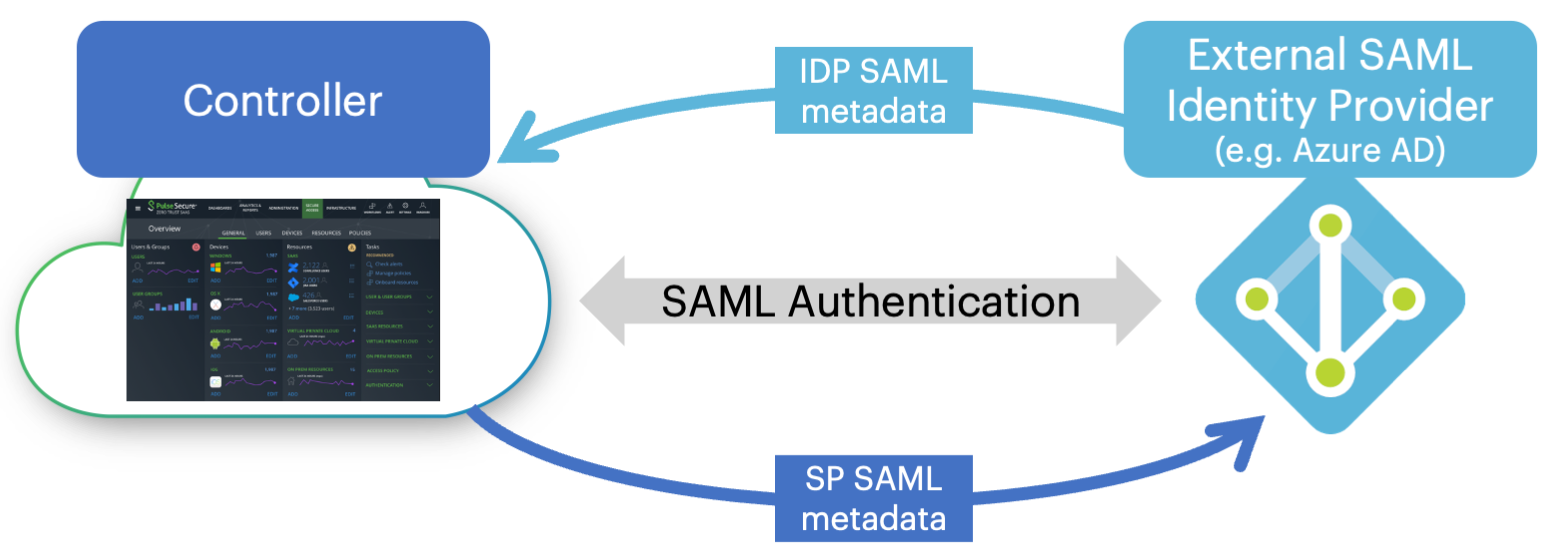
FIGURE 8 Configuring nZTA with a SAML authentication method
This process of authentication metadata-sharing establishes the IdP as a trusted authenticator within nZTA. The IdP, in turn, acknowledges nZTA as a trusted SP.
Note
This guide provides information on configuring trusted connections to supported SAML authenticators. For more detailed instructions, or for deployment scenarios not covered by this guide, refer to the documentation provided by your IdP vendor.
nZTA uses independent authentication policies to handle user enrollment and user sign-in processes. When configuring SAML authentication, you typically create two separate SAML applications in the IdP to handle each process individually. This means that for each authentication policy you must configure a separate nZTA authentication method and, for each method, perform the IdP/SP metadata handshake to establish a trusted connection with the associated SAML application. Ivanti recommends you configure your IdP SAML applications and obtain the corresponding metadata files before you configure your nZTA authentication methods.
To learn more about configuring SAML authenticators in nZTA, see Working with User Authentication.
TOTP Authentication
Time-based One Time Password (TOTP) is defined in RFC6238 as an authentication mechanism where a one-time password (also known as a token) is generated by an authentication server and client from a shared secret key and the current time. This is implemented in nZTA with the Controller acting as the TOTP authentication server.
Any third-party TOTP applications (for example, Google Authenticator, Microsoft Authenticator, and so on) available on the mobile and desktop client platforms generate TOTP tokens.
Note
nZTA supports the use of TOTP in Multi-Factor Authentication as a secondary authentication mechanism only.
To learn more about defining TOTP authenticators for use in nZTA, see Workflow: Adding TOTP to an Authentication Policy.
Using User Authentication Policies
Users trigger authentication by connecting to the access URL defined in your authentication policies. These policies reference authentication methods, as described in Creating User Authentication Methods, and cover the primary scenarios for authenticating user connections:
User enrollment
User sign-in
Administrator sign-in
Note
nZTA supports Multi-Factor Authentication for User sign-in and Administrator sign-in type policies only.
nZTA is pre-configured with built-in “default” policies for each of these scenarios.
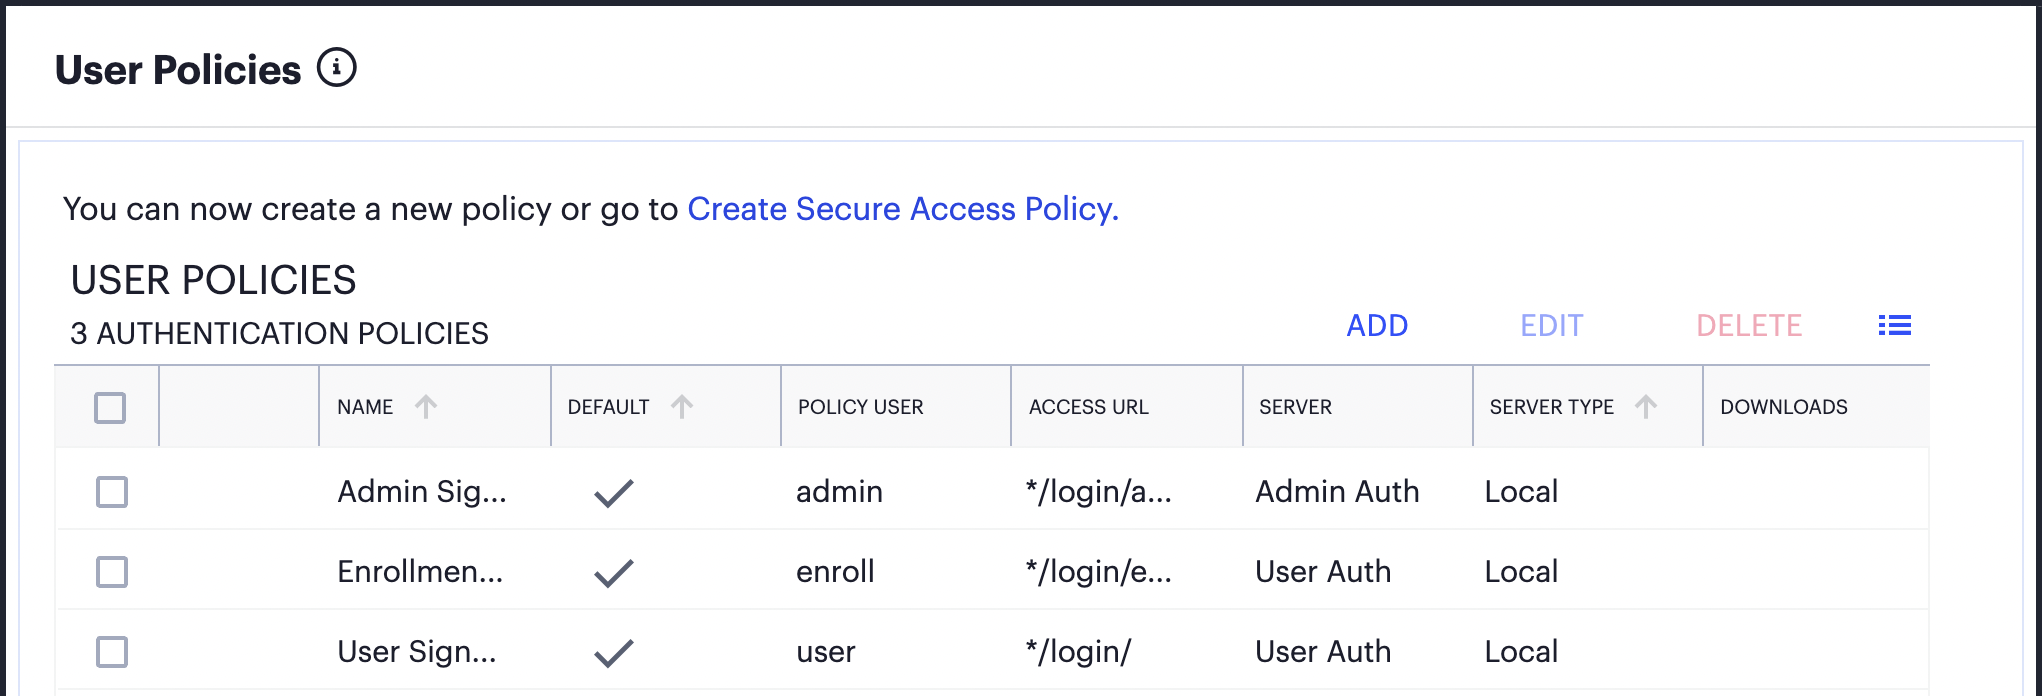
FIGURE 9 Viewing the default user authentication policies provided by the Controller
The access URL defined in each policy is appended to the tenant FQDN and serves as a complete endpoint for that activity. For example, if your tenant FQDN is “example.company.com”, the default sign-in endpoint for your end-users is https://example.company.com/login/ and the default enrollment endpoint is https://example.company.com/login/enroll/.
The specific access URL to which you connect for enrollment depends on the Ivanti Secure Access Client version installed on the device:
For Ivanti Secure Access Client versions defined as recommended for nZTA 21.9.2 or later, or for browser-based enrollment, you enroll a device by connecting directly to the access URL in a user sign-in policy. You do not connect to the enrollment policy directly (enrollment policies are linked to sign-in policies to handle the case where a connecting device is not yet enrolled).
For Ivanti Secure Access Client versions earlier than those recommended for nZTA 21.9.2, you enroll a device by connecting to the access URL in an enrollment policy. Thereafter, enrolled devices connect to the access URL in your default user sign-in policy.
Note
For details of recommended and supported Ivanti Secure Access Client versions, see the Release Notes.
The built-in default policies cannot be replaced or deleted, yet can be edited to update the authentication methods used in each case. For standard deployments involving a single authentication workflow for all enterprise users, these policies should be sufficient.
To establish additional authentication endpoints for specific user groups, you can add custom authentication policies. To learn more, see Adding Custom Authentication Policies.
Adding Custom Authentication Policies
In addition to the built-in authentication policies, you can add custom policies to enable further group-specific login scenarios. You can add, edit, and delete custom authentication policies as required.
In other words, where you only require a single policy for all enterprise users containing an authentication method suitable for everyone, the built-in default policies are likely suitable for your needs. However, you might want to authenticate certain groups of users against a different authentication method. In this scenario, you can set up custom policies, each containing a separate authentication method suitable for your specific group of users (for example, one policy/method for Sales staff versus another for non-Sales staff).
In a custom authentication policy, you define a unique Access URL for the activity (for example, “*/login/saleslogin/” or “*/login/salesenroll/”), and the primary authentication method you want to apply in that case. For Multi-Factor Authentication scenarios, you should also define an appropriate secondary authentication method (based on local or TOTP authentication).
Each time you create a custom authentication policy, you configure the user type (or activity) to which this policy should apply:
Enrollment Users: This policy is intended for enrollment of new end-user devices.
Users: This policy is intended as the sign-in endpoint for enrolled devices.
Administrators: This policy is intended as the authentication endpoint for administrator-level sign-in to the Controller.
Note
Multi-Factor Authentication is supported for user sign-in and admin sign-in custom policies only.
Authentication policies defined as a users sign-in type contain a link to an enrollment users policy that you specify. Through this mechanism, un-enrolled user devices connecting to a sign-in endpoint are instead automatically redirected to the relevant enrollment endpoint. For this reason, make sure you create your enrollment policy BEFORE you create a sign-in policy.
As an example scenario:
For enrollment, you create a new custom user policy specifying a User Type of “Enrollment Users” and a unique enrollment Login URL such as
/login/testenroll. Then, select your required authentication server.To enable your users to sign in post-enrollment, create a separate custom user policy specifying a User Type of “Users”. Enter a separate unique Login URL representing the sign-in endpoint, such as
/login/testuser. Then, select your required primary (and optional secondary) authentication server. Finally, link in the enrollment policy you created in the previous step.When you add a new nSA connection in Ivanti Secure Access Client, you specify the sign-in endpoint (
https://<mydomain>.com/login/testuser). This automatically redirects tohttps://<mydomain>.com/login/testenrollto complete the enrollment process. An enrollment endpoint must not itself be used for device onboarding from Ivanti Secure Access Client or through a web browser-based enrollment.
Note
Your custom user sign-in policies can be configured to redirect enrollment to either another custom (enrollment) policy, or to the built-in Enrollment Signin policy. The built-in User Signin policy is pre-configured with the built-in Enrollment Signin policy and cannot be modified.
If you use custom authentication policies, you must make sure these policies are mapped to a valid Secure Access Policy. Otherwise, connection attempts to enroll an end-user device to these policy end-points will fail.
For more details on enrolling client devices, see Enrolling a User Device.
To learn more about creating user authentication policies, see Working with User Authentication.
Defining User Authentication Rules and Groups
After you have defined a user authentication service, you can proceed to create User Rules and User Groups.
A User Rule is a set of instructions describing whether nZTA should include or exclude a user based on whether the criteria defined in the rule matches the user. For each rule, you specify an attribute of a user’s credentials (such as “username”) and a value to match against or to avoid. The value can be a wild-card character, a literal string, or a mixture of both. For example, you might specify a rule of “username MATCHING *@example.com” to apply to all users with user names in the example.com domain.
The attribute to match varies depending on whether your rule is to be used against an internally held user list or a SAML-based external authentication service.
Note
Consider specifying separate user rules for each type of user in your organization. Consider also defining rules for each type of application or resource you want to publish. For example, you might require a rule to filter out those users that are not authorized to access a sensitive data application, such as an HR or payroll system, held in a specific datacenter.
A User Group contains one or more user rules that, when combined with a user authentication service (see Defining User Authentication), create a complete user authentication policy.
This capability, combined with device policies, can actively fulfill the Users and Devices dimensions of your secure access policy. For more information, see An Overview of Ivanti Neurons for Zero Trust Access.
For logins attempted against a URL endpoint defined in a particular policy, the credentials of the user are checked against the corresponding authentication services and user rules to ascertain whether the user is authorized to access the services published at a ZTA Gateway.
To learn more about defining User Rules and Groups, see Creating User Rules and User Groups.
Publishing Applications
Application publishing is central to the configuration of your nZTA service. A nZTA application can refer to on-premise applications, web pages, or network locations served from your datacenter and cloud infrastructure. nZTA can also publish resources based on SaaS applications such as Microsoft O365 and Salesforce.
The process of publishing an application encompasses all four dimensions of secure access: users, devices, applications, and infrastructure. For each application, you define its type and then apply to it user rules, device policies, and ZTA Gateway infrastructure governing access to it. For more information on the secure access model, see An Overview of Ivanti Neurons for Zero Trust Access.
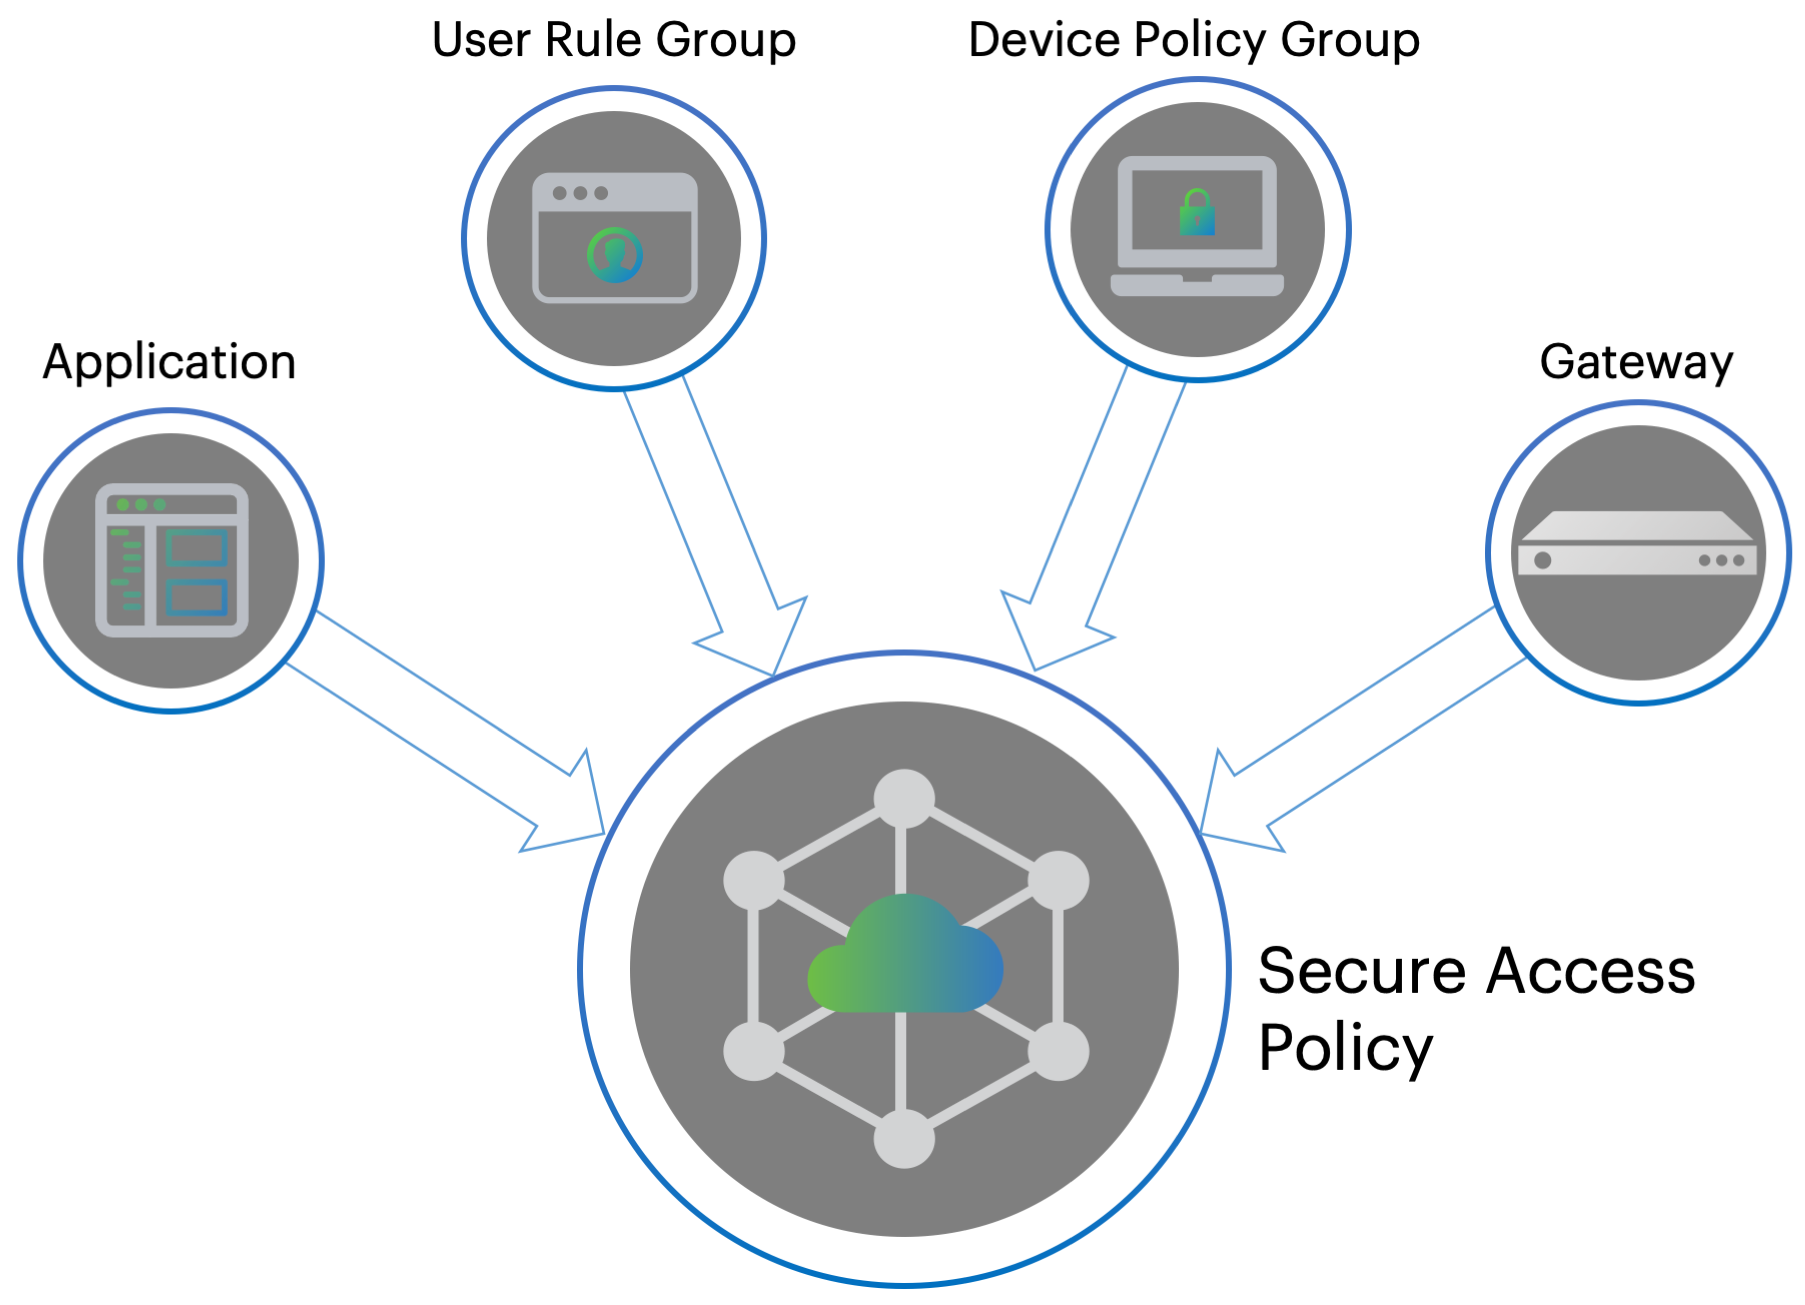
FIGURE 10 Creating a secure access policy
The Tenant Admin Portal allows you to define a complete secure access policy for an application or resource, encompassing the required supporting user rules, device policies, and ZTA Gateway infrastructure.
The portal provides a step-by-step workflow to enable you to define and publish your secure access policy in one process. For more information on the Create Secure Access Policy workflow, see Summary of Steps to Configure Your nZTA Deployment.
Defining Applications and Application Groups
When you create a new secure access policy, you select whether to create a policy for a single application or for a group of related applications. Therefore, the Tenant Admin Portal enables you to define applications individually, and where required to then add one or more application definitions to an application group.
Note
An application, or application group, can be associated with only one secure access policy.
When you create a new application definition in the Tenant Admin Portal, make sure you know the following details:
The Application Details: That is, the URI (Uniform Resource Identifier) you use to access the application, based on a Fully Qualified Domain Name (FQDN). nZTA supports valid entries that match the following forms:
URI Scheme |
Example(s) |
|---|---|
http://<FQDN or IP>[:<port>][/path] |
http://www.example.com, |
https://<FQDN or IP>[:<port>][/path] |
https://www.example.com, |
tcp://<FQDN or IP>[:<port>], |
tcp://example.com, |
udp://<FQDN or IP>[:<port>], |
udp://example.com, |
ssh://<FQDN or IP>[:<port>] |
ssh://example.com, |
rdp://<FQDN or IP>[:<port>] |
rdp://example.com, |
ica://<FQDN or IP> |
ica://example.com, |
<FQDN>:<port> |
www.example.com:9090 |
<FQDN>:<port1>,<port2>[,…] |
www.example.com:9090,9091,9092 |
<FQDN>:<portA>-<portB> |
www.example.com:9090-9099 |
<FQDN>:* |
www.example.com:* |
<IP address block with subnet> |
192.0.2.0/8, |
<IP address>[/<subnet>] |
192.0.2.1, |
Note
IPv6 addresses are not supported when defining application details
The access type. This is one of the following types:
Application-level: Defines an on-premise or cloud application.
SAML: Defines a trusted connection between nZTA and the application, suitable for SaaS applications.
Note
When using SAML authentication with an application group, make sure you add to a single application group only those applications that use the same SAML authentication source.
For simple application access, you specify the full FQDN, URI or IP address at which the application is accessed. In some cases, you might have multiple applications available at a single primary domain, the full set of which might be unknown to the administrator configuring your nZTA service, particularly with SaaS applications. Instead of locating and defining each of these applications individually, you can create a single application definition based on a wildcard-prefixed FQDN (for example, “*.example.com”) and instruct nZTA to employ application discovery on that domain. The method means that a single secure access policy can handle access to all applications discovered at the domain.
nZTA records analytics and metrics for all discovered applications. To learn more about how to track usage, see Reviewing Application Usage.
To learn more about the process of creating applications and application groups, see Adding Applications to the Controller.
Defining an On-Premise Application
Before configuring nZTA to publish your resource, make sure the resource is accessible from the ZTA Gateway you want to use for controlling access. You should obtain the FQDN of the endpoint at which the resource is visible.
nZTA additionally requires a name, description, and icon to represent the resource.
Defining a SaaS Application
The Controller uses SAML to provide a secure connection to a SaaS resource. In this scenario, nZTA acts as a SAML Identity Provider (IdP), with the resource acting as the SAML Service Provider (SP). To learn more about using SAML, see SAML Authentication.
By selecting SAML as the application access type, the Tenant Admin Portal provides the ability to download the IdP metadata file for uploading to the application SP configuration. This action, in turn, should elicit a SP metadata file for uploading back to nZTA.
Defining User Rules and User Rule Groups
A secure access policy links to the same user rule groups as described during the process of configuring user authentication. You create access rules for your enterprise user base and add these rules to a corresponding rule group. You then select a user rule group during the creation of your secure access policy.
For more information, see Defining User Authentication Rules and Groups.
To learn more about the process of defining user rules and rule groups, see Creating User Rules and User Groups.
Creating Device Policies and Device Policy Rules
Device policies define the minimum standard a device must meet to be considered compliant with nZTA.
Examples of compliance include:
All client devices, desktop or mobile, must have anti-virus software installed and enabled.
A specific application might function securely only on devices using a minimum viable Operating System version.
Application access on client devices should be restricted to a defined browser type and minimum version.
Application access should be restricted to a pre-determined range of authorized client device IP addresses.
You create individual device policy rules through the Tenant Admin Portal and then add them to a device policy. As you move on to define your secure access policy, you select a device policy that should be enforced for the selected application, users, and ZTA Gateway.
nZTA includes the following built-in device policy rules:
For McAfee AntiVirus:
McAfee AntiVirus High: This is a high strictness policy rule designed to ensure devices have anti-virus software installed and active, with a virus signature database not more than 2 days old, and a full system scan having been performed. This policy rule is attached to the built-in McAfeeAVHigh device policy.
McAfee AntiVirus Medium: This is a moderate strictness policy rule designed to ensure devices have anti-virus software installed and active, with a virus signature database not more than 10 days old. This policy rule is attached to the built-in McAfeeAVMedium device policy.
McAfee AntiVirus Low: This is a low strictness policy rule designed to ensure devices have anti-virus software installed and active. This policy rule is attached to the built-in McAfeeAVLow device policy.
For Symantec AntiVirus:
Symantec AntiVirus High: This is a high strictness policy rule designed to ensure devices have anti-virus software installed and active, with a virus signature database not more than 2 days old, and a full system scan having been performed. This policy rule is attached to the built-in SymantecAVHigh device policy.
Symantec AntiVirus Medium: This is a moderate strictness policy rule designed to ensure devices have anti-virus software installed and active, with a virus signature database not more than 10 days old. This policy rule is attached to the built-in SymantecAVMedium device policy.
Symantec AntiVirus Low: This is a low strictness policy rule designed to ensure devices have anti-virus software installed and active. This policy rule is attached to the built-in SymantecAVLow device policy.
For TrendMicro AntiVirus:
TrendMicro AntiVirus High: This is a high strictness policy rule designed to ensure devices have anti-virus software installed and active, with a virus signature database not more than 2 days old, and a full system scan having been performed. This policy rule is attached to the built-in TrendMicroAVHigh device policy.
TrendMicro AntiVirus Medium: This is a moderate strictness policy rule designed to ensure devices have anti-virus software installed and active, with a virus signature database not more than 10 days old. This policy rule is attached to the built-in TrendMicroAVMedium device policy.
TrendMicro AntiVirus Low: This is a low strictness policy rule designed to ensure devices have anti-virus software installed and active. This policy rule is attached to the built-in TrendMicroAVLow device policy.
For device modification testing:
AndroidRootRule: This policy rule is designed to ensure that an Android device has not been rooted.
IOSJailBreakRule: This policy rule is designed to ensure that an iOS device is not subject to a jailbreak.
You can create additional device policy rules to match the applications used by your organization and then add these rules to a device policy. You then associate device policies with your secure access policies as required.
Policy rules can be based on the following types:
Rule Type |
Description |
|---|---|
Antispyware |
Checks compliance to designated anti-spyware requirements. |
Antivirus |
Checks compliance to designated anti-virus requirements. |
CVE check |
Checks for protection against a list of publicly disclosed Common Vulnerability and Exposure (CVE) notices (Windows client devices only). |
Command |
Runs a command on the client device to check against an expected value (macOS client devices only). |
File |
Checks for the existence of a known file on the client. |
Firewall |
Checks compliance to designated firewall requirements. |
Location |
Checks the client device’s geographic location matches, or avoids, a list of defined locations. |
Hard Disk Encryption |
If encryption software is installed on the client device, this rule type checks the device’s hard disks for applied encryption. |
Mac Address |
Checks the client device’s MAC address. |
Netbios |
Checks the client device’s Netbios domain name. |
Network |
Checks the client device complies with a defined IP address and netmask range. |
OS |
Checks the client device’s Operating System meets a defined minimum standard. |
Process |
Checks for the existence of a known process on the client. |
Port |
Checks the client device’s network interface ports. |
Patch Management |
If patch management software is installed on a client device, this rule type checks for the existence of missing software patches. |
Registry |
Checks for a value in a registry key (Windows client devices only). |
Time of day |
Checks resource access requests against compliance with a time-based access schedule. |
System Integrity |
Checks the system integrity of the client device (macOS client devices only). |
To learn more about the process of creating device policies and policy groups, see Creating Device Policies and Device Policy Rules.
Enrolling a User Device
To use nZTA-controlled resources, end users must first enroll their devices with the Controller. This process installs or updates the Ivanti Secure Access Client software and establishes a connection to the Controller in order to obtain policies and details for a user’s authorized resources. Ivanti Secure Access Client uses this configuration to establish a secure connection to the ZTA Gateways you deploy to control access to your applications. Through this process, the user is provided a seamless connection to the resources they need and is never aware of the location or extent of the organization’s application infrastructure.
Note
For security reasons, only the authorized user account used to enroll a device is subsequently permitted to sign-in to nZTA on that device.
A new user might arrive at this scenario from one of the following routes:
An existing Pulse Secure or Ivanti user, with a previous Ivanti Secure Access Client connection to Ivanti Connect Secure (ICS) or similar, see Existing ICS Users.
A first time nZTA user, with no previous Pulse Secure or Ivanti software installed, see First Time Users.
An existing nZTA user enrolling a new device, or upgrading a previous version of Ivanti Secure Access Client, see Existing nZTA Users.
To learn more about the processes of enrolling supported mobile and desktop clients, and to see how an admin can manage the list of enrolled devices, see Enrolling Mobile/Desktop Clients.
To learn more about using mobile and desktop clients with nZTA, see Using Ivanti Secure Access Client with nZTA.
Using Ivanti Secure Access Client with nZTA and Enrolling Mobile/Desktop Clients.
Existing ICS Users
Your users might have a previous version of Ivanti Secure Access Client installed if, for example, they are existing ICS users.
To enroll existing ICS users into nZTA, a ICS administrator must first push out the nZTA-ready edition of the client software to the user base. An admin uploads the new client software to the ICS server and activates the nZTA-ready version of Ivanti Secure Access Client from the ICS management console in the same way as any other version. This process ensures that when your users next activate a Ivanti Secure Access Client connection to the server, their device is prompted to download and install the new version.
For more details on this process, see the Ivanti Connect Secure documentation at https://help.ivanti.com.
After the new nZTA-ready version of Ivanti Secure Access Client is installed, the user can configure a nZTA connection using the same process used for other, existing, connections. To create a nZTA connection, compatible Ivanti Secure Access Client versions offer a specific connection type: “Zero Trust Access”.
The tenant admin must then supply the access URL specified in the relevant user sign-in authentication policy to their users to create the new nZTA connection. To learn more about authentication policies, see Using User Authentication Policies.
First Time Users
When enrolling a new device on which no previous Ivanti Secure Access Client is installed, an authorized user contacts the Controller through the access URL of a user sign-in authentication policy to activate an initial first-time enrollment of their client device. The Controller responds to a valid enrollment request by activating a download of Ivanti Secure Access Client along with a suitable client certificate.
After Ivanti Secure Access Client is installed, a secure connection request is attempted with the Controller. The request is validated against the designated authentication policy applicable to that combination of user and device and, where successful, a connection profile is downloaded to the client. This profile enables Ivanti Secure Access Client to set up a secure tunnel directly to the ZTA Gateway serving the resource set the client is authorized to view.
Existing nZTA Users
Existing nZTA users enrolling a new device follow the same procedures described for a first time user, but based on the additional conditions noted here.
The access URL to which you connect for enrollment depends on the Ivanti Secure Access Client version installed on the device:
For Ivanti Secure Access Client versions defined as recommended for nZTA 21.9.2 or later, or for browser-based enrollment, you enroll a device by connecting directly to the access URL in a user sign-in policy. You do not connect to the enrollment policy directly (enrollment policies are linked to sign-in policies to handle the case where a connecting device is not yet enrolled).
For Ivanti Secure Access Client versions earlier than those recommended for nZTA 21.9.2, you enroll a device by connecting to the access URL in an enrollment policy. Thereafter, enrolled devices connect to the access URL in your default user sign-in policy.
Note
For details of recommended and supported Ivanti Secure Access Client versions, see the nSA Controller Release Notes.
After you have enrolled the new device, Ivanti Secure Access Client is installed and configured with the policies and settings relevant to the device type. Your application and resource access rights should be duplicated to the new device.
Note
If a user device is currently using a Beta version of the nZTA-ready Ivanti Secure Access Client, Ivanti advises to remove the nZTA connection from Ivanti Secure Access Client and to re-perform the enrollment procedure through a web browser. For more details, see your support representative.
Viewing Licensing/Subscription Usage
Licenses and subscriptions are added to the Controller by Ivanti.
The Subscriptions page displays your licenses and subscriptions that are active on the Controller. To access this page, select Administration > Subscriptions.
The Summary tab displays for each subscription or license:
License/Subscription high-level details, including dates and usage metrics.
One or more descriptions of the features in the license or subscription. Where there are multiple features, use Previous and Next to navigate.
When any defined limit on the license or subscription is met, a message appears:
At 75% utilization of seats, an information message appears at the bottom of the screen. You can optionally select Close.
At 90% utilization of seats, a modal message appears at login. Select Dismiss to clear the message.
When 25% of the duration of the license or subscription remains, a modal message appears at login. Select Dismiss to clear the message.
Named Users lists users and their devices registered on the Controller.
Summary information for Controller licenses and subscriptions is displayed at the top of the page:
The total number of seats from all licenses or subscriptions.
The number of named users on the Controller. Each of these is listed in the table below the summary.
The percentage of seats consumed.
For each named user, the following information is displayed:
The name of the user.
The number of devices enrolled for that user.
The elapsed time since the most recent session on a device enrolled for that user. If this is greater than 3 weeks, this is displayed in orange.
The timestamp for the start of the most recent login session.
Summary of Steps to Configure Your nZTA Deployment
The remainder of this guide describes each of the processes you need to follow to fully configure your nZTA deployment.
In summary, the main steps are as follows:
Log in to the nZTA Tenant Admin portal
Create and deploy your ZTA Gateways
Define your user authentication methods and policies
Define your user rules and user groups
Define your device policies and policy groups
Define your applications and application groups
Create your complete secure access policy.
The remainder of this guide describes each of these steps in detail.
This guide also provides guidance on client device enrollment (see Enrolling Mobile/Desktop Clients), usage (see Using Ivanti Secure Access Client with nZTA), and a description of the tools you can use to monitor your nZTA services (see Using the Insights Menu to Monitor User Activity and Service Usage).