Creating Device Policies and Device Policy Rules
Introduction
Device Policies define how desktop and mobile devices access cloud and on-premise applications in your Ivanti Neurons for Zero Trust Access (nZTA) deployment.
Note
Device policies act as one of the four dimensions of a Secure Access Policy, see Creating/Editing Secure Access Policies.
You create one or more Device Policy Rules and then group them together to form a complete Device Policy, suitable for adding to a Secure Access Policy. Device policies encompass a set of rules that define the minimum standard a device must meet to be considered compliant with the applications and services served by your Secure Access Policies.
To learn more about Device Policies and Rules, see Creating Device Policies and Device Policy Rules.
Viewing Device Policies and Rules
nZTA provides a number of built-in default device policies, each containing a set of appropriate built-in device rules. These policies and rules are suitable for general use. In addition, nZTA allows the definition of custom policies and rules to fit an organization’s specific requirements.
To view the list of all default and custom device policies or rules defined on the Controller:
Log into the Controller as a Tenant Admin.
From the nZTA menu, select the Secure Access icon, then select Manage Devices.
Then, choose from:
To view device policies, select Device Policies:
The Device Policies page appears. This page lists all current device policies.
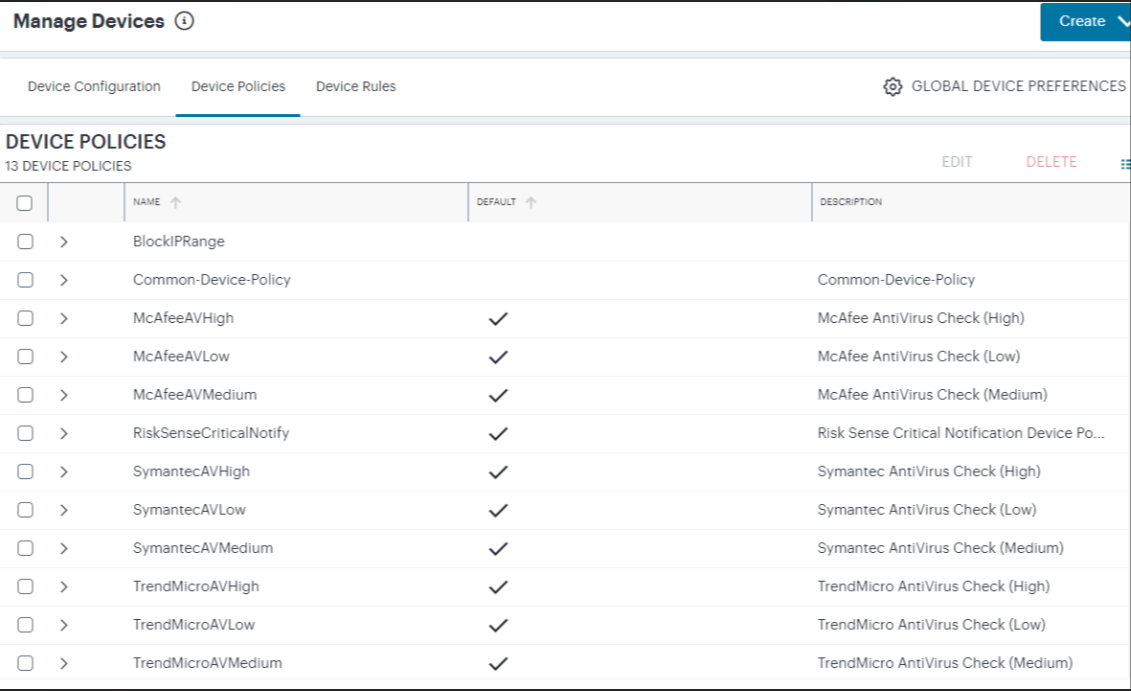
FIGURE 180 The Device Policies page
Built-in default policies are indicated by a tick in the Default column. Custom policies are unticked.
On this page, you can:
Add a new custom device policy, see Creating Device Policies.
Edit a single custom device policy.
Delete a single custom device policy.
To view device rules, select Device Rules:
The Device Rules page appears. This page lists all current device rules.

FIGURE 181 The Device Rules page
Built-in default rules are indicated by a tick in the Default column, and include a Security Level field to indicate the strictness of the parameters in the rule. These fields are not applicable to custom device rules.
To learn more about the default rules included with your deployment, see Creating Device Policies and Device Policy Rules.
On this page, you can:
Add a new custom device rule, see Creating Device Policy Rules.
Edit a single custom device rule.
Delete a single custom device rule.
You can also:
View a summary of the rule contents by selecting the indicator adjacent to the rule name.
Sort the list by a selected column in ascending or descending order.
Switch between normal and denser data views.
Creating Device Policies
You can create Device policies and attach to them one or more Device Rules as required.
To create a device policy:
Log into the Controller as a Tenant Admin.
From the nZTA menu, select the Secure Access icon, then select Manage Devices > Device Policies.
The Device Policies page appears. This page lists all current device policies.
FIGURE 182 Add a new Device Policy
Click Create and then select Create Device Policy.
A form appears to enable you to create the device policy.
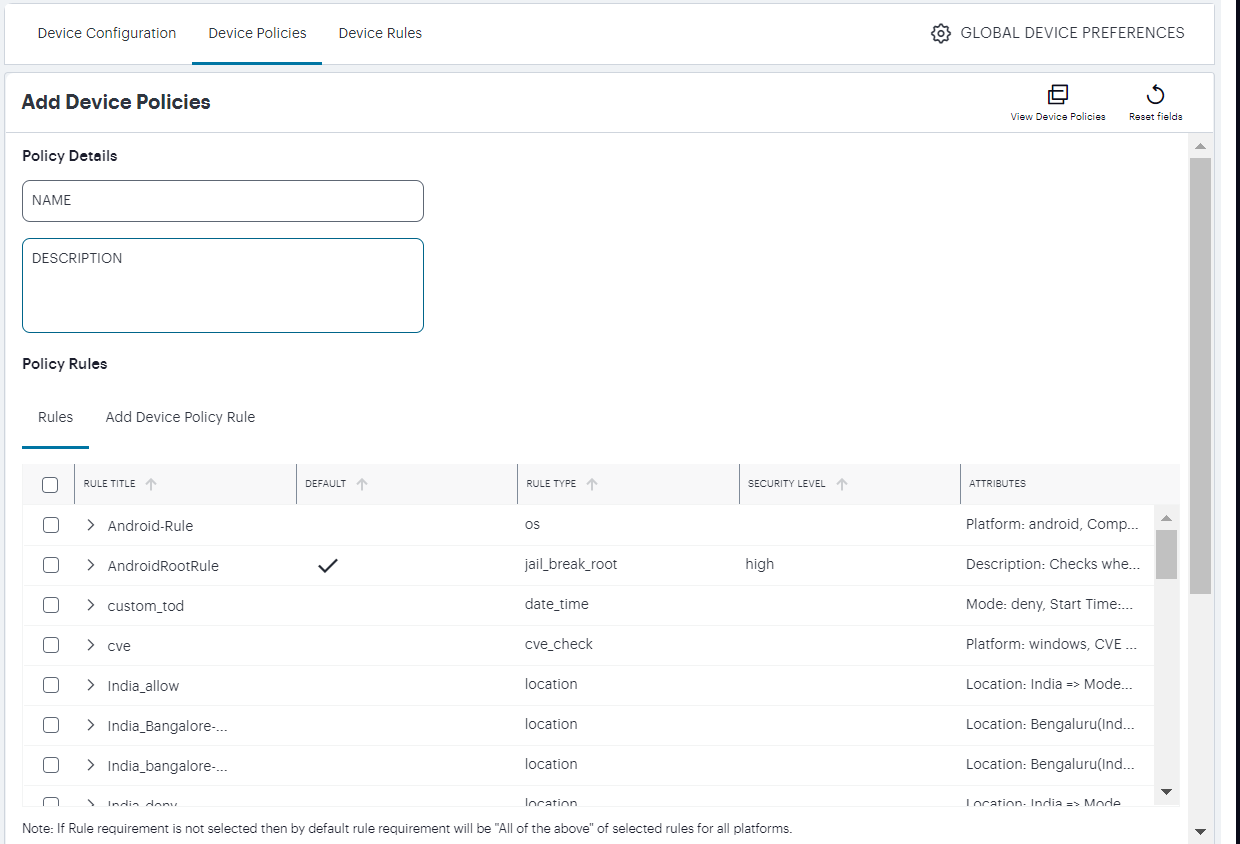
FIGURE 183 Add a new Device Policy
Note
At any point during this process, you can reset the form data by selecting Reset Fields. You can also view existing device policies in a pop-up dialog by selecting View Device Policies.
Enter a Name for the device policy.
Add a Description for the device policy.
Select each of the listed Rules that are required for the device policy, or select Add Device Policy Rule to use the in-line rule creation form. To learn more about this process, see Creating Device Policy Rules.
(Optional) In the Rule Requirement section: Specify for each end-user device Platform how you want to enforce your policy rules by choosing one of the following Rule Requirement options:
All of the above rules: The end-user device must comply with all rules defined in the policy.
Any of the above rules: The end-user device must comply with at least one of the defined rules in the policy.
Custom: The end-user device must comply with the conditions specified in a custom expression. Use the Custom Expression field to define an expression for the rules defined in this policy and how they should be evaluated. You can use the Boolean operators AND, OR and NOT, and also use parentheses to group or nest conditions.
The following is a list of sample custom expressions:
customExpr
(customExpr)
NOT customExpr
customExpr OR customExpr
customExpr AND customExpr
As an example, where a policy has associated with it the rules “Rule1”, “Rule2”, and “Rule3”, the following expression is valid: Rule1 AND (NOT Rule2 OR (NOT Rule3))
When using custom expressions, consider the following points:
Using NOT: When using “NOT expr”, the negated expression evaluates to true if the outcome of expr is false and evaluates to false if the outcome of expr is true.
AND, OR, NOT precedence: These operators are evaluated from highest to lowest precedence in this order: NOT (from right), AND (from left), OR (from left).
A combination of any device rule is allowed in an expression, except location, time of day, and network rules. For example, the following expressions are not allowed:
Windows_Process AND Locationrule
Windows_Process AND Networkrule
Windows_Process AND Time-of-Day_Rule
After you have set a platform and rule requirement, select Apply to add the entry. Then, repeat this procedure if you want to add any rule requirements for other device platforms.
Note
If you intend to add multiple rules of varying types to a device policy, be aware that individual rules might not by themselves guarantee allowed or denied access to an application depending on the outcome of other evaluated rules in a device policy, and the rule requirements settings configured here.
(Optional) In the Remediation section: To provide custom remediation instructions for the policy, tick Enable Custom Instruction and enter your remediation text into Custom Instruction. This option also requires selection of a target Platform.
These instructions are presented through Ivanti Secure Access Client when a device compliance check fails based on this policy.
Note
This feature is applicable to Windows, Mac, and Linux device policies only. Note also that custom instructions are restricted to a 500 byte limit and can contain only plain text or an HTML document with HREF links.
Select Add.
The new device policy appears in the list of Device Policies.
Repeat steps 3-7 to create all required device policies.
After you have created all required device policies, you can move to the next stage of nZTA configuration, which is Creating/Editing Secure Access Policies.
Configuring Default Device Policy for Users
As part of configuring an application, we can associate a device policy, which may have one or more same or different type of device rules configured. When a user tries to login, AAA evaluate these policies, log failures and allows sign in. When a user tries to access applications, device policies are evaluated and enforced. If a device policy evaluation fails, application access is denied.
With Default device policy for users, Admins can configure policies that get enforced even before device authentication, that is during the user enrollment or user authentication.
Note
For default enrollment policy, User Group will always be added.
For a new multi-sign-in policy of type enroll, always add User Group first with the new enroll policy.
You can use the existing default polices or can create new policy and use the default device policy.
To configure default Device Policy for users:
Log into the Controller as a Tenant Admin.
From the nZTA menu, select the Secure Access > Manage Users.
Click User Policies.
Click Create User Policy.

FIGURE 184 Manage User Policy
Enter the Policy Name, Login URL using the format */login/<path>.
Select the User Type: Enrollment Users/ Users/Administrators.
Select the Device Policy from the drop-down menu.
Select the Auth Server.
Click Create User Policy.
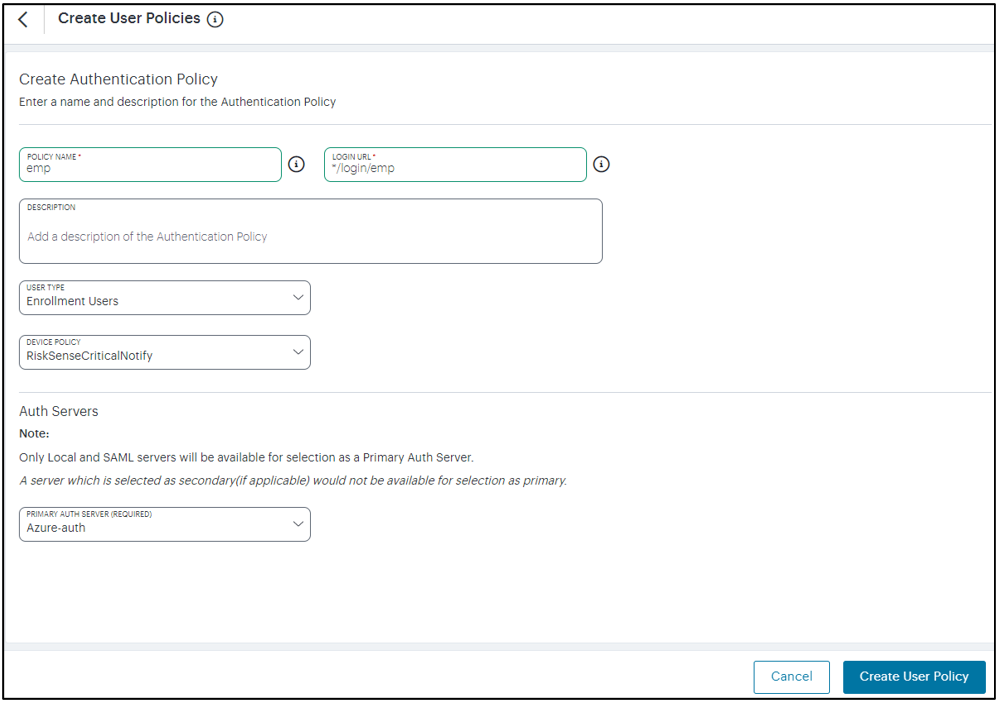
FIGURE 185 Create User Policy
Click Create User Policy.
Users can also edit the existing Default policy to include the Device policy during the enrollment sign-in/user authentication.
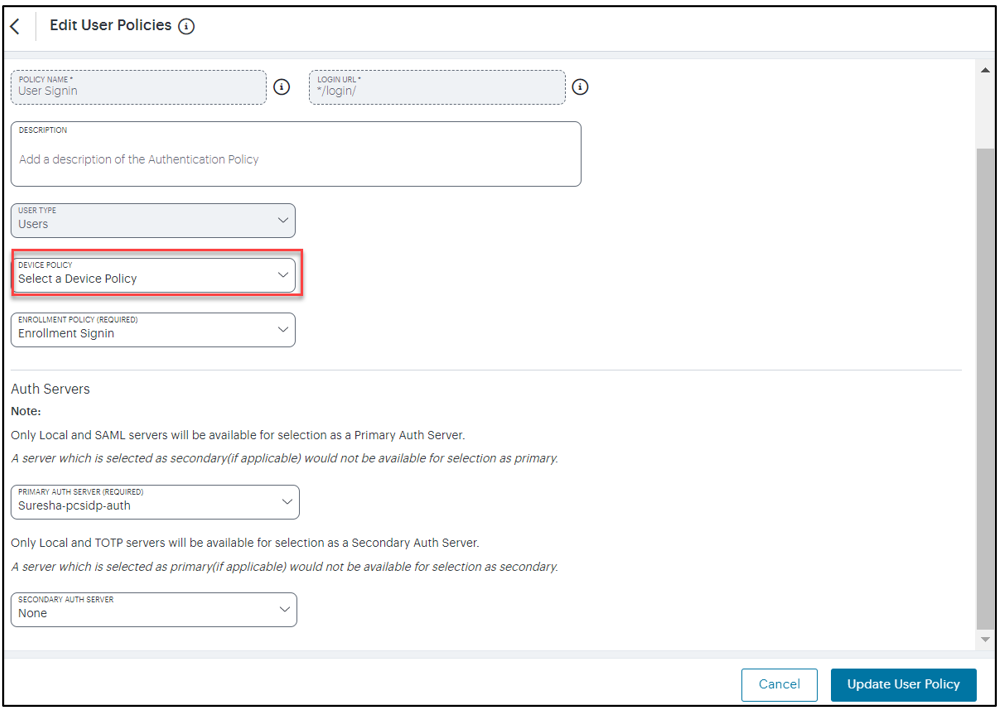
FIGURE 186 Edit User Policy
Creating Device Policy Rules
Before you begin, decide what kind of rule you want to create. For each rule type, make sure you have the supporting parameters. For example, if you are creating a Network rule, make sure you know the IP address and netmask range you want to apply.
To create a device rule:
Log into the Controller as a Tenant Admin.
From the nZTA menu, select the Secure Access icon, then select Manage Devices > Device Rules.
The Device Rules page appears. This page lists all device rules.
FIGURE 187 Device Rules Page
Click Create and then select Create Device Rules.
The Add Device Policy Rules form appears.
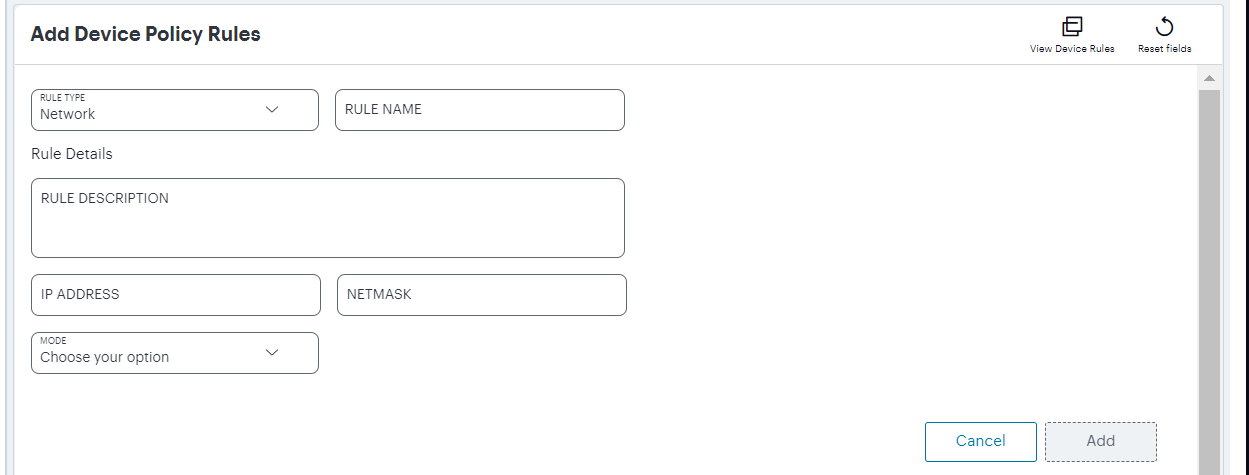
FIGURE 188 Add a Device Rule
Note
At any point during this process, you can reset the form data by selecting Reset Fields. You can also view existing device rules in a pop-up dialog by selecting View Device Rules.
Select Rule Type and select one of the following options:
Antispyware: Checks compliance to designated anti-spyware requirements.
Antivirus: Checks compliance to designated anti-virus requirements.
CVE check: Checks for protection against a list of publicly disclosed Common Vulnerability and Exposure (CVE) notices (Windows client devices only).
Command: Runs a command on the client device to check against an expected value (macOS client devices only).
File: Checks for the existence of a known file on the client.
Firewall: Checks compliance to designated firewall requirements.
Hard Disk Encryption: If encryption software is installed on the client device, this rule type checks the device’s hard disks for applied encryption.
Location: Checks the client device’s geographic location matches, or avoids, a list of defined locations.
Mac Address: Checks the client device’s MAC address.
Netbios: Checks the client device’s Netbios domain name.
Network: Checks the client device complies with a defined IP address and netmask range.
OS: Checks the client device’s Operating System meets a defined minimum standard.
Process: Checks for the existence of a known process on the client.
Port: Checks the client device’s network interface ports.
Patch Management: If patch management software is installed on a client device, this rule type checks for the existence of missing software patches.
Registry: Checks for a value in a registry key (Windows client devices only).
Risk Sense: Supports Allow access, Block access and Notify based on the risk level.
System Integrity: Checks the system integrity of the client device (macOS client devices only).
Time of day: Checks resource access requests against compliance with a time-based access schedule.
Note
Restrictions exist for rule type availability on the following Ivanti Secure Access Client platform variants:
Android clients are limited to rules based on jail_break_root and OS.
iOS clients are limited to rules based on jail_break_root, OS, and Time of day.
Linux clients are limited to rules based on File, Port, and Process.
Enter a Rule Name for your device rule.
(Optional) Enter a Rule Description for your device rule.
The remaining options are dependent on the Rule Type you selected:
For Antispyware and Firewall rules, see Options for Antispyware and Firewall Rules.
For Antivirus rules, see Options for Antivirus Rules.
For CVE check rules, see Options for CVE Check Rules.
For Command rules, see Options for Command Rules.
For File rules, see Options for File Rules.
For Hard Disk Encryption rules, see Options for Hard Disk Encryption Rules.
For Location rules, see Options for Location Rules.
For Mac Address rules, see Options for MAC Address Rules.
For Netbios rules, see Options for Netbios Rules.
For Network rules, see Options for Network Rules.
For OS rules, see Options for OS Rules.
For Process rules, see Options for Process Rules.
For Port rules, see Options for Port Rules.
For Patch Management rules, see Options for Patch Management Rules.
For Registry rules, see Options for Registry Rules.
For Risk Sense rules, see Options for Risk Sense Rules.
For System Integrity rules, see Options for System Integrity Rules.
For Time of day rules, see Options for Time of Day Rules.
Select Add to create the device rule.
The new rule is added to the list of device rules.
Individual device policies cannot be referenced by a secure access policy. After you have created all required device policies, you must organize them into device policy groups, see Creating Device Policies.
Options for Antispyware and Firewall Rules
Select Platform and select one of the following options:
windows
mac
Using the selected platform, nZTA populates the lists of Vendors and Products that can be selected for this rule.
(Optional) Select Select Vendors and use the drop-down list to select or deselect one or more product vendors. When done, select anywhere outside of the list.
Each selected vendor is added to the panel below the drop-down list. To remove a selection, select the corresponding X indicator.
(Optional) Select Select Products and use the drop-down list to select or deselect one or more products. When done, select anywhere outside of the list.
Each selected product is added to the panel below the drop-down list. To remove a selection, select the corresponding X indicator.
Note
While both Vendor and Product fields are optional, you must select at least one vendor or product for your rule.
(Optional) To set advanced options for this rule, select Advanced Configuration.
The following options are provided:
Enable monitoring of this rule in Ivanti Secure Access Client.
Options for Antivirus Rules
Select Platform and select one of the following options:
windows
mac
Using the selected platform, nZTA populates the lists of Vendors and Products that can be selected for this rule.
(Optional) Select Select Vendors and use the drop-down list to select or deselect one or more product vendors. When done, select anywhere outside of the list.
Each selected vendor is added to the panel below the drop-down list. To remove a selection, select the corresponding X indicator.
(Optional) Select Select Products and use the drop-down list to select or deselect one or more products. When done, select anywhere outside of the list.
Each selected product is added to the panel below the drop-down list. To remove a selection, select the corresponding X indicator.
Note
While both Vendor and Product fields are optional, you must select at least one vendor or product for your rule.
Select Enforcement Level and select one of the following options:
high
moderate
low
(Optional) To set advanced options for this rule, select Advanced Configuration.
The following options are provided:
Add a maximum allowed time limit since the last successful system scan, in days.
Add a maximum allowed age limit for the most recent virus definition file update, either by number of available updates or by number of days.
Enable monitoring of this rule in Ivanti Secure Access Client.
Options for CVE Check Rules
Note
This rule type is applicable to Windows devices only.
Select one of the following options:
To check all supported CVEs, select Require all supported CVE checks.
To check a list of specific CVEs, select Check for specific CVE, then use the Select CVE Checks drop-down control to select or deselect CVEs to be included.
Note
To remove a selected CVE from the list, select the “X” button adjacent to the CVE tag.
Options for Command Rules
Note
This rule type is applicable to macOS devices only.
In this release, Command Type is limited to “Defaults Read Command” only. This runs the /usr/bin/defaults read command on the client device.
Enter a value in Argument1 to represent the path of the Property List file to read. For example,
/Applications/Utilities/Terminal.app/Contents/Info.plist.Enter a value in Argument2 to represent the property key name. For example,
CFBundleShortVersionString.Enter one or more Expected Values to be returned by the command, as a comma-separated list. “*” (wildcard) values are also accepted.
Options for File Rules
Note
This rule type is applicable to Windows and macOS devices only.
Select Platform and select one of the following options:
windows
mac
linux
Enter a full file name and path in File Name. For example, “c:test.txt” or “/Users/exampleuser/Downloads/test.txt”.
Select Checksum Type and select one of the following options:
md5
sha256
Enter the Checksum value for the file.
Select Mode and select one of the following options:
allow. Select this to allow access where the file exists and is valid.
deny. Select this to deny access if the file does not exist or is invalid.
Options for Hard Disk Encryption Rules
Note
This rule type is applicable to Windows and macOS devices only.
Select the device Platform to which this rule applies.
Select the Vendors and associated encryption Products you want this rule to check.
Choose which hard drives you want the rule to check:
To check all drives detected on the client device, select All Drives.
To check specific drives on the client device, select Specific Drives, then enter the drive identifiers required.
Select Advanced Configuration to provide additional rule configuration:
(Specific drives only) To ensure the rule does not trigger a failure where one or more of the specified drives are not detected, select Consider policy as passed if the drives are not detected.
To ensure the rule does not trigger a failure where detected drives are currently undergoing encryption, but are not yet fully encrypted, select Consider policy as passed if the drive encryption is in progress.
Options for Location Rules
Select Mode and select one of the following options:
allow. Select this to enable access for devices identified as being present at one of the set locations in the rule.
deny. Select this to disallow access for devices identified as being present at one of the set locations in the rule.
Use the “Add a location” section to define one or more geographic locations to which the current Mode applies:
Select a Country, State (optional), and City (optional).
To add the location, select Add.
Repeat the above steps for each location you want to add to the rule. Multiple “allow” and “deny” locations are possible in a single rule, with each added location identified by a green (allow) or red (deny) tag in the list.
Note
To remove a location, select the “X” button adjacent to the location tag.
Options for MAC Address Rules
Select Platform and select one of the following platform options:
windows
mac
Enter the MAC address as a comma-separated list (without spaces) of MAC addresses in the form HH:HH:HH:HH:HH:HH where the HH is a two-digit hexadecimal number. Duplicate MAC addresses are not supported.
Select Mode and select one of the following options:
allow. Select this to enable access from a listed MAC address.
deny. Select this to disallow access from a listed MAC address.
Options for Netbios Rules
Select Platform and select one of the following platform options:
windows
mac
Enter the Netbios domain Names as a comma-separated list (without spaces) of domain names. Each name can be 15 characters. Duplicate names are not supported.
Select Mode and select one of the following options:
allow. Select this to enable access from a listed Netbios domain name.
deny. Select this to disallow access from a listed Netbios domain name.
Options for Network Rules
Enter the IP Address and Netmask from which you want to either allow or deny access.
Select Mode and select one of the following options:
allow. Select this to enable access for the given IP address and netmask.
deny. Select this to disallow access for the given IP address and netmask.
Options for OS Rules
Select Platform and select one of the following options:
windows
mac
ios
android
The remaining fields are dependent on your choice of Platform:
Where you selected a platform of windows or mac, select OS Name and select an Operating System edition. For example, “Windows 2008” or “macOS Mojave”.
Then, select OS Version and select the version number or service pack associated with that edition of the Operating System. For example, “SP2” or “10.14.3”. To not enforce the version number, select “Ignore”.
Where you selected a platform of ios or android, select Equality and select one of the following options pertaining to how you want to enforce Operating System versions numbers:
above
below
equal
Then, select OS Version and select the version number you want to check against.
Options for Process Rules
Note
This rule type is applicable to desktop devices only.
Select Platform and select one of the following options:
windows
mac
linux
Enter a Process Name. For example, “explorer.exe”.
Select Checksum Type and select one of the following options:
md5
sha256
Enter the Checksum value for the process executable.
Select Mode and select one of the following options:
allow. Select this to allow access where the process exists and is valid.
deny. Select this to deny access if the process does not exist or is invalid.
Options for Port Rules
Select Platform and select one of the following platform options:
windows
mac
linux
Enter the Ports as a comma-separated list (without spaces) of ports. Port ranges are supported. Duplicate ports are not supported.
Select Mode and select one of the following options:
allow. Select this to enable access from a listed port.
deny. Select this to disallow access from a listed port.
Options for Patch Management Rules
Note
This rule type is applicable to Windows and macOS devices only.
Select the device Platform to which this rule applies.
Select the Vendors and associated patch management Products you want this rule to check the presence of.
(Optional) Select Advanced Configuration to view more options:
Choose the Severity levels of missing patches you want to check in this rule:
Critical
Important
Moderate
Low
Unspecified/Unknown
Note
For some products, the patch severity level might not be detectable. In this case, select Unspecified/Unknown to detect missing patches.
Choose the Category types of missing patches you want to check in this rule:
Security Update
Rollup Update
Critical Update
Regular Update
Driver Update
Service Pack Update
Unknown
Note
For some products, the patch category might not be detectable. In this case, select Unknown to detect missing patches.
Options for Registry Rules
Note
This rule type is applicable to Windows devices only.
Select Rootkey and select one of the following options:
HKEY_LOCAL_MACHINE
HKEY_USERS
HKEY_CURRENT_USER
HKEY_CURRENT_CONFIG
HKEY_CLASSES_ROOT
Enter a Subkey for the registry path.
Select Key Type and select one of the following key types:
string
dword
binary
Enter a Key name.
Enter a Value for the registry key.
Tick the 64-bit checkbox to use the 64-bit registry store. Leave this checkbox unticked to use the 32-bit registry store.
The following example values would create a rule to ensure the client device contained a registry key HKEY_LOCAL_MACHINE\SOFTWARE\pzta with a value 123:
Field |
Value |
|---|---|
Rootkey |
HKEY_LOCAL_MACHINE |
Subkey |
SOFTWARE |
Key Type |
string |
Key |
zta |
Value |
123 |
64-bit |
ticked |
Options for Risk Sense Rules
RiskSense provides vulnerability management and prioritization to measure and control cybersecurity risk. The cloud-based RiskSense platform uses a foundation of risk-based scoring, analytics to identify critical security weaknesses with corresponding remediation action plans, dramatically improving security and IT team efficiency and effectiveness.
Integrating RiskSense’s Vulnerability Risk Rating (VRR) scores with nZTA provides an additional layer of security by isolating and preventing vulnerable devices from connecting to the ZTA network thereby protecting enterprise resources.
Note
This rule type is applicable to Windows only.
Enter the Rule Name.
Enter the Rule Details.
Select Risk Level and select one of the following options:
Low
Medium
High
Critical
Select Action and select one of the following options:
Allow: Select this to allow access when the risk level is low or medium.
Block: Select this to block the access based on the risk level.
Notify: Select this to notify the user about the risk identified.
Note
RiskSense Alert will not be generated if the RiskSense device policy is enforced on the enrollment sign-in URL.
RiskSense device policy should always be enforced on the authentication login URL.
To view Top Risky Applications, see the Reviewing User Activity section in Using the Insights Menu to Monitor User Activity and Service Usage.
Options for System Integrity Rules
Note
This rule type is applicable to macOS devices only.
To enable this rule type, select Enable.
Options for Time of Day Rules
This rule type applies a resource restriction (allow or deny access) based upon a specified period frequency within a defined date and time range. Enter the following parameters:
Select the frequency with which you want the rule to apply inside the date range you specify:
Custom: Apply the rule for the whole period continuously between the start date/time and end date/time.
Daily: Apply the rule for the specified days in each month. Enter a comma-separated list of numerical days (1-31), for example: “1,5,19,28”.
Weekly: Apply the rule for the specified days of each week. For Select Days, select the checkbox for each day on which you want the rule to apply.
Monthly: Apply the rule for all days in the specified months. For Month, select one or more months from the drop-down list.
Enter the Start Date and End Date to apply to the selected period frequency. For custom rules, the date range entered here is continuous. For daily, weekly, and monthly rules, each day in the range is executed individually according to the selected times and frequency.
Note
Start and end date values are optional for Daily, Weekly, and Monthly frequencies. If not specified, the rule applies indefinitely.
Enter the Start Time and End Time to apply to the selected period frequency. For custom rules, the times are applied with the corresponding start and end date to provide a continuous period within which the rule applies. For daily, weekly, and monthly rules, the times are applied for each day in the schedule.
Note
All times are applied as UTC timezone values. Your ZTA Gateways must also use UTC time for the rule schedule to apply.
Note
Time periods for daily, weekly, and monthly rule frequencies are restricted to the 24 hours in a single day, such that you cannot enter an end time that is earlier than the start time. Therefore, in cases where you want to apply a rule allowing access for a time period that spans across midnight into the next day, add separate rules for each day in the range covering the time period for that day only. For example, to allow access during the period 21:00 Monday until 12:00 Tuesday, configure the following rules:
Rule 1: Period: weekly, Days: Monday, Start Time: 21:00, End Time: 23:59, Mode: allow Rule 2: Period: weekly, Days: Tuesday, Start Time: 00:00, End Time: 11:59, Mode: allow
Choose the Mode that should apply during the specified times:
allow: Devices accessing resources to which this policy is applied are authorized only during the selected days and times.
deny: Devices accessing resources to which this policy is applied are not authorized during the selected days and times.