Hardware assets
The Hardware Assets workspace gives you access to all of the asset records imported into your database. From here, you can view all details about an asset record, as well as manage those records. To view dashboards of this same data, access the Home workspace—for details, see Dashboards.
Use the Hardware Assets workspace to:
•Categorize assets by type (click the New drop-down to see all available types). For each type (other than Consumable), you can also specify a subtype to further identify the asset. Note that available types will depend on the specific version of ITAM you have installed and cannot be modified. In contrast, Asset Administrators can add, edit, and delete asset subtypes. For details, see Asset validation lists.
Software assets don't display as an asset type in the Hardware Assets workspace. Create and manage them instead in the Software Assets workspace. For details, see Software assets.
•View categories of assets in multiple ways by selecting from the Favorite Searches drop-down above the asset list.
•Find specific assets by clicking Show Filters (to the right of the Favorite Searches drop-down) or by using the Saved Searches feature above the asset list, then clicking the  icon.
icon.
•Convert an unmanaged device to a managed one. For details, see Managed and unmanaged devices.
•Take action by selecting an asset in the list view, then clicking one of the links at the top of the list to:
•Check In – Check the asset into a storage space and add this record to both the Locations and Stock Management workspaces for tracking. Once an asset is checked in, you can transfer it at a later date to a new storage space by clicking Transfer Stock. For details about storage spaces, see Locations and storage spaces and Stock management.
•Assign User or Assign Location – Assign the asset to a specific user or location. When assigning a user, the drop-down shows both the unique login ID and display name of each user in the database. When assigning consumables to users, see the procedure below for extra details.
•Assign Financial Owner – Specify the organizational unit that requested the purchase of this asset. For consumables, see the procedure below for extra details.
To manage any Ivanti Neurons for ITSM CI items after importing them into the database, the Asset Administrator must first generate a unique identifier, or asset ID, for each one in the Hardware Assets workspace. For details, see Asset quick actions.
After initially importing the bulk of your asset data, you may need to manually add new asset records on occasion. To create a new consumable record, see the procedure below.
1.Open the Hardware Assets workspace.
2.Click the New drop-down and select the type of asset you want to create. The asset record page displays.
•If you're curious about what subtypes are available for any of the asset types, select the type, then under the Details tab on the Asset form, click the Asset Subtype drop-down to get an idea of the available options.
•If you're an Asset Administrator, you can create your own asset subtype if needed (for asset types other than Consumable).
•You must create software assets in the Software Assets workspace. Once created, the Software Asset asset type will display in the Hardware Assets workspace with the other asset types. For details, see Software assets.
3.Three fields are required before saving—the asset Name and Serial Number, as well as the Status (see the Details tab > middle column). The serial number is especially important as the unique identifier that is used to track an asset. For details about other information you can add and access for an asset record, expand the Asset tabs defined link below.
4.Click Save. The asset record is created. You can now enter more information under the tabs, as explained below.
Double-clicking an asset in the list view opens the full record, enabling you to edit it. Use the following tabs to update and access additional information. Not all tabs are available for all asset types.
•Details – Records basic details about the asset.
•The left column provides physical details about the asset. The Asset Subtype field is a validation list that enables you to categorize similar assets into different subtypes. For example, the type Computer has the subtypes Laptop, Desktop, and so on. Asset Administrators can Add, Edit, or Delete asset subtypes by clicking the  icon. For details, see Asset validation lists. For details about adding and editing manufacturers, see Manufacturers.
•The middle column provides location and usage details. The Status field shows where the asset is in the asset lifecycle, and Environment indicates where the asset is being used—in production, test, QA, and so on. The remaining fields enable you to specify the Use Policy (such as any encryption requirements), the Service Level, and the asset's security and regulatory requirements.
Note that when the Status field for an asset is changed to Assigned, Disposed, Lost, or Destroyed, the asset record is removed from its listed storage space here and in the Stock Management workspace.
•The right column provides lifecycle, warranty, and identification details. The read-only Asset Age (mo) field calculates the number of months since the purchase date to either the current date or the date when the asset's Status was changed to Disposed, Lost, Stolen, Retired, or Destroyed. This field, along with the Useful Life (mo) field, are used for the calculation of the asset's Depreciated Value on the Finance tab. If an asset has associated child warranties, you can view those from the Warranties tab.
•Custom Attributes – By default, ITAM provides most of the fields about an asset that an organization needs, but this is an additional, configurable tab for any asset information that doesn't display by default. For details, see Asset custom attributes.
•Discovery – A read-only tab that enables you to compare assigned values for an asset with the values that were discovered by an automated tool such as Ivanti Endpoint Manager, Microsoft SCCM, or even a recent barcode scan. It's critical to understand the movement of assets within your organization so that you can proactively update asset details and then refine the processes that govern asset movement.
•This tab displays discovery information, including the Original Import Source (the source where the asset record originated, such as Ivanti Neurons Platform, Endpoint Manager, SCCM, and so on) and the Last Import Source (the source of the most recent changes to the asset record). The values for both import sources must be configured in the individual connector mappings (Endpoint Manager, SCCM, and so on).
•The Last Scan Date is the date that the asset was most recently scanned during discovery.
•You can also compare Assigned Values with Discovered Values for the asset so that you can see what these properties should be (assigned) and what they actually are (discovered).
•Licensable Software – Displays a list of the licensed software installed on a hardware asset. These records are grouped by manufacturer and are imported from Neurons Platform using the data connector for your data source. For details, see Importing from the Ivanti Neurons Platform.
•Installed Software – Displays a list of the software installed on the asset as discovered via the discovery services. Records are grouped by manufacturer. This list is inclusive of the software displayed under the Licensable Software tab.
•Network – Displays a list of network adapters linked with the asset, showing information such as Manufacturer, IP Address, MAC Address, and Subnet Mask. You can link, unlink, delete, or create new network adapters.
•User Assets – Provides a list of other assets that are also owned by the Assigned User of the current asset, grouped by type—this can be useful when you're reclaiming assets. (You can assign a user to an asset from the Details tab.)
•Relationships – Provides a visual relationship mapping of how the asset is connected in your IT system.
•Contracts – Provides information about the contract line items associated with the asset. You cannot create contracts or contract line items from here—they're created in the Contracts workspace. For details, see Contract and Warranty Management.
•Vendor – Provides details about the vendor of the asset. To update details about the vendor, or see the full record for the vendor, click Go to. To associate a vendor with this asset or change the vendor association, use the Finance tab.
•Vendor Scorecards – If you've specified the Vendor on the Finance tab, you can add vendor scorecards to record the performance of the vendor for each interaction you have with them. For details, see Vendors.
•Scorecards enable you to rate vendors and the products they provide. You can add scorecards to the asset record, a purchase order, or a contract line item. The details of all scorecard entries and a performance score calculated from these scorecards display on the vendor record, so that you can see how well the vendor is meeting the needs of the organization.
•Finance – Provides financial information about the asset.
•You can record and view details about the purchase of the asset here. Specify the Vendor and Vendor SKU, and provide information about the Purchase Order, Purchase Date, Freight Cost, Purchase Price, Ownership Type, and Acquisition Method.
•Note that when you enter information into the Purchase Order and Vendor fields, ITAM will attempt to populate the fields with purchase order numbers and vendors that match ones already added to the Purchase Order and Vendor workspaces. Only Asset Administrators can add new purchase orders or vendors here if needed. For details, see Procurement and Vendors.
•The Purchase Date and Purchase Price are taken from the purchase order for the asset. You can add to and edit the values available in Acquisition Method and Ownership Type by clicking the icon. To see the complete Purchase Order record, click the ![]() icon alongside Purchase Order, then click Go to.
icon alongside Purchase Order, then click Go to.
•The second column provides details about the value of the asset to the business. You can record who the Financial Owner is (populated by information in the Financial Owners workspace), the Fixed Asset GL, the Salvage Value, and the current Market Price for the asset. Financial ownership is tracked at the cost center or organizational unit level. The Fixed Asset GL enables you to assign a General Ledger Code to the asset record, which is useful when you need to conduct a capital audit and need to know which assets are impacted. The salvage value for an asset is its value at the end of its useful life, as recorded on the Details tab.
•This section also reports the current Depreciated Value for the asset. This value is calculated by determining the monthly straight-line depreciation from the Purchase Price to the Salvage Value using the Asset Age (mo) calculated on the Details tab. The monthly depreciation is calculated by subtracting the Salvage Value from the Purchase Price and multiplying this value by the Asset Age (mo) divided by the Useful Life. Each month, this depreciation value is subtracted from the purchase price to give the Depreciated Value until it matches the salvage value at the end of its useful life.
•Financial Transactions – Displays a list of additional costs incurred by the asset. You can add new items to this list using either the New ITFM Cost item or New from price list item buttons. Contract renewals also display here. For details, see Contract and Warranty Management.
•Journal – Enables you to add notes to the asset record using the New button. Asset Administrators can customize the available journal categories and sources. For details, see Journals.
•Attachments – Attach a document to this record, or add a URL link to a relevant website. URLs must include the https:// prefix.
•Inventory Transactions – Enables you to track the movement of the asset over its lifespan as it moves between locations, storage spaces, and users.
•Audit History – Automatically tracks any changes made to key attributes of this record.
•Warranties: Displays all child warranties associated with the asset. For example, computers often include separate warranties for their associated components. The asset's child warranty information is obtained during a sync from Neurons Platform (where it's located on the Device page for the asset under Details > Warranties). This tab is available for use with ITAM Cloud only and must be enabled by the ITSM Administrator before it displays here.
1.Open the Hardware Assets workspace.
2.Click the New drop-down and select New Consumable. The asset record page displays.
3.The Name and Type are required before saving. You'll generally purchase consumables in multiples, so Quantity is important here. Overall Quantity is also useful when linking more than one storage space to the record. With each linked space, you'll be prompted to enter the portion of the overall quantity to be stored there.
4.Under the Storage Space tab, click Link and select where this consumable will be stored.
5.Click Save. You'll be prompted to enter the portion of the overall quantity to be stored at this space. Repeat for each linked space. The Storage Space Transactions tab will update (here and in the Stock Management workspace) to display the quantity stored at each linked space.
6.Click Save to save the record.
1.Open the Hardware Assets workspace.
2.From the list view, expand Asset Type: Consumable and open a record.
3.Click either Assign User or Assign Financial Owner at the top of the page.
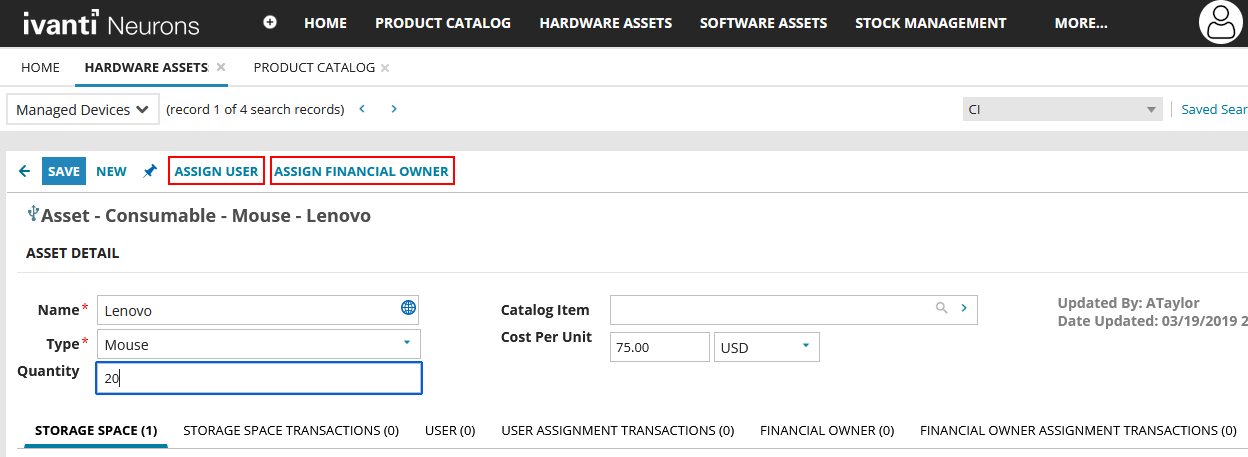
4.Follow the prompt to select a user or financial owner, then enter the quantity you're assigning to them.
5.Click Save. The updates will display under the consumable record's tabs for User and User Assignment Transactions or Financial Owner and Financial Owner Assignment Transactions.
The consumable quantity will automatically decrement by that same number in the linked storage space, as shown under the Storage Space Transactions tab (here and in the Stock Management workspace). You can repeat this action for as many users or financial owners as needed.
If more than one storage space record is linked, the assigned quantity will decrement from the Storage Space Transactions tab by looping through each record. The decrement won't be specific to any one storage space, even if highlighted.
For assigned users, consumables will display under their employee record in the Employee workspace. If the consumable is part of the Product Catalog, you'll see its catalog description under the Consumables tab; the assigned quantity will display under the Consumable Transactions tab.
For assigned financial owners, consumables will display under the org unit's record in the Financial Owners workspace. If the consumable is part of the Product Catalog, you'll see its catalog description under the Consumables tab; the assigned quantity will display under the Consumable Transactions tab.

Updating asset records
Double-clicking an asset in the list view opens the full record for the asset, enabling you to edit it.
The More drop-down at the top right of the page enables you to perform certain actions on an asset record, such as changing the asset type. For details, see Asset quick actions.
Create Disposal enables you to dispose of an end-of-life asset. For details, see Asset disposals.
Bulk Update enables you to change the value of an attribute on several asset records at the same time. Note that not all attributes are available for bulk update; for example, you can't change the asset type this way.
1.Open the Hardware Assets workspace to view a list of assets in your database.
2.Hold SHIFT and click to select a range of assets in the list, or hold CTRL and click to select several individual assets in the list.
3.Click Bulk Update (next to the More menu).
4.Select the Field that you want to update.
5.Either select the Replace All Values check box or set the current Value that you want to replace in the field.
6.Set the value you want to update the field to in Replace with value.
7.Select Find all results in current Saved Search (which will override any range of assets selected above in step 2) or Find results in selected rows, then click Replace. A dialog displays the number of updated records.
Filtering, sorting, and grouping asset records
In most workspaces, you can filter, sort, and group the list of displayed records. To access these options, hover over a column header and click the  icon. A menu opens enabling you to:
•Sort the column by ascending or descending order.
•Filter the viewable columns.
•Group records by field (i.e., by this column). To clear a grouping, click Show in Groups.
•Filter column results by typing text in the Filter text box. To clear the filter text, highlight and delete it.
In most workspaces, you can sort by more than one column at a time using the Multisort feature.
1.Click Multisort in the Hardware Assets workspace toolbar. In the resulting dialog, select the first column to sort by, then click the  icon and select another column. Repeat as needed. Click the
  icon to delete a selected column.
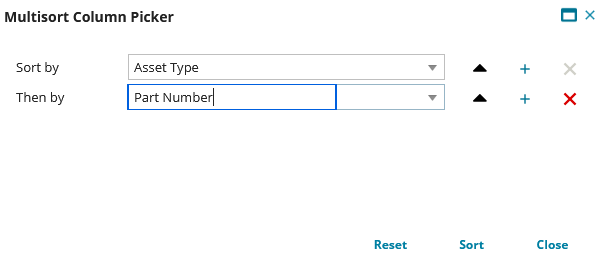
2.When you're finished, click Sort then Close.
To remove the multisort and reset the list view, click Multisort again, then click Reset and Close.
Deleting asset records (and tracking them)
Asset Administrators can delete an asset record from the ITAM database via the Hardware Assets workspace. Do so by selecting the asset in the list view and clicking Delete in the toolbar. You'll be prompted to confirm the delete before it happens. To delete more than one record at a time, use your keyboard's Ctrl key to select specific assets or the Shift key to select groups of assets.
To help maintain data integrity, the Deleted Assets Audit workspace enables you to track asset records removed from the database. This workspace displays the users who created and deleted the record, as well as the dates those actions occurred. Other details include the asset name, type, subtype, serial number, tag, and discovery ID.
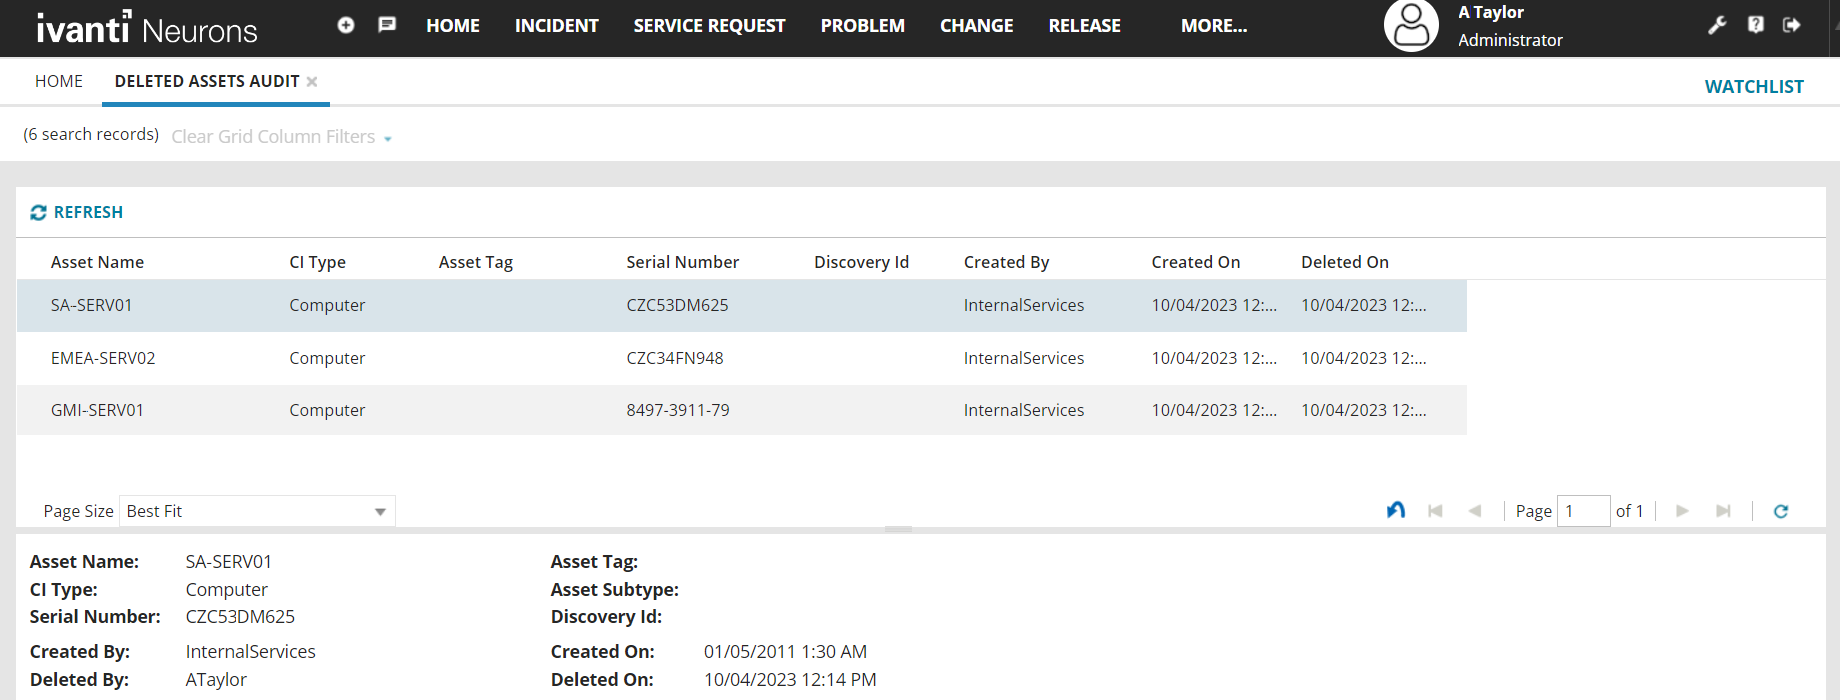
If you're also using Ivanti Neurons for ITSM, you'll see an extra Linked Incidents column for incidents that were linked to the assets before deletion.
For auditing purposes, you can also export the data from this workspace into an Excel (.XLSX) file. To do so, click the  icon in the top right corner of the list view and confirm.