Avalanche powered by Wavelink
This page refers to an older version of the product.View the current version of the User Guide.
Managing Mobile Devices with LANDESK Management Suite
LANDESK Management Suite integrates with a Wavelink Avalanche service to allow you to manage mobile devices running iOS, Android, or Windows Phone.
[[architecture diagram]]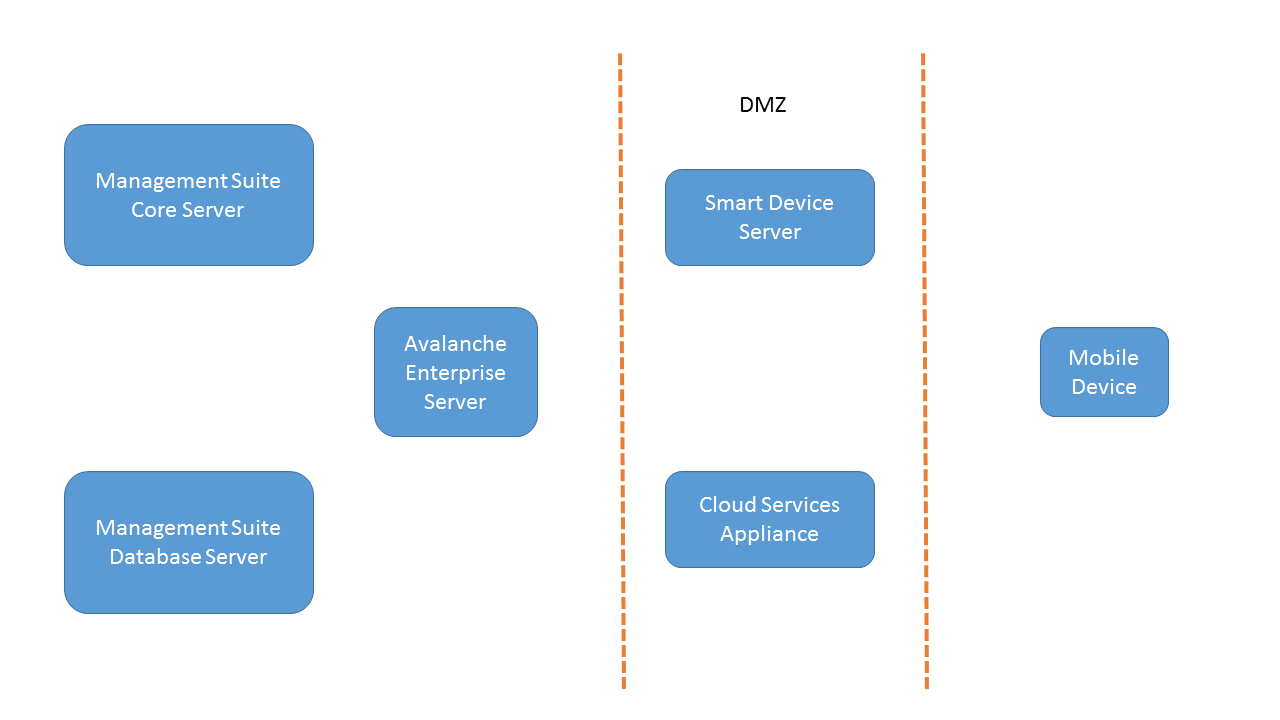
[[overview of the steps]]
Before You Start
In addition to having LANDESK Management Suite 9.6 installed, make sure you have the following tasks completed:
•Obtain the Avalanche 6.1 installer and an Enterprise license for Avalanche. Get these from your contact in LANDESK Sales.
•Obtain credentials for an LDMS Administrator service account, the core database, and an Active Directory service account.
•Update and patch your CSA. Although you can set up the environment without a CSA, a CSA is required for features such as app wrapping.
Using the AES cipher on the CSA is okay, but make sure your CSA configuration is NOT using the AES256 encryption cipher. You should only need to change this if you have modified the encryption cipher on the CSA.
•Make sure you have Anonymous Authentication disabled in IIS on the core for the Premise Services site. This is disabled by default, so you should only need to change this if you have changed authentication after installing LANDESK Management Suite.
Getting an SSL Certificate
Obtain an SSL certificate for the Avalanche Smart Device Server. The certificate must be in PKCS#12 format (file extension pfx or p12). You can either use an existing certificate, follow the instructions provided by your Certificate Authority, or use the instructions below to get one. The name on the certificate must match the server name where you will install the Avalanche Smart Device Server.
These instructions explain how to generate a certificate signing request using OpenSSL. You can find a version of OpenSSL that runs on Windows through the OpenSSL Web site.
If you plan to enroll Windows Phone 8 devices, do not use wildcard certificates.
To generate a private key for the certificate:
1.From a command line, navigate to:
[OpenSSL installation directory]\bin
2.Use the command:
openssl genrsa -des3 -out privateKey.key 2048
3.At the prompt Enter pass phrase for privateKey.key, type a pass phrase. When prompted, re-enter the pass phrase. The pass phrase is arbitrary, but should be noted for future reference.
If you get a message that says "WARNING: can't open config file: /usr/local/ssl/openssl.cfg", you need to set the configuration file location. From the command prompt, use the following command:set OPENSSL_CONF=[OpenSSL installation directory]\bin\openssl.cfg
If OpenSSL created the privateKey.key file anyway, delete it. Then repeat steps 2 and 3.
4.Use the command:
openssl req -new -key privateKey.key -out CACert.csr
5.At the prompts, enter all requested information. For the Common Name, provide the fully qualified domain name of the computer where you plan to install the certificate. The domain name used should be one that your company owns. Add a DNS entry if needed to resolve this computer.
An example of generating a CSR:
Country Name (2 letter code) [GB]:US
State or Province Name (full name) [Some-State]:Utah
Locality Name (eg, city) [Newbury]:Midvale
Organization Name (eg, company) [My Company Ltd]:Wavelink Corporation
Organizational Unit Name (eg, section) []:Engineering
Common Name (eg, your name or your server's hostname) []:avaself.wavelink.com
Email Address []:[email protected]
Please enter the following 'extra' attributes
to be sent with your certificate request
A challenge password []: avalanche
An optional company name []: Wavelink Corporation
When you apply to a certificate authority for an SSL web server certificate, you will need to submit the CACert.csr file that is generated by this process.
After a certificate authority has provided you with a certificate file, you need to import the private key into the certificate file.
In order to use an SSL certificate for the Avalanche Console, Remote Control, or the Smart Device Server, the certificate must be in PKCS #12 format and include the private key. Even if the certificate authority gave you a .p12 file, you must import the private key into the .p12 file before you can use it.
To import the private key and convert a certificate to PKCS #12:
1.From a command line, navigate to:
[OpenSSL installation directory]\bin
2.Use the command:
openssl pkcs12 -export -out certificate.p12 -inkey privateKey.key -in ca.pem
Where privateKey.key is the name of the key you created (either before creating the CSR, or when you generated a self-signed certificate), and ca.pem is the name of the certificate you are converting.
If you submitted a certificate signing request to a certificate authority and they sent back the certificate chain separate from the certificate, add -certfile intcert.crt to the end of the command, where intcert.crt is the name of the intermediate certificate.
3.Enter the pass phrase associated with the private key.
4.Enter an export password. Verify the export password again.
The PKCS #12 file is created in the OpenSSL installation directory.
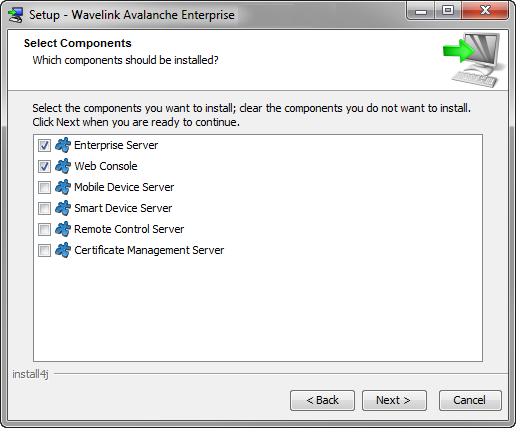
Running the Avalanche Installer
You'll run the Avalanche installer twice: once for the Enterprise Server, and once for the Smart Device Server (SDS). Install the SDS in a location where the mobile devices are able to access it. For most companies, this means the DMZ. Make sure you install the Enterprise Server first.
Do not install Avalanche on the same server as the LDMS core or a server with any previous version of Avalanche.
To install the Enterprise server:
1.Double-click the installer.
2.Select the language and click OK.
3.The Welcome screen appears. Click Next.
4.The Select Destination Directory screen appears. Choose where you want to install and click Next.
5.The Installation Type screen appears. Make sure New Installation is selected and click Next.
6.The Select Components screen appears. Select the Enterprise Server and Web Console. If you want the ability to remote control your Android devices, install the Remote Control Server.
7.The SQL Server Credentials screen appears. Provide the hostname and credentials for the core database. The installer will create two new databases
8.
Importing the SSL Certificate
The certificate must be in PKCS #12 format. If the certificate is in a different format, see Converting a Certificate.
To import the SSL Certificate:
1.From the Avalanche Console, navigate to Tools > System Settings.
2.In the HTTPS Configuration section, click Add.
3.Locate the certificate.p12 file and click Open.
4.Enter the pass phrase associated with the certificate. When the pass phrase is entered correctly, the Common Name is displayed in the SDS Public Address text box.
5.If the certificate is a wildcard certificate (uses a * in the Common Name), type the server address in the SDS Public Address text box.
6.Click Save at the top right of the page.
7.Perform a deployment from My Enterprise.
After you have set up the APNS certificate, GCM key, and the SSL certificate, communication between Smart devices and the Smart device server is enabled and you can enroll devices. You should import your licenses before attempting to connect devices.
This page refers to an older version of the product.View the current version of the User Guide.
The topic was:
Inaccurate
Incomplete
Not what I expected
Other
Copyright © 2017, Ivanti. All rights reserved.